class: center, middle, inverse, title-slide # Obraz jest wart tysiąca słów ## pasywne i interaktywne wizualizacje w R ### Julia Romanowska ### BIOS, UiB ### 25.11.2020 --- class: middle, center ## Julia Romanowska ### biostatystyka, wizualizacje, data scientist ### współzałożycielka R-Ladies Bergen **Uniwersytet w Bergen, Norwegia** https://jrom.bitbucket.io/homepage/ ??? Witam, kilka słów o mnie - jestem bioinformatykiem na Uniwersytecie w Bergen w Norwegii, ale moją pasją są wizualizacje. W dzisiejszym świecie, gdzie jest tyle danych, tyle informacji, że nikt nie jest w stanie tego przetrawić, coraz ważniejsza jest dobra wizualizacja tych danych, żeby przekonać siebie lub innych o tym jaką wiadomość przekazują te dane. --- ## INFO - [github repozytorium](https://github.com/jromanowska/Wizualizacje_R) z kodem i tą prezentacją - [slajdy online](https://jromanowska.github.io/Wizualizacje_R/) - prezentacja zrobiona w Rmarkdown, z użyciem: - `xaringan`, - `xaringanthemer` - `xaringanextra` - `flipbookr` - kod na slajdach można skopiować (*"Copy code"* w górnym prawym rogu) - jeśli chcesz zobaczyć notatki, kliknij *"p"* ??? Zanim zaczniemy, kilka informacji - repozytorium zawiera kod i prezentację. --- class: left, inverse, bottom # PLAN ## Wstęp - jak projektować grafikę? ## Krótko o ggplot2 ## Interaktywne grafy ### na szybko ### i trochę wolniej ??? Oto plan na następne 28 minut - najpierw dam kilka wskazówek co do tego jak zaplanować naszą wizualizację, potem, pokażę krótko ciekawe rzeczy w ggplot2 i na końcu pokażę jak w R można robić interaktywne wizualizacje - prosto i trochę bardziej zaawansowanie. --- *For a graph to be effective, it must be easy for its audience to decode and interpret.* [Duke, S. P. et al. Stat.Med. 34 (2015)](https://doi.org/10.1002/sim.6549) <br>  <p style="font-size: small; font-style: italic;">[src: Charles Joseph Minard, Napoleon’s March InfoGraphic]</p> ??? Ten rysunek pewnie widzieliście nie raz. Wyprawa Napoleona na Moskwę podsumowana w pięknym grafie francuskiego statystyka Minard'a. Przypatrzmy się trochę. Na tym rysunku jest tak naprawdę 5 różnych typów danych: - przede wszystkim, dane geograficzne - grubość linii pokazuje jak wielu żołnierzy miał Napoleon na kolejnych odcinkach - kolor linii mówi nam czy to był marsz na Moskwę czy odwrót - na dole mamy czas w trakcie odwrotu - oraz temperaturę, bo to nie tylko rosyjskie wojska, ale też zima wykończyła Napoleona OK, ale jak zaprojektować taką piękną wizualizację? Czy jest jakiś łatwy przepis? --- ## Wstęp - jak projektować grafikę? - eksploruj dane - wypróbuj różne typy grafów **na kartce!** - wybierz kolorystykę - jaką wiadomość przekazuje grafika? ??? _Łatwego_ przepisu nie ma, ale są wskazówki. Przede wszystkim, trzeba poznać dane - więc sprawdzić jakiego są typu, czy są braki danych, czy niektóre elementy są zależne od siebie, itp. Potem, można zacząć myśleć o tym jaki typ grafu wybrać, ale *uwaga* - najlepiej szkicować ołówkiem na kartce! Jeśli już uznamy, że znaleźliśmy ten najlepszy typ, to można wybrać kolory i sprawdzić jak będzie to wyglądało np. w ggplot - czy rzeczywiście przedstawia ten graf to co chcieliśmy? -- - dobre książki: - ["Info We Trust", RJ Andrews](https://www.amazon.com/Info-We-Trust-Inspire-World/dp/1119483891) - ["Storytelling with Data"](https://www.amazon.com/Storytelling-Data-Visualization-Business-Professionals/dp/1119002257) and ["Storytelling with Data / Let's practice!"](https://www.amazon.com/Storytelling-Data-Cole-Nussbaumer-Knaflic/dp/1119621496), Cole Nussbaumer Knaflic ??? Nie mam tu czasu, żeby pokryć całą tematykę wyboru typu grafu czy kolorystyki. Jest o tym mnóstwo książek - ja polecam te trzy, które czyta się bardzo łatwo, gdyż nie skupiają się na technicznych detaljach, a raczej na ogólnych zasadach. --- class: inverse, left, middle ## ggplot2 i rozszerzenia ??? OK - teraz czas na akcję - ggplot2. Zakładam, że umiecie trochę rysować w R, jeśli nie, to jest mnóstwo wspaniałych tutoriali online. --- <div style="float: right; position: fixed; right: 10px; top: 10px;"> <img style="float: right; position: relative; width: 120px" src="palmer_penguins_logo.png" alt="ggiraph"/><br> </div> [palmerpenguins](https://allisonhorst.github.io/palmerpenguins/) <br><br><br> ```r penguins ``` ``` ## # A tibble: 344 x 8 ## species island bill_length_mm bill_depth_mm flipper_length_… body_mass_g ## <fct> <fct> <dbl> <dbl> <int> <int> ## 1 Adelie Torge… 39.1 18.7 181 3750 ## 2 Adelie Torge… 39.5 17.4 186 3800 ## 3 Adelie Torge… 40.3 18 195 3250 ## 4 Adelie Torge… NA NA NA NA ## 5 Adelie Torge… 36.7 19.3 193 3450 ## 6 Adelie Torge… 39.3 20.6 190 3650 ## 7 Adelie Torge… 38.9 17.8 181 3625 ## 8 Adelie Torge… 39.2 19.6 195 4675 ## 9 Adelie Torge… 34.1 18.1 193 3475 ## 10 Adelie Torge… 42 20.2 190 4250 ## # … with 334 more rows, and 2 more variables: sex <fct>, year <int> ``` ??? Będę używać takiego zestawu danych, który jest dostępny w pakiecie "palmerpenguins" i który zawiera informacje o morfologii pingwinów z pewnych wysp. --- count: false .panel1-penguins_species-auto[ ```r *ggplot(data = penguins) ``` ] .panel2-penguins_species-auto[ <!-- --> ] --- count: false .panel1-penguins_species-auto[ ```r ggplot(data = penguins) + * aes(x = bill_length_mm, * y = bill_depth_mm) ``` ] .panel2-penguins_species-auto[ <!-- --> ] --- count: false .panel1-penguins_species-auto[ ```r ggplot(data = penguins) + aes(x = bill_length_mm, y = bill_depth_mm) + * geom_point( * aes(color = species, * shape = species), * size = 2) ``` ] .panel2-penguins_species-auto[ <!-- --> ] --- count: false .panel1-penguins_species-auto[ ```r ggplot(data = penguins) + aes(x = bill_length_mm, y = bill_depth_mm) + geom_point( aes(color = species, shape = species), size = 2) + * geom_smooth(method = "lm", * se = FALSE, * aes(color = species)) ``` ] .panel2-penguins_species-auto[ ``` ## `geom_smooth()` using formula 'y ~ x' ``` <!-- --> ] --- count: false .panel1-penguins_species-auto[ ```r ggplot(data = penguins) + aes(x = bill_length_mm, y = bill_depth_mm) + geom_point( aes(color = species, shape = species), size = 2) + geom_smooth(method = "lm", se = FALSE, aes(color = species)) *penguins_default <- last_plot() ``` ] .panel2-penguins_species-auto[ ``` ## `geom_smooth()` using formula 'y ~ x' ``` <!-- --> ] <style> .panel1-penguins_species-auto { color: black; width: 38.6060606060606%; hight: 32%; float: left; padding-left: 1%; font-size: 50% } .panel2-penguins_species-auto { color: black; width: 59.3939393939394%; hight: 32%; float: left; padding-left: 1%; font-size: 50% } .panel3-penguins_species-auto { color: black; width: NA%; hight: 33%; float: left; padding-left: 1%; font-size: 50% } </style> ??? Podstawowe rysowanie w ggplot2: - 'aesthetics' + data + geom --- count: false .panel1-penguins_species2-auto[ ```r *penguins_default ``` ] .panel2-penguins_species2-auto[ ``` ## `geom_smooth()` using formula 'y ~ x' ``` <!-- --> ] --- count: false .panel1-penguins_species2-auto[ ```r penguins_default + * scale_color_manual( * values = c("darkorange", * "darkorchid", * "cyan4") * ) ``` ] .panel2-penguins_species2-auto[ ``` ## `geom_smooth()` using formula 'y ~ x' ``` <!-- --> ] --- count: false .panel1-penguins_species2-auto[ ```r penguins_default + scale_color_manual( values = c("darkorange", "darkorchid", "cyan4") ) + * facet_grid(rows = vars(species)) ``` ] .panel2-penguins_species2-auto[ ``` ## `geom_smooth()` using formula 'y ~ x' ``` <!-- --> ] --- count: false .panel1-penguins_species2-auto[ ```r penguins_default + scale_color_manual( values = c("darkorange", "darkorchid", "cyan4") ) + facet_grid(rows = vars(species)) + * labs(title = * "Penguin species differentation") ``` ] .panel2-penguins_species2-auto[ ``` ## `geom_smooth()` using formula 'y ~ x' ``` <!-- --> ] --- count: false .panel1-penguins_species2-auto[ ```r penguins_default + scale_color_manual( values = c("darkorange", "darkorchid", "cyan4") ) + facet_grid(rows = vars(species)) + labs(title = "Penguin species differentation") + * labs(subtitle = * "based on bill depth and bill length") ``` ] .panel2-penguins_species2-auto[ ``` ## `geom_smooth()` using formula 'y ~ x' ``` <!-- --> ] --- count: false .panel1-penguins_species2-auto[ ```r penguins_default + scale_color_manual( values = c("darkorange", "darkorchid", "cyan4") ) + facet_grid(rows = vars(species)) + labs(title = "Penguin species differentation") + labs(subtitle = "based on bill depth and bill length") + * xlab("bill length (mm)") ``` ] .panel2-penguins_species2-auto[ ``` ## `geom_smooth()` using formula 'y ~ x' ``` <!-- --> ] --- count: false .panel1-penguins_species2-auto[ ```r penguins_default + scale_color_manual( values = c("darkorange", "darkorchid", "cyan4") ) + facet_grid(rows = vars(species)) + labs(title = "Penguin species differentation") + labs(subtitle = "based on bill depth and bill length") + xlab("bill length (mm)") + * ylab("bill depth (mm)") ``` ] .panel2-penguins_species2-auto[ ``` ## `geom_smooth()` using formula 'y ~ x' ``` 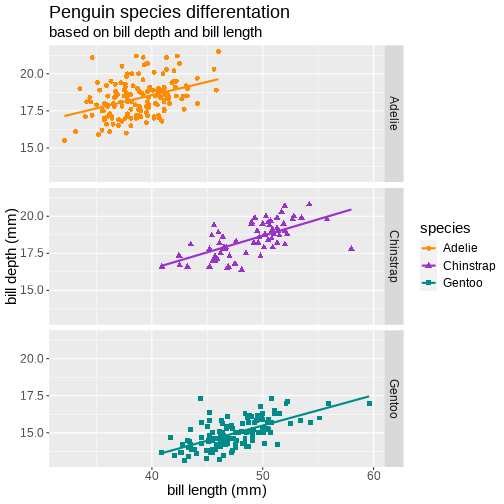<!-- --> ] --- count: false .panel1-penguins_species2-auto[ ```r penguins_default + scale_color_manual( values = c("darkorange", "darkorchid", "cyan4") ) + facet_grid(rows = vars(species)) + labs(title = "Penguin species differentation") + labs(subtitle = "based on bill depth and bill length") + xlab("bill length (mm)") + ylab("bill depth (mm)") + * theme_minimal() ``` ] .panel2-penguins_species2-auto[ ``` ## `geom_smooth()` using formula 'y ~ x' ``` <!-- --> ] --- count: false .panel1-penguins_species2-auto[ ```r penguins_default + scale_color_manual( values = c("darkorange", "darkorchid", "cyan4") ) + facet_grid(rows = vars(species)) + labs(title = "Penguin species differentation") + labs(subtitle = "based on bill depth and bill length") + xlab("bill length (mm)") + ylab("bill depth (mm)") + theme_minimal() + * theme( * plot.title = * element_text(face = "bold"), * plot.subtitle = * element_text(face = "italic")) ``` ] .panel2-penguins_species2-auto[ ``` ## `geom_smooth()` using formula 'y ~ x' ``` 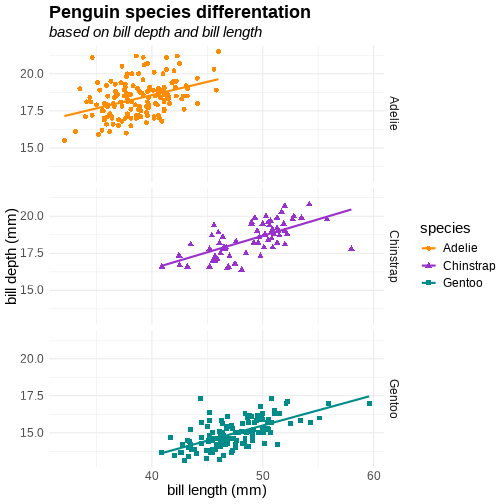<!-- --> ] --- count: false .panel1-penguins_species2-auto[ ```r penguins_default + scale_color_manual( values = c("darkorange", "darkorchid", "cyan4") ) + facet_grid(rows = vars(species)) + labs(title = "Penguin species differentation") + labs(subtitle = "based on bill depth and bill length") + xlab("bill length (mm)") + ylab("bill depth (mm)") + theme_minimal() + theme( plot.title = element_text(face = "bold"), plot.subtitle = element_text(face = "italic")) + * theme(legend.position = "none") ``` ] .panel2-penguins_species2-auto[ ``` ## `geom_smooth()` using formula 'y ~ x' ``` 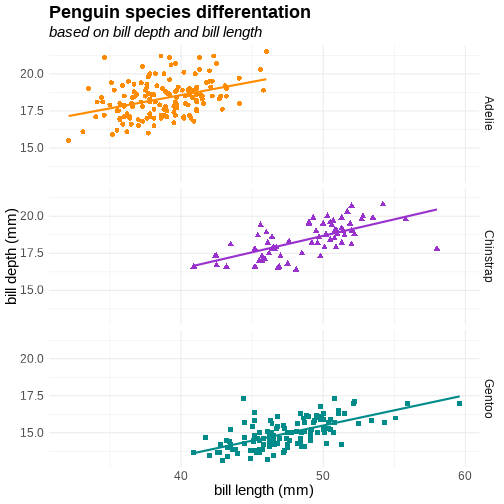<!-- --> ] <style> .panel1-penguins_species2-auto { color: black; width: 38.6060606060606%; hight: 32%; float: left; padding-left: 1%; font-size: 50% } .panel2-penguins_species2-auto { color: black; width: 59.3939393939394%; hight: 32%; float: left; padding-left: 1%; font-size: 50% } .panel3-penguins_species2-auto { color: black; width: NA%; hight: 33%; float: left; padding-left: 1%; font-size: 50% } </style> ??? OK, to był podstawowy graf. Teraz zróbmy go wyjątkowego. - zmiana kolorystyki, - rozbicie na podgrafy wg.gatunku, - dodanie tytułu - podpisy na osiach - wygląd grafu --- ## tips and tricks - **kolory** - [ColorBrewer](https://colorbrewer2.org) wbudowane w ggplot2 [`scale_color_brewer`](https://ggplot2.tidyverse.org/reference/scale_brewer.html) - [sanzo palette](https://github.com/jmaasch/sanzo) można zainstalować z CRANa - mnóstwo innych możliwości: np. [paletteer](https://emilhvitfeldt.github.io/paletteer/) - **roszerzenia** - [ggrepel](https://ggrepel.slowkow.com/) ładniejsze pozycjonowanie napisów - [gggenes](https://wilkox.org/gggenes/) wizualizacja genów jako strzałek - mnóstwo innych możliwości: [ggextensions](https://exts.ggplot2.tidyverse.org/gallery/) ??? Jest mnóstwo innych pakietów, które pozwalają na dopasowanie naszych obrazków do naszego gustu. --- class: inverse, left, middle # Interaktywne grafy ## na szybko ??? Jednak na takim grafie przedstawimy tylko 2 dane: długość i szerokość dzioba pingwinów. Jeśli chcemy _jednocześnie_ pokazać inne dane, musimy zrobić więcej grafów, albo... spróbować dodać elementy interaktywne. --- <div style="float: right; position: fixed; right: 10px; top: 10px;"> <img style="float: right; position: relative;" src="ggiraph_logo.png" alt="ggiraph"/><br> </div> ## ggiraph https://davidgohel.github.io/ggiraph - do gotowego grafu `ggplot` dodaje interaktywność - rozszerza `ggplot2` o `geom`y: - `geom_point_interactive` - `geom_tile_interactive` - `scale_fill_manual_interactive` - i wiele więcej --- ```r penguins ``` ``` ## # A tibble: 344 x 8 ## species island bill_length_mm bill_depth_mm flipper_length_… body_mass_g ## <fct> <fct> <dbl> <dbl> <int> <int> ## 1 Adelie Torge… 39.1 18.7 181 3750 ## 2 Adelie Torge… 39.5 17.4 186 3800 ## 3 Adelie Torge… 40.3 18 195 3250 ## 4 Adelie Torge… NA NA NA NA ## 5 Adelie Torge… 36.7 19.3 193 3450 ## 6 Adelie Torge… 39.3 20.6 190 3650 ## 7 Adelie Torge… 38.9 17.8 181 3625 ## 8 Adelie Torge… 39.2 19.6 195 4675 ## 9 Adelie Torge… 34.1 18.1 193 3475 ## 10 Adelie Torge… 42 20.2 190 4250 ## # … with 334 more rows, and 2 more variables: sex <fct>, year <int> ``` --- ```r penguins_int <- penguins %>% mutate(hover_text = paste0("This ", sex, " lives at ", island, " and was measured in ", year)) penguins_int %>% select(hover_text) ``` ``` ## # A tibble: 344 x 1 ## hover_text ## <chr> ## 1 This male lives at Torgersen and was measured in 2007 ## 2 This female lives at Torgersen and was measured in 2007 ## 3 This female lives at Torgersen and was measured in 2007 ## 4 This NA lives at Torgersen and was measured in 2007 ## 5 This female lives at Torgersen and was measured in 2007 ## 6 This male lives at Torgersen and was measured in 2007 ## 7 This female lives at Torgersen and was measured in 2007 ## 8 This male lives at Torgersen and was measured in 2007 ## 9 This NA lives at Torgersen and was measured in 2007 ## 10 This NA lives at Torgersen and was measured in 2007 ## # … with 334 more rows ``` --- count: false .panel1-ggiraph_test-user[ ```r *penguins_int_plot <- ggplot( * data = penguins_int * ) + * aes(x = bill_length_mm, * y = bill_depth_mm) + * geom_point_interactive( #<< * aes(color = species, * shape = species, * tooltip = hover_text), #<< * size = 2) + * geom_smooth(method = "lm", * se = FALSE, * aes(color = species)) + * scale_color_manual( * values = c( * "darkorange", * "darkorchid", * "cyan4")) + * labs(title = * "Penguin species differentation") + * xlab("bill length (mm)") + * ylab("bill depth (mm)") + * theme_minimal() + * theme( * plot.title = * element_text(face = "bold"), * plot.subtitle = * element_text(face = "italic")) + * theme(legend.position = "bottom") ``` ] .panel2-ggiraph_test-user[ ] --- count: false .panel1-ggiraph_test-user[ ```r penguins_int_plot <- ggplot( data = penguins_int ) + aes(x = bill_length_mm, y = bill_depth_mm) + * geom_point_interactive( aes(color = species, shape = species, * tooltip = hover_text), size = 2) + geom_smooth(method = "lm", se = FALSE, aes(color = species)) + scale_color_manual( values = c( "darkorange", "darkorchid", "cyan4")) + labs(title = "Penguin species differentation") + xlab("bill length (mm)") + ylab("bill depth (mm)") + theme_minimal() + theme( plot.title = element_text(face = "bold"), plot.subtitle = element_text(face = "italic")) + theme(legend.position = "bottom") *girafe(ggobj = penguins_int_plot) ``` ] .panel2-ggiraph_test-user[ ``` ## `geom_smooth()` using formula 'y ~ x' ``` <div id="htmlwidget-5570be3002408d1c53ac" style="width:504px;height:504px;" class="girafe html-widget"></div> <script type="application/json" data-for="htmlwidget-5570be3002408d1c53ac">{"x":{"html":"<?xml version=\"1.0\" encoding=\"UTF-8\"?>\n<svg xmlns=\"http://www.w3.org/2000/svg\" xmlns:xlink=\"http://www.w3.org/1999/xlink\" id=\"svg_08e96ccb-fb6a-4348-ade5-b42f94a74a2f\" viewBox=\"0 0 432.00 360.00\">\n <g>\n <defs>\n <clipPath id=\"svg_08e96ccb-fb6a-4348-ade5-b42f94a74a2f_cl_1\">\n <rect x=\"0.00\" y=\"0.00\" width=\"432.00\" height=\"360.00\"/>\n <\/clipPath>\n <\/defs>\n <rect x=\"0.00\" y=\"0.00\" width=\"432.00\" height=\"360.00\" id=\"svg_08e96ccb-fb6a-4348-ade5-b42f94a74a2f_el_1\" clip-path=\"url(#svg_08e96ccb-fb6a-4348-ade5-b42f94a74a2f_cl_1)\" fill=\"#FFFFFF\" fill-opacity=\"1\" stroke-width=\"0.75\" stroke=\"#FFFFFF\" stroke-opacity=\"1\" stroke-linejoin=\"round\" stroke-linecap=\"round\"/>\n <defs>\n <clipPath id=\"svg_08e96ccb-fb6a-4348-ade5-b42f94a74a2f_cl_2\">\n <rect x=\"0.00\" y=\"0.00\" width=\"432.00\" height=\"360.00\"/>\n <\/clipPath>\n <\/defs>\n <defs>\n <clipPath id=\"svg_08e96ccb-fb6a-4348-ade5-b42f94a74a2f_cl_3\">\n <rect x=\"43.05\" y=\"23.33\" width=\"383.47\" height=\"265.77\"/>\n <\/clipPath>\n <\/defs>\n <polyline points=\"43.05,258.32 426.52,258.32\" id=\"svg_08e96ccb-fb6a-4348-ade5-b42f94a74a2f_el_2\" clip-path=\"url(#svg_08e96ccb-fb6a-4348-ade5-b42f94a74a2f_cl_3)\" fill=\"none\" stroke-width=\"0.533489\" stroke=\"#EBEBEB\" stroke-opacity=\"1\" stroke-linejoin=\"round\" stroke-linecap=\"butt\"/>\n <polyline points=\"43.05,186.41 426.52,186.41\" id=\"svg_08e96ccb-fb6a-4348-ade5-b42f94a74a2f_el_3\" clip-path=\"url(#svg_08e96ccb-fb6a-4348-ade5-b42f94a74a2f_cl_3)\" fill=\"none\" stroke-width=\"0.533489\" stroke=\"#EBEBEB\" stroke-opacity=\"1\" stroke-linejoin=\"round\" stroke-linecap=\"butt\"/>\n <polyline points=\"43.05,114.51 426.52,114.51\" id=\"svg_08e96ccb-fb6a-4348-ade5-b42f94a74a2f_el_4\" clip-path=\"url(#svg_08e96ccb-fb6a-4348-ade5-b42f94a74a2f_cl_3)\" fill=\"none\" stroke-width=\"0.533489\" stroke=\"#EBEBEB\" stroke-opacity=\"1\" stroke-linejoin=\"round\" stroke-linecap=\"butt\"/>\n <polyline points=\"43.05,42.60 426.52,42.60\" id=\"svg_08e96ccb-fb6a-4348-ade5-b42f94a74a2f_el_5\" clip-path=\"url(#svg_08e96ccb-fb6a-4348-ade5-b42f94a74a2f_cl_3)\" fill=\"none\" stroke-width=\"0.533489\" stroke=\"#EBEBEB\" stroke-opacity=\"1\" stroke-linejoin=\"round\" stroke-linecap=\"butt\"/>\n <polyline points=\"97.24,289.10 97.24,23.33\" id=\"svg_08e96ccb-fb6a-4348-ade5-b42f94a74a2f_el_6\" clip-path=\"url(#svg_08e96ccb-fb6a-4348-ade5-b42f94a74a2f_cl_3)\" fill=\"none\" stroke-width=\"0.533489\" stroke=\"#EBEBEB\" stroke-opacity=\"1\" stroke-linejoin=\"round\" stroke-linecap=\"butt\"/>\n <polyline points=\"224.01,289.10 224.01,23.33\" id=\"svg_08e96ccb-fb6a-4348-ade5-b42f94a74a2f_el_7\" clip-path=\"url(#svg_08e96ccb-fb6a-4348-ade5-b42f94a74a2f_cl_3)\" fill=\"none\" stroke-width=\"0.533489\" stroke=\"#EBEBEB\" stroke-opacity=\"1\" stroke-linejoin=\"round\" stroke-linecap=\"butt\"/>\n <polyline points=\"350.78,289.10 350.78,23.33\" id=\"svg_08e96ccb-fb6a-4348-ade5-b42f94a74a2f_el_8\" clip-path=\"url(#svg_08e96ccb-fb6a-4348-ade5-b42f94a74a2f_cl_3)\" fill=\"none\" stroke-width=\"0.533489\" stroke=\"#EBEBEB\" stroke-opacity=\"1\" stroke-linejoin=\"round\" stroke-linecap=\"butt\"/>\n <polyline points=\"43.05,222.37 426.52,222.37\" id=\"svg_08e96ccb-fb6a-4348-ade5-b42f94a74a2f_el_9\" clip-path=\"url(#svg_08e96ccb-fb6a-4348-ade5-b42f94a74a2f_cl_3)\" fill=\"none\" stroke-width=\"1.06698\" stroke=\"#EBEBEB\" stroke-opacity=\"1\" stroke-linejoin=\"round\" stroke-linecap=\"butt\"/>\n <polyline points=\"43.05,150.46 426.52,150.46\" id=\"svg_08e96ccb-fb6a-4348-ade5-b42f94a74a2f_el_10\" clip-path=\"url(#svg_08e96ccb-fb6a-4348-ade5-b42f94a74a2f_cl_3)\" fill=\"none\" stroke-width=\"1.06698\" stroke=\"#EBEBEB\" stroke-opacity=\"1\" stroke-linejoin=\"round\" stroke-linecap=\"butt\"/>\n <polyline points=\"43.05,78.55 426.52,78.55\" id=\"svg_08e96ccb-fb6a-4348-ade5-b42f94a74a2f_el_11\" clip-path=\"url(#svg_08e96ccb-fb6a-4348-ade5-b42f94a74a2f_cl_3)\" fill=\"none\" stroke-width=\"1.06698\" stroke=\"#EBEBEB\" stroke-opacity=\"1\" stroke-linejoin=\"round\" stroke-linecap=\"butt\"/>\n <polyline points=\"160.63,289.10 160.63,23.33\" id=\"svg_08e96ccb-fb6a-4348-ade5-b42f94a74a2f_el_12\" clip-path=\"url(#svg_08e96ccb-fb6a-4348-ade5-b42f94a74a2f_cl_3)\" fill=\"none\" stroke-width=\"1.06698\" stroke=\"#EBEBEB\" stroke-opacity=\"1\" stroke-linejoin=\"round\" stroke-linecap=\"butt\"/>\n <polyline points=\"287.39,289.10 287.39,23.33\" id=\"svg_08e96ccb-fb6a-4348-ade5-b42f94a74a2f_el_13\" clip-path=\"url(#svg_08e96ccb-fb6a-4348-ade5-b42f94a74a2f_cl_3)\" fill=\"none\" stroke-width=\"1.06698\" stroke=\"#EBEBEB\" stroke-opacity=\"1\" stroke-linejoin=\"round\" stroke-linecap=\"butt\"/>\n <polyline points=\"414.16,289.10 414.16,23.33\" id=\"svg_08e96ccb-fb6a-4348-ade5-b42f94a74a2f_el_14\" clip-path=\"url(#svg_08e96ccb-fb6a-4348-ade5-b42f94a74a2f_cl_3)\" fill=\"none\" stroke-width=\"1.06698\" stroke=\"#EBEBEB\" stroke-opacity=\"1\" stroke-linejoin=\"round\" stroke-linecap=\"butt\"/>\n <circle cx=\"149.22\" cy=\"115.94\" r=\"1.87pt\" id=\"svg_08e96ccb-fb6a-4348-ade5-b42f94a74a2f_el_15\" clip-path=\"url(#svg_08e96ccb-fb6a-4348-ade5-b42f94a74a2f_cl_3)\" fill=\"#FF8C00\" fill-opacity=\"1\" stroke=\"none\" title=\"This male lives at Torgersen and was measured in 2007\"/>\n <circle cx=\"154.29\" cy=\"153.34\" r=\"1.87pt\" id=\"svg_08e96ccb-fb6a-4348-ade5-b42f94a74a2f_el_16\" clip-path=\"url(#svg_08e96ccb-fb6a-4348-ade5-b42f94a74a2f_cl_3)\" fill=\"#FF8C00\" fill-opacity=\"1\" stroke=\"none\" title=\"This female lives at Torgersen and was measured in 2007\"/>\n <circle cx=\"164.43\" cy=\"136.08\" r=\"1.87pt\" id=\"svg_08e96ccb-fb6a-4348-ade5-b42f94a74a2f_el_17\" clip-path=\"url(#svg_08e96ccb-fb6a-4348-ade5-b42f94a74a2f_cl_3)\" fill=\"#FF8C00\" fill-opacity=\"1\" stroke=\"none\" title=\"This female lives at Torgersen and was measured in 2007\"/>\n <circle cx=\"118.79\" cy=\"98.69\" r=\"1.87pt\" id=\"svg_08e96ccb-fb6a-4348-ade5-b42f94a74a2f_el_18\" clip-path=\"url(#svg_08e96ccb-fb6a-4348-ade5-b42f94a74a2f_cl_3)\" fill=\"#FF8C00\" fill-opacity=\"1\" stroke=\"none\" title=\"This female lives at Torgersen and was measured in 2007\"/>\n <circle cx=\"151.75\" cy=\"61.29\" r=\"1.87pt\" id=\"svg_08e96ccb-fb6a-4348-ade5-b42f94a74a2f_el_19\" clip-path=\"url(#svg_08e96ccb-fb6a-4348-ade5-b42f94a74a2f_cl_3)\" fill=\"#FF8C00\" fill-opacity=\"1\" stroke=\"none\" title=\"This male lives at Torgersen and was measured in 2007\"/>\n <circle cx=\"146.68\" cy=\"141.83\" r=\"1.87pt\" id=\"svg_08e96ccb-fb6a-4348-ade5-b42f94a74a2f_el_20\" clip-path=\"url(#svg_08e96ccb-fb6a-4348-ade5-b42f94a74a2f_cl_3)\" fill=\"#FF8C00\" fill-opacity=\"1\" stroke=\"none\" title=\"This female lives at Torgersen and was measured in 2007\"/>\n <circle cx=\"150.49\" cy=\"90.06\" r=\"1.87pt\" id=\"svg_08e96ccb-fb6a-4348-ade5-b42f94a74a2f_el_21\" clip-path=\"url(#svg_08e96ccb-fb6a-4348-ade5-b42f94a74a2f_cl_3)\" fill=\"#FF8C00\" fill-opacity=\"1\" stroke=\"none\" title=\"This male lives at Torgersen and was measured in 2007\"/>\n <circle cx=\"85.84\" cy=\"133.20\" r=\"1.87pt\" id=\"svg_08e96ccb-fb6a-4348-ade5-b42f94a74a2f_el_22\" clip-path=\"url(#svg_08e96ccb-fb6a-4348-ade5-b42f94a74a2f_cl_3)\" fill=\"#FF8C00\" fill-opacity=\"1\" stroke=\"none\" title=\"This NA lives at Torgersen and was measured in 2007\"/>\n <circle cx=\"185.98\" cy=\"72.80\" r=\"1.87pt\" id=\"svg_08e96ccb-fb6a-4348-ade5-b42f94a74a2f_el_23\" clip-path=\"url(#svg_08e96ccb-fb6a-4348-ade5-b42f94a74a2f_cl_3)\" fill=\"#FF8C00\" fill-opacity=\"1\" stroke=\"none\" title=\"This NA lives at Torgersen and was measured in 2007\"/>\n <circle cx=\"132.74\" cy=\"161.97\" r=\"1.87pt\" id=\"svg_08e96ccb-fb6a-4348-ade5-b42f94a74a2f_el_24\" clip-path=\"url(#svg_08e96ccb-fb6a-4348-ade5-b42f94a74a2f_cl_3)\" fill=\"#FF8C00\" fill-opacity=\"1\" stroke=\"none\" title=\"This NA lives at Torgersen and was measured in 2007\"/>\n <circle cx=\"132.74\" cy=\"156.21\" r=\"1.87pt\" id=\"svg_08e96ccb-fb6a-4348-ade5-b42f94a74a2f_el_25\" clip-path=\"url(#svg_08e96ccb-fb6a-4348-ade5-b42f94a74a2f_cl_3)\" fill=\"#FF8C00\" fill-opacity=\"1\" stroke=\"none\" title=\"This NA lives at Torgersen and was measured in 2007\"/>\n <circle cx=\"174.57\" cy=\"147.58\" r=\"1.87pt\" id=\"svg_08e96ccb-fb6a-4348-ade5-b42f94a74a2f_el_26\" clip-path=\"url(#svg_08e96ccb-fb6a-4348-ade5-b42f94a74a2f_cl_3)\" fill=\"#FF8C00\" fill-opacity=\"1\" stroke=\"none\" title=\"This female lives at Torgersen and was measured in 2007\"/>\n <circle cx=\"142.88\" cy=\"44.04\" r=\"1.87pt\" id=\"svg_08e96ccb-fb6a-4348-ade5-b42f94a74a2f_el_27\" clip-path=\"url(#svg_08e96ccb-fb6a-4348-ade5-b42f94a74a2f_cl_3)\" fill=\"#FF8C00\" fill-opacity=\"1\" stroke=\"none\" title=\"This male lives at Torgersen and was measured in 2007\"/>\n <circle cx=\"92.17\" cy=\"46.91\" r=\"1.87pt\" id=\"svg_08e96ccb-fb6a-4348-ade5-b42f94a74a2f_el_28\" clip-path=\"url(#svg_08e96ccb-fb6a-4348-ade5-b42f94a74a2f_cl_3)\" fill=\"#FF8C00\" fill-opacity=\"1\" stroke=\"none\" title=\"This male lives at Torgersen and was measured in 2007\"/>\n <circle cx=\"117.53\" cy=\"141.83\" r=\"1.87pt\" id=\"svg_08e96ccb-fb6a-4348-ade5-b42f94a74a2f_el_29\" clip-path=\"url(#svg_08e96ccb-fb6a-4348-ade5-b42f94a74a2f_cl_3)\" fill=\"#FF8C00\" fill-opacity=\"1\" stroke=\"none\" title=\"This female lives at Torgersen and was measured in 2007\"/>\n <circle cx=\"144.15\" cy=\"107.32\" r=\"1.87pt\" id=\"svg_08e96ccb-fb6a-4348-ade5-b42f94a74a2f_el_30\" clip-path=\"url(#svg_08e96ccb-fb6a-4348-ade5-b42f94a74a2f_cl_3)\" fill=\"#FF8C00\" fill-opacity=\"1\" stroke=\"none\" title=\"This female lives at Torgersen and was measured in 2007\"/>\n <circle cx=\"192.32\" cy=\"58.42\" r=\"1.87pt\" id=\"svg_08e96ccb-fb6a-4348-ade5-b42f94a74a2f_el_31\" clip-path=\"url(#svg_08e96ccb-fb6a-4348-ade5-b42f94a74a2f_cl_3)\" fill=\"#FF8C00\" fill-opacity=\"1\" stroke=\"none\" title=\"This male lives at Torgersen and was measured in 2007\"/>\n <circle cx=\"89.64\" cy=\"124.57\" r=\"1.87pt\" id=\"svg_08e96ccb-fb6a-4348-ade5-b42f94a74a2f_el_32\" clip-path=\"url(#svg_08e96ccb-fb6a-4348-ade5-b42f94a74a2f_cl_3)\" fill=\"#FF8C00\" fill-opacity=\"1\" stroke=\"none\" title=\"This female lives at Torgersen and was measured in 2007\"/>\n <circle cx=\"236.69\" cy=\"35.41\" r=\"1.87pt\" id=\"svg_08e96ccb-fb6a-4348-ade5-b42f94a74a2f_el_33\" clip-path=\"url(#svg_08e96ccb-fb6a-4348-ade5-b42f94a74a2f_cl_3)\" fill=\"#FF8C00\" fill-opacity=\"1\" stroke=\"none\" title=\"This male lives at Torgersen and was measured in 2007\"/>\n <circle cx=\"132.74\" cy=\"127.45\" r=\"1.87pt\" id=\"svg_08e96ccb-fb6a-4348-ade5-b42f94a74a2f_el_34\" clip-path=\"url(#svg_08e96ccb-fb6a-4348-ade5-b42f94a74a2f_cl_3)\" fill=\"#FF8C00\" fill-opacity=\"1\" stroke=\"none\" title=\"This female lives at Biscoe and was measured in 2007\"/>\n <circle cx=\"131.47\" cy=\"115.94\" r=\"1.87pt\" id=\"svg_08e96ccb-fb6a-4348-ade5-b42f94a74a2f_el_35\" clip-path=\"url(#svg_08e96ccb-fb6a-4348-ade5-b42f94a74a2f_cl_3)\" fill=\"#FF8C00\" fill-opacity=\"1\" stroke=\"none\" title=\"This male lives at Biscoe and was measured in 2007\"/>\n <circle cx=\"108.65\" cy=\"101.56\" r=\"1.87pt\" id=\"svg_08e96ccb-fb6a-4348-ade5-b42f94a74a2f_el_36\" clip-path=\"url(#svg_08e96ccb-fb6a-4348-ade5-b42f94a74a2f_cl_3)\" fill=\"#FF8C00\" fill-opacity=\"1\" stroke=\"none\" title=\"This female lives at Biscoe and was measured in 2007\"/>\n <circle cx=\"137.81\" cy=\"133.20\" r=\"1.87pt\" id=\"svg_08e96ccb-fb6a-4348-ade5-b42f94a74a2f_el_37\" clip-path=\"url(#svg_08e96ccb-fb6a-4348-ade5-b42f94a74a2f_cl_3)\" fill=\"#FF8C00\" fill-opacity=\"1\" stroke=\"none\" title=\"This male lives at Biscoe and was measured in 2007\"/>\n <circle cx=\"145.42\" cy=\"159.09\" r=\"1.87pt\" id=\"svg_08e96ccb-fb6a-4348-ade5-b42f94a74a2f_el_38\" clip-path=\"url(#svg_08e96ccb-fb6a-4348-ade5-b42f94a74a2f_cl_3)\" fill=\"#FF8C00\" fill-opacity=\"1\" stroke=\"none\" title=\"This male lives at Biscoe and was measured in 2007\"/>\n <circle cx=\"101.05\" cy=\"110.19\" r=\"1.87pt\" id=\"svg_08e96ccb-fb6a-4348-ade5-b42f94a74a2f_el_39\" clip-path=\"url(#svg_08e96ccb-fb6a-4348-ade5-b42f94a74a2f_cl_3)\" fill=\"#FF8C00\" fill-opacity=\"1\" stroke=\"none\" title=\"This female lives at Biscoe and was measured in 2007\"/>\n <circle cx=\"168.23\" cy=\"118.82\" r=\"1.87pt\" id=\"svg_08e96ccb-fb6a-4348-ade5-b42f94a74a2f_el_40\" clip-path=\"url(#svg_08e96ccb-fb6a-4348-ade5-b42f94a74a2f_cl_3)\" fill=\"#FF8C00\" fill-opacity=\"1\" stroke=\"none\" title=\"This male lives at Biscoe and was measured in 2007\"/>\n <circle cx=\"166.97\" cy=\"138.96\" r=\"1.87pt\" id=\"svg_08e96ccb-fb6a-4348-ade5-b42f94a74a2f_el_41\" clip-path=\"url(#svg_08e96ccb-fb6a-4348-ade5-b42f94a74a2f_cl_3)\" fill=\"#FF8C00\" fill-opacity=\"1\" stroke=\"none\" title=\"This female lives at Biscoe and was measured in 2007\"/>\n <circle cx=\"134.01\" cy=\"118.82\" r=\"1.87pt\" id=\"svg_08e96ccb-fb6a-4348-ade5-b42f94a74a2f_el_42\" clip-path=\"url(#svg_08e96ccb-fb6a-4348-ade5-b42f94a74a2f_cl_3)\" fill=\"#FF8C00\" fill-opacity=\"1\" stroke=\"none\" title=\"This female lives at Biscoe and was measured in 2007\"/>\n <circle cx=\"166.97\" cy=\"110.19\" r=\"1.87pt\" id=\"svg_08e96ccb-fb6a-4348-ade5-b42f94a74a2f_el_43\" clip-path=\"url(#svg_08e96ccb-fb6a-4348-ade5-b42f94a74a2f_cl_3)\" fill=\"#FF8C00\" fill-opacity=\"1\" stroke=\"none\" title=\"This male lives at Biscoe and was measured in 2007\"/>\n <circle cx=\"154.29\" cy=\"173.47\" r=\"1.87pt\" id=\"svg_08e96ccb-fb6a-4348-ade5-b42f94a74a2f_el_44\" clip-path=\"url(#svg_08e96ccb-fb6a-4348-ade5-b42f94a74a2f_cl_3)\" fill=\"#FF8C00\" fill-opacity=\"1\" stroke=\"none\" title=\"This female lives at Dream and was measured in 2007\"/>\n <circle cx=\"125.13\" cy=\"133.20\" r=\"1.87pt\" id=\"svg_08e96ccb-fb6a-4348-ade5-b42f94a74a2f_el_45\" clip-path=\"url(#svg_08e96ccb-fb6a-4348-ade5-b42f94a74a2f_cl_3)\" fill=\"#FF8C00\" fill-opacity=\"1\" stroke=\"none\" title=\"This male lives at Dream and was measured in 2007\"/>\n <circle cx=\"154.29\" cy=\"141.83\" r=\"1.87pt\" id=\"svg_08e96ccb-fb6a-4348-ade5-b42f94a74a2f_el_46\" clip-path=\"url(#svg_08e96ccb-fb6a-4348-ade5-b42f94a74a2f_cl_3)\" fill=\"#FF8C00\" fill-opacity=\"1\" stroke=\"none\" title=\"This female lives at Dream and was measured in 2007\"/>\n <circle cx=\"172.04\" cy=\"110.19\" r=\"1.87pt\" id=\"svg_08e96ccb-fb6a-4348-ade5-b42f94a74a2f_el_47\" clip-path=\"url(#svg_08e96ccb-fb6a-4348-ade5-b42f94a74a2f_cl_3)\" fill=\"#FF8C00\" fill-opacity=\"1\" stroke=\"none\" title=\"This male lives at Dream and was measured in 2007\"/>\n <circle cx=\"114.99\" cy=\"164.84\" r=\"1.87pt\" id=\"svg_08e96ccb-fb6a-4348-ade5-b42f94a74a2f_el_48\" clip-path=\"url(#svg_08e96ccb-fb6a-4348-ade5-b42f94a74a2f_cl_3)\" fill=\"#FF8C00\" fill-opacity=\"1\" stroke=\"none\" title=\"This female lives at Dream and was measured in 2007\"/>\n <circle cx=\"150.49\" cy=\"46.91\" r=\"1.87pt\" id=\"svg_08e96ccb-fb6a-4348-ade5-b42f94a74a2f_el_49\" clip-path=\"url(#svg_08e96ccb-fb6a-4348-ade5-b42f94a74a2f_cl_3)\" fill=\"#FF8C00\" fill-opacity=\"1\" stroke=\"none\" title=\"This male lives at Dream and was measured in 2007\"/>\n <circle cx=\"145.42\" cy=\"78.55\" r=\"1.87pt\" id=\"svg_08e96ccb-fb6a-4348-ade5-b42f94a74a2f_el_50\" clip-path=\"url(#svg_08e96ccb-fb6a-4348-ade5-b42f94a74a2f_cl_3)\" fill=\"#FF8C00\" fill-opacity=\"1\" stroke=\"none\" title=\"This male lives at Dream and was measured in 2007\"/>\n <circle cx=\"188.52\" cy=\"121.70\" r=\"1.87pt\" id=\"svg_08e96ccb-fb6a-4348-ade5-b42f94a74a2f_el_51\" clip-path=\"url(#svg_08e96ccb-fb6a-4348-ade5-b42f94a74a2f_cl_3)\" fill=\"#FF8C00\" fill-opacity=\"1\" stroke=\"none\" title=\"This female lives at Dream and was measured in 2007\"/>\n <circle cx=\"130.20\" cy=\"98.69\" r=\"1.87pt\" id=\"svg_08e96ccb-fb6a-4348-ade5-b42f94a74a2f_el_52\" clip-path=\"url(#svg_08e96ccb-fb6a-4348-ade5-b42f94a74a2f_cl_3)\" fill=\"#FF8C00\" fill-opacity=\"1\" stroke=\"none\" title=\"This female lives at Dream and was measured in 2007\"/>\n <circle cx=\"158.09\" cy=\"104.44\" r=\"1.87pt\" id=\"svg_08e96ccb-fb6a-4348-ade5-b42f94a74a2f_el_53\" clip-path=\"url(#svg_08e96ccb-fb6a-4348-ade5-b42f94a74a2f_cl_3)\" fill=\"#FF8C00\" fill-opacity=\"1\" stroke=\"none\" title=\"This male lives at Dream and was measured in 2007\"/>\n <circle cx=\"116.26\" cy=\"136.08\" r=\"1.87pt\" id=\"svg_08e96ccb-fb6a-4348-ade5-b42f94a74a2f_el_54\" clip-path=\"url(#svg_08e96ccb-fb6a-4348-ade5-b42f94a74a2f_cl_3)\" fill=\"#FF8C00\" fill-opacity=\"1\" stroke=\"none\" title=\"This female lives at Dream and was measured in 2007\"/>\n <circle cx=\"170.77\" cy=\"124.57\" r=\"1.87pt\" id=\"svg_08e96ccb-fb6a-4348-ade5-b42f94a74a2f_el_55\" clip-path=\"url(#svg_08e96ccb-fb6a-4348-ade5-b42f94a74a2f_cl_3)\" fill=\"#FF8C00\" fill-opacity=\"1\" stroke=\"none\" title=\"This male lives at Dream and was measured in 2007\"/>\n <circle cx=\"109.92\" cy=\"121.70\" r=\"1.87pt\" id=\"svg_08e96ccb-fb6a-4348-ade5-b42f94a74a2f_el_56\" clip-path=\"url(#svg_08e96ccb-fb6a-4348-ade5-b42f94a74a2f_cl_3)\" fill=\"#FF8C00\" fill-opacity=\"1\" stroke=\"none\" title=\"This female lives at Dream and was measured in 2007\"/>\n <circle cx=\"212.60\" cy=\"87.18\" r=\"1.87pt\" id=\"svg_08e96ccb-fb6a-4348-ade5-b42f94a74a2f_el_57\" clip-path=\"url(#svg_08e96ccb-fb6a-4348-ade5-b42f94a74a2f_cl_3)\" fill=\"#FF8C00\" fill-opacity=\"1\" stroke=\"none\" title=\"This male lives at Dream and was measured in 2007\"/>\n <circle cx=\"122.60\" cy=\"167.72\" r=\"1.87pt\" id=\"svg_08e96ccb-fb6a-4348-ade5-b42f94a74a2f_el_58\" clip-path=\"url(#svg_08e96ccb-fb6a-4348-ade5-b42f94a74a2f_cl_3)\" fill=\"#FF8C00\" fill-opacity=\"1\" stroke=\"none\" title=\"This female lives at Dream and was measured in 2007\"/>\n <circle cx=\"155.56\" cy=\"113.07\" r=\"1.87pt\" id=\"svg_08e96ccb-fb6a-4348-ade5-b42f94a74a2f_el_59\" clip-path=\"url(#svg_08e96ccb-fb6a-4348-ade5-b42f94a74a2f_cl_3)\" fill=\"#FF8C00\" fill-opacity=\"1\" stroke=\"none\" title=\"This male lives at Dream and was measured in 2007\"/>\n <circle cx=\"174.57\" cy=\"107.32\" r=\"1.87pt\" id=\"svg_08e96ccb-fb6a-4348-ade5-b42f94a74a2f_el_60\" clip-path=\"url(#svg_08e96ccb-fb6a-4348-ade5-b42f94a74a2f_cl_3)\" fill=\"#FF8C00\" fill-opacity=\"1\" stroke=\"none\" title=\"This male lives at Dream and was measured in 2007\"/>\n <circle cx=\"128.94\" cy=\"110.19\" r=\"1.87pt\" id=\"svg_08e96ccb-fb6a-4348-ade5-b42f94a74a2f_el_61\" clip-path=\"url(#svg_08e96ccb-fb6a-4348-ade5-b42f94a74a2f_cl_3)\" fill=\"#FF8C00\" fill-opacity=\"1\" stroke=\"none\" title=\"This NA lives at Dream and was measured in 2007\"/>\n <circle cx=\"109.92\" cy=\"138.96\" r=\"1.87pt\" id=\"svg_08e96ccb-fb6a-4348-ade5-b42f94a74a2f_el_62\" clip-path=\"url(#svg_08e96ccb-fb6a-4348-ade5-b42f94a74a2f_cl_3)\" fill=\"#FF8C00\" fill-opacity=\"1\" stroke=\"none\" title=\"This female lives at Dream and was measured in 2007\"/>\n <circle cx=\"189.78\" cy=\"44.04\" r=\"1.87pt\" id=\"svg_08e96ccb-fb6a-4348-ade5-b42f94a74a2f_el_63\" clip-path=\"url(#svg_08e96ccb-fb6a-4348-ade5-b42f94a74a2f_cl_3)\" fill=\"#FF8C00\" fill-opacity=\"1\" stroke=\"none\" title=\"This male lives at Dream and was measured in 2007\"/>\n <circle cx=\"155.56\" cy=\"144.71\" r=\"1.87pt\" id=\"svg_08e96ccb-fb6a-4348-ade5-b42f94a74a2f_el_64\" clip-path=\"url(#svg_08e96ccb-fb6a-4348-ade5-b42f94a74a2f_cl_3)\" fill=\"#FF8C00\" fill-opacity=\"1\" stroke=\"none\" title=\"This female lives at Biscoe and was measured in 2008\"/>\n <circle cx=\"161.90\" cy=\"110.19\" r=\"1.87pt\" id=\"svg_08e96ccb-fb6a-4348-ade5-b42f94a74a2f_el_65\" clip-path=\"url(#svg_08e96ccb-fb6a-4348-ade5-b42f94a74a2f_cl_3)\" fill=\"#FF8C00\" fill-opacity=\"1\" stroke=\"none\" title=\"This male lives at Biscoe and was measured in 2008\"/>\n <circle cx=\"97.24\" cy=\"138.96\" r=\"1.87pt\" id=\"svg_08e96ccb-fb6a-4348-ade5-b42f94a74a2f_el_66\" clip-path=\"url(#svg_08e96ccb-fb6a-4348-ade5-b42f94a74a2f_cl_3)\" fill=\"#FF8C00\" fill-opacity=\"1\" stroke=\"none\" title=\"This female lives at Biscoe and was measured in 2008\"/>\n <circle cx=\"185.98\" cy=\"92.93\" r=\"1.87pt\" id=\"svg_08e96ccb-fb6a-4348-ade5-b42f94a74a2f_el_67\" clip-path=\"url(#svg_08e96ccb-fb6a-4348-ade5-b42f94a74a2f_cl_3)\" fill=\"#FF8C00\" fill-opacity=\"1\" stroke=\"none\" title=\"This male lives at Biscoe and was measured in 2008\"/>\n <circle cx=\"90.91\" cy=\"133.20\" r=\"1.87pt\" id=\"svg_08e96ccb-fb6a-4348-ade5-b42f94a74a2f_el_68\" clip-path=\"url(#svg_08e96ccb-fb6a-4348-ade5-b42f94a74a2f_cl_3)\" fill=\"#FF8C00\" fill-opacity=\"1\" stroke=\"none\" title=\"This female lives at Biscoe and was measured in 2008\"/>\n <circle cx=\"178.37\" cy=\"118.82\" r=\"1.87pt\" id=\"svg_08e96ccb-fb6a-4348-ade5-b42f94a74a2f_el_69\" clip-path=\"url(#svg_08e96ccb-fb6a-4348-ade5-b42f94a74a2f_cl_3)\" fill=\"#FF8C00\" fill-opacity=\"1\" stroke=\"none\" title=\"This male lives at Biscoe and was measured in 2008\"/>\n <circle cx=\"147.95\" cy=\"150.46\" r=\"1.87pt\" id=\"svg_08e96ccb-fb6a-4348-ade5-b42f94a74a2f_el_70\" clip-path=\"url(#svg_08e96ccb-fb6a-4348-ade5-b42f94a74a2f_cl_3)\" fill=\"#FF8C00\" fill-opacity=\"1\" stroke=\"none\" title=\"This female lives at Biscoe and was measured in 2008\"/>\n <circle cx=\"168.23\" cy=\"113.07\" r=\"1.87pt\" id=\"svg_08e96ccb-fb6a-4348-ade5-b42f94a74a2f_el_71\" clip-path=\"url(#svg_08e96ccb-fb6a-4348-ade5-b42f94a74a2f_cl_3)\" fill=\"#FF8C00\" fill-opacity=\"1\" stroke=\"none\" title=\"This male lives at Biscoe and was measured in 2008\"/>\n <circle cx=\"116.26\" cy=\"176.35\" r=\"1.87pt\" id=\"svg_08e96ccb-fb6a-4348-ade5-b42f94a74a2f_el_72\" clip-path=\"url(#svg_08e96ccb-fb6a-4348-ade5-b42f94a74a2f_cl_3)\" fill=\"#FF8C00\" fill-opacity=\"1\" stroke=\"none\" title=\"This female lives at Biscoe and was measured in 2008\"/>\n <circle cx=\"130.20\" cy=\"104.44\" r=\"1.87pt\" id=\"svg_08e96ccb-fb6a-4348-ade5-b42f94a74a2f_el_73\" clip-path=\"url(#svg_08e96ccb-fb6a-4348-ade5-b42f94a74a2f_cl_3)\" fill=\"#FF8C00\" fill-opacity=\"1\" stroke=\"none\" title=\"This male lives at Biscoe and was measured in 2008\"/>\n <circle cx=\"106.12\" cy=\"167.72\" r=\"1.87pt\" id=\"svg_08e96ccb-fb6a-4348-ade5-b42f94a74a2f_el_74\" clip-path=\"url(#svg_08e96ccb-fb6a-4348-ade5-b42f94a74a2f_cl_3)\" fill=\"#FF8C00\" fill-opacity=\"1\" stroke=\"none\" title=\"This female lives at Biscoe and was measured in 2008\"/>\n <circle cx=\"177.11\" cy=\"46.91\" r=\"1.87pt\" id=\"svg_08e96ccb-fb6a-4348-ade5-b42f94a74a2f_el_75\" clip-path=\"url(#svg_08e96ccb-fb6a-4348-ade5-b42f94a74a2f_cl_3)\" fill=\"#FF8C00\" fill-opacity=\"1\" stroke=\"none\" title=\"This male lives at Biscoe and was measured in 2008\"/>\n <circle cx=\"130.20\" cy=\"164.84\" r=\"1.87pt\" id=\"svg_08e96ccb-fb6a-4348-ade5-b42f94a74a2f_el_76\" clip-path=\"url(#svg_08e96ccb-fb6a-4348-ade5-b42f94a74a2f_cl_3)\" fill=\"#FF8C00\" fill-opacity=\"1\" stroke=\"none\" title=\"This female lives at Biscoe and was measured in 2008\"/>\n <circle cx=\"174.57\" cy=\"130.33\" r=\"1.87pt\" id=\"svg_08e96ccb-fb6a-4348-ade5-b42f94a74a2f_el_77\" clip-path=\"url(#svg_08e96ccb-fb6a-4348-ade5-b42f94a74a2f_cl_3)\" fill=\"#FF8C00\" fill-opacity=\"1\" stroke=\"none\" title=\"This male lives at Biscoe and was measured in 2008\"/>\n <circle cx=\"114.99\" cy=\"161.97\" r=\"1.87pt\" id=\"svg_08e96ccb-fb6a-4348-ade5-b42f94a74a2f_el_78\" clip-path=\"url(#svg_08e96ccb-fb6a-4348-ade5-b42f94a74a2f_cl_3)\" fill=\"#FF8C00\" fill-opacity=\"1\" stroke=\"none\" title=\"This female lives at Biscoe and was measured in 2008\"/>\n <circle cx=\"180.91\" cy=\"136.08\" r=\"1.87pt\" id=\"svg_08e96ccb-fb6a-4348-ade5-b42f94a74a2f_el_79\" clip-path=\"url(#svg_08e96ccb-fb6a-4348-ade5-b42f94a74a2f_cl_3)\" fill=\"#FF8C00\" fill-opacity=\"1\" stroke=\"none\" title=\"This male lives at Biscoe and was measured in 2008\"/>\n <circle cx=\"103.58\" cy=\"187.85\" r=\"1.87pt\" id=\"svg_08e96ccb-fb6a-4348-ade5-b42f94a74a2f_el_80\" clip-path=\"url(#svg_08e96ccb-fb6a-4348-ade5-b42f94a74a2f_cl_3)\" fill=\"#FF8C00\" fill-opacity=\"1\" stroke=\"none\" title=\"This female lives at Biscoe and was measured in 2008\"/>\n <circle cx=\"174.57\" cy=\"104.44\" r=\"1.87pt\" id=\"svg_08e96ccb-fb6a-4348-ade5-b42f94a74a2f_el_81\" clip-path=\"url(#svg_08e96ccb-fb6a-4348-ade5-b42f94a74a2f_cl_3)\" fill=\"#FF8C00\" fill-opacity=\"1\" stroke=\"none\" title=\"This male lives at Biscoe and was measured in 2008\"/>\n <circle cx=\"108.65\" cy=\"176.35\" r=\"1.87pt\" id=\"svg_08e96ccb-fb6a-4348-ade5-b42f94a74a2f_el_82\" clip-path=\"url(#svg_08e96ccb-fb6a-4348-ade5-b42f94a74a2f_cl_3)\" fill=\"#FF8C00\" fill-opacity=\"1\" stroke=\"none\" title=\"This female lives at Torgersen and was measured in 2008\"/>\n <circle cx=\"183.45\" cy=\"95.81\" r=\"1.87pt\" id=\"svg_08e96ccb-fb6a-4348-ade5-b42f94a74a2f_el_83\" clip-path=\"url(#svg_08e96ccb-fb6a-4348-ade5-b42f94a74a2f_cl_3)\" fill=\"#FF8C00\" fill-opacity=\"1\" stroke=\"none\" title=\"This male lives at Torgersen and was measured in 2008\"/>\n <circle cx=\"78.23\" cy=\"107.32\" r=\"1.87pt\" id=\"svg_08e96ccb-fb6a-4348-ade5-b42f94a74a2f_el_84\" clip-path=\"url(#svg_08e96ccb-fb6a-4348-ade5-b42f94a74a2f_cl_3)\" fill=\"#FF8C00\" fill-opacity=\"1\" stroke=\"none\" title=\"This female lives at Torgersen and was measured in 2008\"/>\n <circle cx=\"156.82\" cy=\"124.57\" r=\"1.87pt\" id=\"svg_08e96ccb-fb6a-4348-ade5-b42f94a74a2f_el_85\" clip-path=\"url(#svg_08e96ccb-fb6a-4348-ade5-b42f94a74a2f_cl_3)\" fill=\"#FF8C00\" fill-opacity=\"1\" stroke=\"none\" title=\"This male lives at Torgersen and was measured in 2008\"/>\n <circle cx=\"155.56\" cy=\"159.09\" r=\"1.87pt\" id=\"svg_08e96ccb-fb6a-4348-ade5-b42f94a74a2f_el_86\" clip-path=\"url(#svg_08e96ccb-fb6a-4348-ade5-b42f94a74a2f_cl_3)\" fill=\"#FF8C00\" fill-opacity=\"1\" stroke=\"none\" title=\"This female lives at Torgersen and was measured in 2008\"/>\n <circle cx=\"234.15\" cy=\"110.19\" r=\"1.87pt\" id=\"svg_08e96ccb-fb6a-4348-ade5-b42f94a74a2f_el_87\" clip-path=\"url(#svg_08e96ccb-fb6a-4348-ade5-b42f94a74a2f_cl_3)\" fill=\"#FF8C00\" fill-opacity=\"1\" stroke=\"none\" title=\"This male lives at Torgersen and was measured in 2008\"/>\n <circle cx=\"103.58\" cy=\"150.46\" r=\"1.87pt\" id=\"svg_08e96ccb-fb6a-4348-ade5-b42f94a74a2f_el_88\" clip-path=\"url(#svg_08e96ccb-fb6a-4348-ade5-b42f94a74a2f_cl_3)\" fill=\"#FF8C00\" fill-opacity=\"1\" stroke=\"none\" title=\"This female lives at Torgersen and was measured in 2008\"/>\n <circle cx=\"196.12\" cy=\"121.70\" r=\"1.87pt\" id=\"svg_08e96ccb-fb6a-4348-ade5-b42f94a74a2f_el_89\" clip-path=\"url(#svg_08e96ccb-fb6a-4348-ade5-b42f94a74a2f_cl_3)\" fill=\"#FF8C00\" fill-opacity=\"1\" stroke=\"none\" title=\"This male lives at Torgersen and was measured in 2008\"/>\n <circle cx=\"172.04\" cy=\"170.59\" r=\"1.87pt\" id=\"svg_08e96ccb-fb6a-4348-ade5-b42f94a74a2f_el_90\" clip-path=\"url(#svg_08e96ccb-fb6a-4348-ade5-b42f94a74a2f_cl_3)\" fill=\"#FF8C00\" fill-opacity=\"1\" stroke=\"none\" title=\"This female lives at Torgersen and was measured in 2008\"/>\n <circle cx=\"125.13\" cy=\"95.81\" r=\"1.87pt\" id=\"svg_08e96ccb-fb6a-4348-ade5-b42f94a74a2f_el_91\" clip-path=\"url(#svg_08e96ccb-fb6a-4348-ade5-b42f94a74a2f_cl_3)\" fill=\"#FF8C00\" fill-opacity=\"1\" stroke=\"none\" title=\"This male lives at Torgersen and was measured in 2008\"/>\n <circle cx=\"112.46\" cy=\"190.73\" r=\"1.87pt\" id=\"svg_08e96ccb-fb6a-4348-ade5-b42f94a74a2f_el_92\" clip-path=\"url(#svg_08e96ccb-fb6a-4348-ade5-b42f94a74a2f_cl_3)\" fill=\"#FF8C00\" fill-opacity=\"1\" stroke=\"none\" title=\"This female lives at Torgersen and was measured in 2008\"/>\n <circle cx=\"187.25\" cy=\"104.44\" r=\"1.87pt\" id=\"svg_08e96ccb-fb6a-4348-ade5-b42f94a74a2f_el_93\" clip-path=\"url(#svg_08e96ccb-fb6a-4348-ade5-b42f94a74a2f_cl_3)\" fill=\"#FF8C00\" fill-opacity=\"1\" stroke=\"none\" title=\"This male lives at Torgersen and was measured in 2008\"/>\n <circle cx=\"92.17\" cy=\"159.09\" r=\"1.87pt\" id=\"svg_08e96ccb-fb6a-4348-ade5-b42f94a74a2f_el_94\" clip-path=\"url(#svg_08e96ccb-fb6a-4348-ade5-b42f94a74a2f_cl_3)\" fill=\"#FF8C00\" fill-opacity=\"1\" stroke=\"none\" title=\"This female lives at Torgersen and was measured in 2008\"/>\n <circle cx=\"197.39\" cy=\"147.58\" r=\"1.87pt\" id=\"svg_08e96ccb-fb6a-4348-ade5-b42f94a74a2f_el_95\" clip-path=\"url(#svg_08e96ccb-fb6a-4348-ade5-b42f94a74a2f_cl_3)\" fill=\"#FF8C00\" fill-opacity=\"1\" stroke=\"none\" title=\"This male lives at Torgersen and was measured in 2008\"/>\n <circle cx=\"118.79\" cy=\"113.07\" r=\"1.87pt\" id=\"svg_08e96ccb-fb6a-4348-ade5-b42f94a74a2f_el_96\" clip-path=\"url(#svg_08e96ccb-fb6a-4348-ade5-b42f94a74a2f_cl_3)\" fill=\"#FF8C00\" fill-opacity=\"1\" stroke=\"none\" title=\"This female lives at Torgersen and was measured in 2008\"/>\n <circle cx=\"98.51\" cy=\"95.81\" r=\"1.87pt\" id=\"svg_08e96ccb-fb6a-4348-ade5-b42f94a74a2f_el_97\" clip-path=\"url(#svg_08e96ccb-fb6a-4348-ade5-b42f94a74a2f_cl_3)\" fill=\"#FF8C00\" fill-opacity=\"1\" stroke=\"none\" title=\"This male lives at Torgersen and was measured in 2008\"/>\n <circle cx=\"126.40\" cy=\"141.83\" r=\"1.87pt\" id=\"svg_08e96ccb-fb6a-4348-ade5-b42f94a74a2f_el_98\" clip-path=\"url(#svg_08e96ccb-fb6a-4348-ade5-b42f94a74a2f_cl_3)\" fill=\"#FF8C00\" fill-opacity=\"1\" stroke=\"none\" title=\"This female lives at Dream and was measured in 2008\"/>\n <circle cx=\"177.11\" cy=\"69.92\" r=\"1.87pt\" id=\"svg_08e96ccb-fb6a-4348-ade5-b42f94a74a2f_el_99\" clip-path=\"url(#svg_08e96ccb-fb6a-4348-ade5-b42f94a74a2f_cl_3)\" fill=\"#FF8C00\" fill-opacity=\"1\" stroke=\"none\" title=\"This male lives at Dream and was measured in 2008\"/>\n <circle cx=\"113.72\" cy=\"92.93\" r=\"1.87pt\" id=\"svg_08e96ccb-fb6a-4348-ade5-b42f94a74a2f_el_100\" clip-path=\"url(#svg_08e96ccb-fb6a-4348-ade5-b42f94a74a2f_cl_3)\" fill=\"#FF8C00\" fill-opacity=\"1\" stroke=\"none\" title=\"This male lives at Dream and was measured in 2008\"/>\n <circle cx=\"121.33\" cy=\"118.82\" r=\"1.87pt\" id=\"svg_08e96ccb-fb6a-4348-ade5-b42f94a74a2f_el_101\" clip-path=\"url(#svg_08e96ccb-fb6a-4348-ade5-b42f94a74a2f_cl_3)\" fill=\"#FF8C00\" fill-opacity=\"1\" stroke=\"none\" title=\"This female lives at Dream and was measured in 2008\"/>\n <circle cx=\"139.08\" cy=\"101.56\" r=\"1.87pt\" id=\"svg_08e96ccb-fb6a-4348-ade5-b42f94a74a2f_el_102\" clip-path=\"url(#svg_08e96ccb-fb6a-4348-ade5-b42f94a74a2f_cl_3)\" fill=\"#FF8C00\" fill-opacity=\"1\" stroke=\"none\" title=\"This male lives at Dream and was measured in 2008\"/>\n <circle cx=\"146.68\" cy=\"113.07\" r=\"1.87pt\" id=\"svg_08e96ccb-fb6a-4348-ade5-b42f94a74a2f_el_103\" clip-path=\"url(#svg_08e96ccb-fb6a-4348-ade5-b42f94a74a2f_cl_3)\" fill=\"#FF8C00\" fill-opacity=\"1\" stroke=\"none\" title=\"This female lives at Dream and was measured in 2008\"/>\n <circle cx=\"106.12\" cy=\"136.08\" r=\"1.87pt\" id=\"svg_08e96ccb-fb6a-4348-ade5-b42f94a74a2f_el_104\" clip-path=\"url(#svg_08e96ccb-fb6a-4348-ade5-b42f94a74a2f_cl_3)\" fill=\"#FF8C00\" fill-opacity=\"1\" stroke=\"none\" title=\"This female lives at Dream and was measured in 2008\"/>\n <circle cx=\"174.57\" cy=\"133.20\" r=\"1.87pt\" id=\"svg_08e96ccb-fb6a-4348-ade5-b42f94a74a2f_el_105\" clip-path=\"url(#svg_08e96ccb-fb6a-4348-ade5-b42f94a74a2f_cl_3)\" fill=\"#FF8C00\" fill-opacity=\"1\" stroke=\"none\" title=\"This male lives at Dream and was measured in 2008\"/>\n <circle cx=\"84.57\" cy=\"161.97\" r=\"1.87pt\" id=\"svg_08e96ccb-fb6a-4348-ade5-b42f94a74a2f_el_106\" clip-path=\"url(#svg_08e96ccb-fb6a-4348-ade5-b42f94a74a2f_cl_3)\" fill=\"#FF8C00\" fill-opacity=\"1\" stroke=\"none\" title=\"This female lives at Dream and was measured in 2008\"/>\n <circle cx=\"155.56\" cy=\"133.20\" r=\"1.87pt\" id=\"svg_08e96ccb-fb6a-4348-ade5-b42f94a74a2f_el_107\" clip-path=\"url(#svg_08e96ccb-fb6a-4348-ade5-b42f94a74a2f_cl_3)\" fill=\"#FF8C00\" fill-opacity=\"1\" stroke=\"none\" title=\"This male lives at Dream and was measured in 2008\"/>\n <circle cx=\"112.46\" cy=\"156.21\" r=\"1.87pt\" id=\"svg_08e96ccb-fb6a-4348-ade5-b42f94a74a2f_el_108\" clip-path=\"url(#svg_08e96ccb-fb6a-4348-ade5-b42f94a74a2f_cl_3)\" fill=\"#FF8C00\" fill-opacity=\"1\" stroke=\"none\" title=\"This female lives at Dream and was measured in 2008\"/>\n <circle cx=\"170.77\" cy=\"110.19\" r=\"1.87pt\" id=\"svg_08e96ccb-fb6a-4348-ade5-b42f94a74a2f_el_109\" clip-path=\"url(#svg_08e96ccb-fb6a-4348-ade5-b42f94a74a2f_cl_3)\" fill=\"#FF8C00\" fill-opacity=\"1\" stroke=\"none\" title=\"This male lives at Dream and was measured in 2008\"/>\n <circle cx=\"136.54\" cy=\"118.82\" r=\"1.87pt\" id=\"svg_08e96ccb-fb6a-4348-ade5-b42f94a74a2f_el_110\" clip-path=\"url(#svg_08e96ccb-fb6a-4348-ade5-b42f94a74a2f_cl_3)\" fill=\"#FF8C00\" fill-opacity=\"1\" stroke=\"none\" title=\"This female lives at Dream and was measured in 2008\"/>\n <circle cx=\"164.43\" cy=\"121.70\" r=\"1.87pt\" id=\"svg_08e96ccb-fb6a-4348-ade5-b42f94a74a2f_el_111\" clip-path=\"url(#svg_08e96ccb-fb6a-4348-ade5-b42f94a74a2f_cl_3)\" fill=\"#FF8C00\" fill-opacity=\"1\" stroke=\"none\" title=\"This male lives at Dream and was measured in 2008\"/>\n <circle cx=\"73.16\" cy=\"190.73\" r=\"1.87pt\" id=\"svg_08e96ccb-fb6a-4348-ade5-b42f94a74a2f_el_112\" clip-path=\"url(#svg_08e96ccb-fb6a-4348-ade5-b42f94a74a2f_cl_3)\" fill=\"#FF8C00\" fill-opacity=\"1\" stroke=\"none\" title=\"This female lives at Dream and was measured in 2008\"/>\n <circle cx=\"201.19\" cy=\"121.70\" r=\"1.87pt\" id=\"svg_08e96ccb-fb6a-4348-ade5-b42f94a74a2f_el_113\" clip-path=\"url(#svg_08e96ccb-fb6a-4348-ade5-b42f94a74a2f_cl_3)\" fill=\"#FF8C00\" fill-opacity=\"1\" stroke=\"none\" title=\"This male lives at Dream and was measured in 2008\"/>\n <circle cx=\"97.24\" cy=\"138.96\" r=\"1.87pt\" id=\"svg_08e96ccb-fb6a-4348-ade5-b42f94a74a2f_el_114\" clip-path=\"url(#svg_08e96ccb-fb6a-4348-ade5-b42f94a74a2f_cl_3)\" fill=\"#FF8C00\" fill-opacity=\"1\" stroke=\"none\" title=\"This female lives at Biscoe and was measured in 2009\"/>\n <circle cx=\"173.30\" cy=\"78.55\" r=\"1.87pt\" id=\"svg_08e96ccb-fb6a-4348-ade5-b42f94a74a2f_el_115\" clip-path=\"url(#svg_08e96ccb-fb6a-4348-ade5-b42f94a74a2f_cl_3)\" fill=\"#FF8C00\" fill-opacity=\"1\" stroke=\"none\" title=\"This male lives at Biscoe and was measured in 2009\"/>\n <circle cx=\"131.47\" cy=\"193.61\" r=\"1.87pt\" id=\"svg_08e96ccb-fb6a-4348-ade5-b42f94a74a2f_el_116\" clip-path=\"url(#svg_08e96ccb-fb6a-4348-ade5-b42f94a74a2f_cl_3)\" fill=\"#FF8C00\" fill-opacity=\"1\" stroke=\"none\" title=\"This female lives at Biscoe and was measured in 2009\"/>\n <circle cx=\"132.74\" cy=\"78.55\" r=\"1.87pt\" id=\"svg_08e96ccb-fb6a-4348-ade5-b42f94a74a2f_el_117\" clip-path=\"url(#svg_08e96ccb-fb6a-4348-ade5-b42f94a74a2f_cl_3)\" fill=\"#FF8C00\" fill-opacity=\"1\" stroke=\"none\" title=\"This male lives at Biscoe and was measured in 2009\"/>\n <circle cx=\"134.01\" cy=\"118.82\" r=\"1.87pt\" id=\"svg_08e96ccb-fb6a-4348-ade5-b42f94a74a2f_el_118\" clip-path=\"url(#svg_08e96ccb-fb6a-4348-ade5-b42f94a74a2f_cl_3)\" fill=\"#FF8C00\" fill-opacity=\"1\" stroke=\"none\" title=\"This female lives at Biscoe and was measured in 2009\"/>\n <circle cx=\"156.82\" cy=\"110.19\" r=\"1.87pt\" id=\"svg_08e96ccb-fb6a-4348-ade5-b42f94a74a2f_el_119\" clip-path=\"url(#svg_08e96ccb-fb6a-4348-ade5-b42f94a74a2f_cl_3)\" fill=\"#FF8C00\" fill-opacity=\"1\" stroke=\"none\" title=\"This male lives at Biscoe and was measured in 2009\"/>\n <circle cx=\"142.88\" cy=\"159.09\" r=\"1.87pt\" id=\"svg_08e96ccb-fb6a-4348-ade5-b42f94a74a2f_el_120\" clip-path=\"url(#svg_08e96ccb-fb6a-4348-ade5-b42f94a74a2f_cl_3)\" fill=\"#FF8C00\" fill-opacity=\"1\" stroke=\"none\" title=\"This female lives at Biscoe and was measured in 2009\"/>\n <circle cx=\"137.81\" cy=\"78.55\" r=\"1.87pt\" id=\"svg_08e96ccb-fb6a-4348-ade5-b42f94a74a2f_el_121\" clip-path=\"url(#svg_08e96ccb-fb6a-4348-ade5-b42f94a74a2f_cl_3)\" fill=\"#FF8C00\" fill-opacity=\"1\" stroke=\"none\" title=\"This male lives at Biscoe and was measured in 2009\"/>\n <circle cx=\"136.54\" cy=\"164.84\" r=\"1.87pt\" id=\"svg_08e96ccb-fb6a-4348-ade5-b42f94a74a2f_el_122\" clip-path=\"url(#svg_08e96ccb-fb6a-4348-ade5-b42f94a74a2f_cl_3)\" fill=\"#FF8C00\" fill-opacity=\"1\" stroke=\"none\" title=\"This female lives at Biscoe and was measured in 2009\"/>\n <circle cx=\"201.19\" cy=\"107.32\" r=\"1.87pt\" id=\"svg_08e96ccb-fb6a-4348-ade5-b42f94a74a2f_el_123\" clip-path=\"url(#svg_08e96ccb-fb6a-4348-ade5-b42f94a74a2f_cl_3)\" fill=\"#FF8C00\" fill-opacity=\"1\" stroke=\"none\" title=\"This male lives at Biscoe and was measured in 2009\"/>\n <circle cx=\"136.54\" cy=\"179.22\" r=\"1.87pt\" id=\"svg_08e96ccb-fb6a-4348-ade5-b42f94a74a2f_el_124\" clip-path=\"url(#svg_08e96ccb-fb6a-4348-ade5-b42f94a74a2f_cl_3)\" fill=\"#FF8C00\" fill-opacity=\"1\" stroke=\"none\" title=\"This female lives at Biscoe and was measured in 2009\"/>\n <circle cx=\"231.62\" cy=\"69.92\" r=\"1.87pt\" id=\"svg_08e96ccb-fb6a-4348-ade5-b42f94a74a2f_el_125\" clip-path=\"url(#svg_08e96ccb-fb6a-4348-ade5-b42f94a74a2f_cl_3)\" fill=\"#FF8C00\" fill-opacity=\"1\" stroke=\"none\" title=\"This male lives at Biscoe and was measured in 2009\"/>\n <circle cx=\"156.82\" cy=\"144.71\" r=\"1.87pt\" id=\"svg_08e96ccb-fb6a-4348-ade5-b42f94a74a2f_el_126\" clip-path=\"url(#svg_08e96ccb-fb6a-4348-ade5-b42f94a74a2f_cl_3)\" fill=\"#FF8C00\" fill-opacity=\"1\" stroke=\"none\" title=\"This female lives at Biscoe and was measured in 2009\"/>\n <circle cx=\"188.52\" cy=\"92.93\" r=\"1.87pt\" id=\"svg_08e96ccb-fb6a-4348-ade5-b42f94a74a2f_el_127\" clip-path=\"url(#svg_08e96ccb-fb6a-4348-ade5-b42f94a74a2f_cl_3)\" fill=\"#FF8C00\" fill-opacity=\"1\" stroke=\"none\" title=\"This male lives at Biscoe and was measured in 2009\"/>\n <circle cx=\"155.56\" cy=\"58.42\" r=\"1.87pt\" id=\"svg_08e96ccb-fb6a-4348-ade5-b42f94a74a2f_el_128\" clip-path=\"url(#svg_08e96ccb-fb6a-4348-ade5-b42f94a74a2f_cl_3)\" fill=\"#FF8C00\" fill-opacity=\"1\" stroke=\"none\" title=\"This female lives at Biscoe and was measured in 2009\"/>\n <circle cx=\"194.85\" cy=\"127.45\" r=\"1.87pt\" id=\"svg_08e96ccb-fb6a-4348-ade5-b42f94a74a2f_el_129\" clip-path=\"url(#svg_08e96ccb-fb6a-4348-ade5-b42f94a74a2f_cl_3)\" fill=\"#FF8C00\" fill-opacity=\"1\" stroke=\"none\" title=\"This male lives at Biscoe and was measured in 2009\"/>\n <circle cx=\"142.88\" cy=\"164.84\" r=\"1.87pt\" id=\"svg_08e96ccb-fb6a-4348-ade5-b42f94a74a2f_el_130\" clip-path=\"url(#svg_08e96ccb-fb6a-4348-ade5-b42f94a74a2f_cl_3)\" fill=\"#FF8C00\" fill-opacity=\"1\" stroke=\"none\" title=\"This female lives at Torgersen and was measured in 2009\"/>\n <circle cx=\"126.40\" cy=\"64.17\" r=\"1.87pt\" id=\"svg_08e96ccb-fb6a-4348-ade5-b42f94a74a2f_el_131\" clip-path=\"url(#svg_08e96ccb-fb6a-4348-ade5-b42f94a74a2f_cl_3)\" fill=\"#FF8C00\" fill-opacity=\"1\" stroke=\"none\" title=\"This male lives at Torgersen and was measured in 2009\"/>\n <circle cx=\"106.12\" cy=\"164.84\" r=\"1.87pt\" id=\"svg_08e96ccb-fb6a-4348-ade5-b42f94a74a2f_el_132\" clip-path=\"url(#svg_08e96ccb-fb6a-4348-ade5-b42f94a74a2f_cl_3)\" fill=\"#FF8C00\" fill-opacity=\"1\" stroke=\"none\" title=\"This female lives at Torgersen and was measured in 2009\"/>\n <circle cx=\"174.57\" cy=\"118.82\" r=\"1.87pt\" id=\"svg_08e96ccb-fb6a-4348-ade5-b42f94a74a2f_el_133\" clip-path=\"url(#svg_08e96ccb-fb6a-4348-ade5-b42f94a74a2f_cl_3)\" fill=\"#FF8C00\" fill-opacity=\"1\" stroke=\"none\" title=\"This male lives at Torgersen and was measured in 2009\"/>\n <circle cx=\"112.46\" cy=\"159.09\" r=\"1.87pt\" id=\"svg_08e96ccb-fb6a-4348-ade5-b42f94a74a2f_el_134\" clip-path=\"url(#svg_08e96ccb-fb6a-4348-ade5-b42f94a74a2f_cl_3)\" fill=\"#FF8C00\" fill-opacity=\"1\" stroke=\"none\" title=\"This female lives at Torgersen and was measured in 2009\"/>\n <circle cx=\"131.47\" cy=\"84.31\" r=\"1.87pt\" id=\"svg_08e96ccb-fb6a-4348-ade5-b42f94a74a2f_el_135\" clip-path=\"url(#svg_08e96ccb-fb6a-4348-ade5-b42f94a74a2f_cl_3)\" fill=\"#FF8C00\" fill-opacity=\"1\" stroke=\"none\" title=\"This male lives at Torgersen and was measured in 2009\"/>\n <circle cx=\"163.16\" cy=\"164.84\" r=\"1.87pt\" id=\"svg_08e96ccb-fb6a-4348-ade5-b42f94a74a2f_el_136\" clip-path=\"url(#svg_08e96ccb-fb6a-4348-ade5-b42f94a74a2f_cl_3)\" fill=\"#FF8C00\" fill-opacity=\"1\" stroke=\"none\" title=\"This female lives at Torgersen and was measured in 2009\"/>\n <circle cx=\"178.37\" cy=\"121.70\" r=\"1.87pt\" id=\"svg_08e96ccb-fb6a-4348-ade5-b42f94a74a2f_el_137\" clip-path=\"url(#svg_08e96ccb-fb6a-4348-ade5-b42f94a74a2f_cl_3)\" fill=\"#FF8C00\" fill-opacity=\"1\" stroke=\"none\" title=\"This male lives at Torgersen and was measured in 2009\"/>\n <circle cx=\"99.78\" cy=\"196.48\" r=\"1.87pt\" id=\"svg_08e96ccb-fb6a-4348-ade5-b42f94a74a2f_el_138\" clip-path=\"url(#svg_08e96ccb-fb6a-4348-ade5-b42f94a74a2f_cl_3)\" fill=\"#FF8C00\" fill-opacity=\"1\" stroke=\"none\" title=\"This female lives at Torgersen and was measured in 2009\"/>\n <circle cx=\"168.23\" cy=\"107.32\" r=\"1.87pt\" id=\"svg_08e96ccb-fb6a-4348-ade5-b42f94a74a2f_el_139\" clip-path=\"url(#svg_08e96ccb-fb6a-4348-ade5-b42f94a74a2f_cl_3)\" fill=\"#FF8C00\" fill-opacity=\"1\" stroke=\"none\" title=\"This male lives at Torgersen and was measured in 2009\"/>\n <circle cx=\"145.42\" cy=\"147.58\" r=\"1.87pt\" id=\"svg_08e96ccb-fb6a-4348-ade5-b42f94a74a2f_el_140\" clip-path=\"url(#svg_08e96ccb-fb6a-4348-ade5-b42f94a74a2f_cl_3)\" fill=\"#FF8C00\" fill-opacity=\"1\" stroke=\"none\" title=\"This female lives at Torgersen and was measured in 2009\"/>\n <circle cx=\"179.64\" cy=\"127.45\" r=\"1.87pt\" id=\"svg_08e96ccb-fb6a-4348-ade5-b42f94a74a2f_el_141\" clip-path=\"url(#svg_08e96ccb-fb6a-4348-ade5-b42f94a74a2f_cl_3)\" fill=\"#FF8C00\" fill-opacity=\"1\" stroke=\"none\" title=\"This male lives at Torgersen and was measured in 2009\"/>\n <circle cx=\"147.95\" cy=\"161.97\" r=\"1.87pt\" id=\"svg_08e96ccb-fb6a-4348-ade5-b42f94a74a2f_el_142\" clip-path=\"url(#svg_08e96ccb-fb6a-4348-ade5-b42f94a74a2f_cl_3)\" fill=\"#FF8C00\" fill-opacity=\"1\" stroke=\"none\" title=\"This female lives at Torgersen and was measured in 2009\"/>\n <circle cx=\"212.60\" cy=\"136.08\" r=\"1.87pt\" id=\"svg_08e96ccb-fb6a-4348-ade5-b42f94a74a2f_el_143\" clip-path=\"url(#svg_08e96ccb-fb6a-4348-ade5-b42f94a74a2f_cl_3)\" fill=\"#FF8C00\" fill-opacity=\"1\" stroke=\"none\" title=\"This male lives at Torgersen and was measured in 2009\"/>\n <circle cx=\"141.61\" cy=\"138.96\" r=\"1.87pt\" id=\"svg_08e96ccb-fb6a-4348-ade5-b42f94a74a2f_el_144\" clip-path=\"url(#svg_08e96ccb-fb6a-4348-ade5-b42f94a74a2f_cl_3)\" fill=\"#FF8C00\" fill-opacity=\"1\" stroke=\"none\" title=\"This female lives at Torgersen and was measured in 2009\"/>\n <circle cx=\"199.93\" cy=\"101.56\" r=\"1.87pt\" id=\"svg_08e96ccb-fb6a-4348-ade5-b42f94a74a2f_el_145\" clip-path=\"url(#svg_08e96ccb-fb6a-4348-ade5-b42f94a74a2f_cl_3)\" fill=\"#FF8C00\" fill-opacity=\"1\" stroke=\"none\" title=\"This male lives at Torgersen and was measured in 2009\"/>\n <circle cx=\"120.06\" cy=\"121.70\" r=\"1.87pt\" id=\"svg_08e96ccb-fb6a-4348-ade5-b42f94a74a2f_el_146\" clip-path=\"url(#svg_08e96ccb-fb6a-4348-ade5-b42f94a74a2f_cl_3)\" fill=\"#FF8C00\" fill-opacity=\"1\" stroke=\"none\" title=\"This female lives at Dream and was measured in 2009\"/>\n <circle cx=\"128.94\" cy=\"121.70\" r=\"1.87pt\" id=\"svg_08e96ccb-fb6a-4348-ade5-b42f94a74a2f_el_147\" clip-path=\"url(#svg_08e96ccb-fb6a-4348-ade5-b42f94a74a2f_cl_3)\" fill=\"#FF8C00\" fill-opacity=\"1\" stroke=\"none\" title=\"This male lives at Dream and was measured in 2009\"/>\n <circle cx=\"136.54\" cy=\"147.58\" r=\"1.87pt\" id=\"svg_08e96ccb-fb6a-4348-ade5-b42f94a74a2f_el_148\" clip-path=\"url(#svg_08e96ccb-fb6a-4348-ade5-b42f94a74a2f_cl_3)\" fill=\"#FF8C00\" fill-opacity=\"1\" stroke=\"none\" title=\"This female lives at Dream and was measured in 2009\"/>\n <circle cx=\"174.57\" cy=\"150.46\" r=\"1.87pt\" id=\"svg_08e96ccb-fb6a-4348-ade5-b42f94a74a2f_el_149\" clip-path=\"url(#svg_08e96ccb-fb6a-4348-ade5-b42f94a74a2f_cl_3)\" fill=\"#FF8C00\" fill-opacity=\"1\" stroke=\"none\" title=\"This male lives at Dream and was measured in 2009\"/>\n <circle cx=\"104.85\" cy=\"150.46\" r=\"1.87pt\" id=\"svg_08e96ccb-fb6a-4348-ade5-b42f94a74a2f_el_150\" clip-path=\"url(#svg_08e96ccb-fb6a-4348-ade5-b42f94a74a2f_cl_3)\" fill=\"#FF8C00\" fill-opacity=\"1\" stroke=\"none\" title=\"This female lives at Dream and was measured in 2009\"/>\n <circle cx=\"163.16\" cy=\"75.68\" r=\"1.87pt\" id=\"svg_08e96ccb-fb6a-4348-ade5-b42f94a74a2f_el_151\" clip-path=\"url(#svg_08e96ccb-fb6a-4348-ade5-b42f94a74a2f_cl_3)\" fill=\"#FF8C00\" fill-opacity=\"1\" stroke=\"none\" title=\"This male lives at Dream and was measured in 2009\"/>\n <circle cx=\"122.60\" cy=\"179.22\" r=\"1.87pt\" id=\"svg_08e96ccb-fb6a-4348-ade5-b42f94a74a2f_el_152\" clip-path=\"url(#svg_08e96ccb-fb6a-4348-ade5-b42f94a74a2f_cl_3)\" fill=\"#FF8C00\" fill-opacity=\"1\" stroke=\"none\" title=\"This female lives at Dream and was measured in 2009\"/>\n <circle cx=\"156.82\" cy=\"138.96\" r=\"1.87pt\" id=\"svg_08e96ccb-fb6a-4348-ade5-b42f94a74a2f_el_153\" clip-path=\"url(#svg_08e96ccb-fb6a-4348-ade5-b42f94a74a2f_cl_3)\" fill=\"#FF8C00\" fill-opacity=\"1\" stroke=\"none\" title=\"This male lives at Dream and was measured in 2009\"/>\n <circle cx=\"163.16\" cy=\"161.97\" r=\"1.87pt\" id=\"svg_08e96ccb-fb6a-4348-ade5-b42f94a74a2f_el_154\" clip-path=\"url(#svg_08e96ccb-fb6a-4348-ade5-b42f94a74a2f_cl_3)\" fill=\"#FF8C00\" fill-opacity=\"1\" stroke=\"none\" title=\"This female lives at Dream and was measured in 2009\"/>\n <circle cx=\"168.23\" cy=\"159.09\" r=\"1.87pt\" id=\"svg_08e96ccb-fb6a-4348-ade5-b42f94a74a2f_el_155\" clip-path=\"url(#svg_08e96ccb-fb6a-4348-ade5-b42f94a74a2f_cl_3)\" fill=\"#FF8C00\" fill-opacity=\"1\" stroke=\"none\" title=\"This male lives at Dream and was measured in 2009\"/>\n <circle cx=\"60.48\" cy=\"207.99\" r=\"1.87pt\" id=\"svg_08e96ccb-fb6a-4348-ade5-b42f94a74a2f_el_156\" clip-path=\"url(#svg_08e96ccb-fb6a-4348-ade5-b42f94a74a2f_cl_3)\" fill=\"#FF8C00\" fill-opacity=\"1\" stroke=\"none\" title=\"This female lives at Dream and was measured in 2009\"/>\n <circle cx=\"169.50\" cy=\"164.84\" r=\"1.87pt\" id=\"svg_08e96ccb-fb6a-4348-ade5-b42f94a74a2f_el_157\" clip-path=\"url(#svg_08e96ccb-fb6a-4348-ade5-b42f94a74a2f_cl_3)\" fill=\"#FF8C00\" fill-opacity=\"1\" stroke=\"none\" title=\"This male lives at Dream and was measured in 2009\"/>\n <circle cx=\"126.40\" cy=\"170.59\" r=\"1.87pt\" id=\"svg_08e96ccb-fb6a-4348-ade5-b42f94a74a2f_el_158\" clip-path=\"url(#svg_08e96ccb-fb6a-4348-ade5-b42f94a74a2f_cl_3)\" fill=\"#FF8C00\" fill-opacity=\"1\" stroke=\"none\" title=\"This female lives at Dream and was measured in 2009\"/>\n <circle cx=\"147.95\" cy=\"115.94\" r=\"1.87pt\" id=\"svg_08e96ccb-fb6a-4348-ade5-b42f94a74a2f_el_159\" clip-path=\"url(#svg_08e96ccb-fb6a-4348-ade5-b42f94a74a2f_cl_3)\" fill=\"#FF8C00\" fill-opacity=\"1\" stroke=\"none\" title=\"This male lives at Dream and was measured in 2009\"/>\n <circle cx=\"150.49\" cy=\"118.82\" r=\"1.87pt\" id=\"svg_08e96ccb-fb6a-4348-ade5-b42f94a74a2f_el_160\" clip-path=\"url(#svg_08e96ccb-fb6a-4348-ade5-b42f94a74a2f_cl_3)\" fill=\"#FF8C00\" fill-opacity=\"1\" stroke=\"none\" title=\"This male lives at Dream and was measured in 2009\"/>\n <circle cx=\"117.53\" cy=\"124.57\" r=\"1.87pt\" id=\"svg_08e96ccb-fb6a-4348-ade5-b42f94a74a2f_el_161\" clip-path=\"url(#svg_08e96ccb-fb6a-4348-ade5-b42f94a74a2f_cl_3)\" fill=\"#FF8C00\" fill-opacity=\"1\" stroke=\"none\" title=\"This female lives at Dream and was measured in 2009\"/>\n <circle cx=\"109.92\" cy=\"141.83\" r=\"1.87pt\" id=\"svg_08e96ccb-fb6a-4348-ade5-b42f94a74a2f_el_162\" clip-path=\"url(#svg_08e96ccb-fb6a-4348-ade5-b42f94a74a2f_cl_3)\" fill=\"#FF8C00\" fill-opacity=\"1\" stroke=\"none\" title=\"This female lives at Dream and was measured in 2009\"/>\n <circle cx=\"132.74\" cy=\"133.20\" r=\"1.87pt\" id=\"svg_08e96ccb-fb6a-4348-ade5-b42f94a74a2f_el_163\" clip-path=\"url(#svg_08e96ccb-fb6a-4348-ade5-b42f94a74a2f_cl_3)\" fill=\"#FF8C00\" fill-opacity=\"1\" stroke=\"none\" title=\"This male lives at Dream and was measured in 2009\"/>\n <circle cx=\"109.92\" cy=\"161.97\" r=\"1.87pt\" id=\"svg_08e96ccb-fb6a-4348-ade5-b42f94a74a2f_el_164\" clip-path=\"url(#svg_08e96ccb-fb6a-4348-ade5-b42f94a74a2f_cl_3)\" fill=\"#FF8C00\" fill-opacity=\"1\" stroke=\"none\" title=\"This female lives at Dream and was measured in 2009\"/>\n <circle cx=\"179.64\" cy=\"121.70\" r=\"1.87pt\" id=\"svg_08e96ccb-fb6a-4348-ade5-b42f94a74a2f_el_165\" clip-path=\"url(#svg_08e96ccb-fb6a-4348-ade5-b42f94a74a2f_cl_3)\" fill=\"#FF8C00\" fill-opacity=\"1\" stroke=\"none\" title=\"This male lives at Dream and was measured in 2009\"/>\n <polygon points=\"235.47,276.63 240.44,276.63 240.44,271.65 235.47,271.65\" id=\"svg_08e96ccb-fb6a-4348-ade5-b42f94a74a2f_el_166\" clip-path=\"url(#svg_08e96ccb-fb6a-4348-ade5-b42f94a74a2f_cl_3)\" fill=\"#008B8B\" fill-opacity=\"1\" stroke=\"none\" title=\"This female lives at Biscoe and was measured in 2007\"/>\n <polygon points=\"284.91,187.46 289.88,187.46 289.88,182.49 284.91,182.49\" id=\"svg_08e96ccb-fb6a-4348-ade5-b42f94a74a2f_el_167\" clip-path=\"url(#svg_08e96ccb-fb6a-4348-ade5-b42f94a74a2f_cl_3)\" fill=\"#008B8B\" fill-opacity=\"1\" stroke=\"none\" title=\"This male lives at Biscoe and was measured in 2007\"/>\n <polygon points=\"268.43,250.74 273.40,250.74 273.40,245.77 268.43,245.77\" id=\"svg_08e96ccb-fb6a-4348-ade5-b42f94a74a2f_el_168\" clip-path=\"url(#svg_08e96ccb-fb6a-4348-ade5-b42f94a74a2f_cl_3)\" fill=\"#008B8B\" fill-opacity=\"1\" stroke=\"none\" title=\"This female lives at Biscoe and was measured in 2007\"/>\n <polygon points=\"284.91,219.10 289.88,219.10 289.88,214.13 284.91,214.13\" id=\"svg_08e96ccb-fb6a-4348-ade5-b42f94a74a2f_el_169\" clip-path=\"url(#svg_08e96ccb-fb6a-4348-ade5-b42f94a74a2f_cl_3)\" fill=\"#008B8B\" fill-opacity=\"1\" stroke=\"none\" title=\"This male lives at Biscoe and was measured in 2007\"/>\n <polygon points=\"254.48,239.24 259.46,239.24 259.46,234.26 254.48,234.26\" id=\"svg_08e96ccb-fb6a-4348-ade5-b42f94a74a2f_el_170\" clip-path=\"url(#svg_08e96ccb-fb6a-4348-ade5-b42f94a74a2f_cl_3)\" fill=\"#008B8B\" fill-opacity=\"1\" stroke=\"none\" title=\"This male lives at Biscoe and was measured in 2007\"/>\n <polygon points=\"240.54,268.00 245.51,268.00 245.51,263.02 240.54,263.02\" id=\"svg_08e96ccb-fb6a-4348-ade5-b42f94a74a2f_el_171\" clip-path=\"url(#svg_08e96ccb-fb6a-4348-ade5-b42f94a74a2f_cl_3)\" fill=\"#008B8B\" fill-opacity=\"1\" stroke=\"none\" title=\"This female lives at Biscoe and was measured in 2007\"/>\n <polygon points=\"226.59,236.36 231.57,236.36 231.57,231.39 226.59,231.39\" id=\"svg_08e96ccb-fb6a-4348-ade5-b42f94a74a2f_el_172\" clip-path=\"url(#svg_08e96ccb-fb6a-4348-ade5-b42f94a74a2f_cl_3)\" fill=\"#008B8B\" fill-opacity=\"1\" stroke=\"none\" title=\"This female lives at Biscoe and was measured in 2007\"/>\n <polygon points=\"243.07,216.23 248.05,216.23 248.05,211.25 243.07,211.25\" id=\"svg_08e96ccb-fb6a-4348-ade5-b42f94a74a2f_el_173\" clip-path=\"url(#svg_08e96ccb-fb6a-4348-ade5-b42f94a74a2f_cl_3)\" fill=\"#008B8B\" fill-opacity=\"1\" stroke=\"none\" title=\"This male lives at Biscoe and was measured in 2007\"/>\n <polygon points=\"199.97,270.88 204.95,270.88 204.95,265.90 199.97,265.90\" id=\"svg_08e96ccb-fb6a-4348-ade5-b42f94a74a2f_el_174\" clip-path=\"url(#svg_08e96ccb-fb6a-4348-ade5-b42f94a74a2f_cl_3)\" fill=\"#008B8B\" fill-opacity=\"1\" stroke=\"none\" title=\"This female lives at Biscoe and was measured in 2007\"/>\n <polygon points=\"244.34,213.35 249.32,213.35 249.32,208.37 244.34,208.37\" id=\"svg_08e96ccb-fb6a-4348-ade5-b42f94a74a2f_el_175\" clip-path=\"url(#svg_08e96ccb-fb6a-4348-ade5-b42f94a74a2f_cl_3)\" fill=\"#008B8B\" fill-opacity=\"1\" stroke=\"none\" title=\"This male lives at Biscoe and was measured in 2007\"/>\n <polygon points=\"169.55,262.25 174.52,262.25 174.52,257.27 169.55,257.27\" id=\"svg_08e96ccb-fb6a-4348-ade5-b42f94a74a2f_el_176\" clip-path=\"url(#svg_08e96ccb-fb6a-4348-ade5-b42f94a74a2f_cl_3)\" fill=\"#008B8B\" fill-opacity=\"1\" stroke=\"none\" title=\"This female lives at Biscoe and was measured in 2007\"/>\n <polygon points=\"272.23,193.22 277.21,193.22 277.21,188.24 272.23,188.24\" id=\"svg_08e96ccb-fb6a-4348-ade5-b42f94a74a2f_el_177\" clip-path=\"url(#svg_08e96ccb-fb6a-4348-ade5-b42f94a74a2f_cl_3)\" fill=\"#008B8B\" fill-opacity=\"1\" stroke=\"none\" title=\"This male lives at Biscoe and was measured in 2007\"/>\n <polygon points=\"227.86,262.25 232.84,262.25 232.84,257.27 227.86,257.27\" id=\"svg_08e96ccb-fb6a-4348-ade5-b42f94a74a2f_el_178\" clip-path=\"url(#svg_08e96ccb-fb6a-4348-ade5-b42f94a74a2f_cl_3)\" fill=\"#008B8B\" fill-opacity=\"1\" stroke=\"none\" title=\"This female lives at Biscoe and was measured in 2007\"/>\n <polygon points=\"264.62,236.36 269.60,236.36 269.60,231.39 264.62,231.39\" id=\"svg_08e96ccb-fb6a-4348-ade5-b42f94a74a2f_el_179\" clip-path=\"url(#svg_08e96ccb-fb6a-4348-ade5-b42f94a74a2f_cl_3)\" fill=\"#008B8B\" fill-opacity=\"1\" stroke=\"none\" title=\"This male lives at Biscoe and was measured in 2007\"/>\n <polygon points=\"231.66,236.36 236.64,236.36 236.64,231.39 231.66,231.39\" id=\"svg_08e96ccb-fb6a-4348-ade5-b42f94a74a2f_el_180\" clip-path=\"url(#svg_08e96ccb-fb6a-4348-ade5-b42f94a74a2f_cl_3)\" fill=\"#008B8B\" fill-opacity=\"1\" stroke=\"none\" title=\"This female lives at Biscoe and was measured in 2007\"/>\n <polygon points=\"276.03,204.72 281.01,204.72 281.01,199.75 276.03,199.75\" id=\"svg_08e96ccb-fb6a-4348-ade5-b42f94a74a2f_el_181\" clip-path=\"url(#svg_08e96ccb-fb6a-4348-ade5-b42f94a74a2f_cl_3)\" fill=\"#008B8B\" fill-opacity=\"1\" stroke=\"none\" title=\"This male lives at Biscoe and was measured in 2007\"/>\n <polygon points=\"183.49,268.00 188.47,268.00 188.47,263.02 183.49,263.02\" id=\"svg_08e96ccb-fb6a-4348-ade5-b42f94a74a2f_el_182\" clip-path=\"url(#svg_08e96ccb-fb6a-4348-ade5-b42f94a74a2f_cl_3)\" fill=\"#008B8B\" fill-opacity=\"1\" stroke=\"none\" title=\"This female lives at Biscoe and was measured in 2007\"/>\n <polygon points=\"274.76,219.10 279.74,219.10 279.74,214.13 274.76,214.13\" id=\"svg_08e96ccb-fb6a-4348-ade5-b42f94a74a2f_el_183\" clip-path=\"url(#svg_08e96ccb-fb6a-4348-ade5-b42f94a74a2f_cl_3)\" fill=\"#008B8B\" fill-opacity=\"1\" stroke=\"none\" title=\"This male lives at Biscoe and was measured in 2007\"/>\n <polygon points=\"236.73,239.24 241.71,239.24 241.71,234.26 236.73,234.26\" id=\"svg_08e96ccb-fb6a-4348-ade5-b42f94a74a2f_el_184\" clip-path=\"url(#svg_08e96ccb-fb6a-4348-ade5-b42f94a74a2f_cl_3)\" fill=\"#008B8B\" fill-opacity=\"1\" stroke=\"none\" title=\"This female lives at Biscoe and was measured in 2007\"/>\n <polygon points=\"268.43,221.98 273.40,221.98 273.40,217.00 268.43,217.00\" id=\"svg_08e96ccb-fb6a-4348-ade5-b42f94a74a2f_el_185\" clip-path=\"url(#svg_08e96ccb-fb6a-4348-ade5-b42f94a74a2f_cl_3)\" fill=\"#008B8B\" fill-opacity=\"1\" stroke=\"none\" title=\"This male lives at Biscoe and was measured in 2007\"/>\n <polygon points=\"287.44,244.99 292.42,244.99 292.42,240.01 287.44,240.01\" id=\"svg_08e96ccb-fb6a-4348-ade5-b42f94a74a2f_el_186\" clip-path=\"url(#svg_08e96ccb-fb6a-4348-ade5-b42f94a74a2f_cl_3)\" fill=\"#008B8B\" fill-opacity=\"1\" stroke=\"none\" title=\"This male lives at Biscoe and was measured in 2007\"/>\n <polygon points=\"222.79,239.24 227.77,239.24 227.77,234.26 222.79,234.26\" id=\"svg_08e96ccb-fb6a-4348-ade5-b42f94a74a2f_el_187\" clip-path=\"url(#svg_08e96ccb-fb6a-4348-ade5-b42f94a74a2f_cl_3)\" fill=\"#008B8B\" fill-opacity=\"1\" stroke=\"none\" title=\"This female lives at Biscoe and was measured in 2007\"/>\n <polygon points=\"240.54,239.24 245.51,239.24 245.51,234.26 240.54,234.26\" id=\"svg_08e96ccb-fb6a-4348-ade5-b42f94a74a2f_el_188\" clip-path=\"url(#svg_08e96ccb-fb6a-4348-ade5-b42f94a74a2f_cl_3)\" fill=\"#008B8B\" fill-opacity=\"1\" stroke=\"none\" title=\"This female lives at Biscoe and was measured in 2007\"/>\n <polygon points=\"238.00,201.85 242.98,201.85 242.98,196.87 238.00,196.87\" id=\"svg_08e96ccb-fb6a-4348-ade5-b42f94a74a2f_el_189\" clip-path=\"url(#svg_08e96ccb-fb6a-4348-ade5-b42f94a74a2f_cl_3)\" fill=\"#008B8B\" fill-opacity=\"1\" stroke=\"none\" title=\"This male lives at Biscoe and was measured in 2007\"/>\n <polygon points=\"194.90,279.51 199.88,279.51 199.88,274.53 194.90,274.53\" id=\"svg_08e96ccb-fb6a-4348-ade5-b42f94a74a2f_el_190\" clip-path=\"url(#svg_08e96ccb-fb6a-4348-ade5-b42f94a74a2f_cl_3)\" fill=\"#008B8B\" fill-opacity=\"1\" stroke=\"none\" title=\"This female lives at Biscoe and was measured in 2007\"/>\n <polygon points=\"235.47,221.98 240.44,221.98 240.44,217.00 235.47,217.00\" id=\"svg_08e96ccb-fb6a-4348-ade5-b42f94a74a2f_el_191\" clip-path=\"url(#svg_08e96ccb-fb6a-4348-ade5-b42f94a74a2f_cl_3)\" fill=\"#008B8B\" fill-opacity=\"1\" stroke=\"none\" title=\"This male lives at Biscoe and was measured in 2007\"/>\n <polygon points=\"215.18,244.99 220.16,244.99 220.16,240.01 215.18,240.01\" id=\"svg_08e96ccb-fb6a-4348-ade5-b42f94a74a2f_el_192\" clip-path=\"url(#svg_08e96ccb-fb6a-4348-ade5-b42f94a74a2f_cl_3)\" fill=\"#008B8B\" fill-opacity=\"1\" stroke=\"none\" title=\"This NA lives at Biscoe and was measured in 2007\"/>\n <polygon points=\"257.02,224.86 261.99,224.86 261.99,219.88 257.02,219.88\" id=\"svg_08e96ccb-fb6a-4348-ade5-b42f94a74a2f_el_193\" clip-path=\"url(#svg_08e96ccb-fb6a-4348-ade5-b42f94a74a2f_cl_3)\" fill=\"#008B8B\" fill-opacity=\"1\" stroke=\"none\" title=\"This male lives at Biscoe and was measured in 2007\"/>\n <polygon points=\"262.09,244.99 267.06,244.99 267.06,240.01 262.09,240.01\" id=\"svg_08e96ccb-fb6a-4348-ade5-b42f94a74a2f_el_194\" clip-path=\"url(#svg_08e96ccb-fb6a-4348-ade5-b42f94a74a2f_cl_3)\" fill=\"#008B8B\" fill-opacity=\"1\" stroke=\"none\" title=\"This female lives at Biscoe and was measured in 2007\"/>\n <polygon points=\"284.91,216.23 289.88,216.23 289.88,211.25 284.91,211.25\" id=\"svg_08e96ccb-fb6a-4348-ade5-b42f94a74a2f_el_195\" clip-path=\"url(#svg_08e96ccb-fb6a-4348-ade5-b42f94a74a2f_cl_3)\" fill=\"#008B8B\" fill-opacity=\"1\" stroke=\"none\" title=\"This male lives at Biscoe and was measured in 2007\"/>\n <polygon points=\"250.68,216.23 255.66,216.23 255.66,211.25 250.68,211.25\" id=\"svg_08e96ccb-fb6a-4348-ade5-b42f94a74a2f_el_196\" clip-path=\"url(#svg_08e96ccb-fb6a-4348-ade5-b42f94a74a2f_cl_3)\" fill=\"#008B8B\" fill-opacity=\"1\" stroke=\"none\" title=\"This male lives at Biscoe and was measured in 2007\"/>\n <polygon points=\"193.63,247.87 198.61,247.87 198.61,242.89 193.63,242.89\" id=\"svg_08e96ccb-fb6a-4348-ade5-b42f94a74a2f_el_197\" clip-path=\"url(#svg_08e96ccb-fb6a-4348-ade5-b42f94a74a2f_cl_3)\" fill=\"#008B8B\" fill-opacity=\"1\" stroke=\"none\" title=\"This female lives at Biscoe and was measured in 2007\"/>\n <polygon points=\"222.79,239.24 227.77,239.24 227.77,234.26 222.79,234.26\" id=\"svg_08e96ccb-fb6a-4348-ade5-b42f94a74a2f_el_198\" clip-path=\"url(#svg_08e96ccb-fb6a-4348-ade5-b42f94a74a2f_cl_3)\" fill=\"#008B8B\" fill-opacity=\"1\" stroke=\"none\" title=\"This female lives at Biscoe and was measured in 2007\"/>\n <polygon points=\"406.60,167.33 411.58,167.33 411.58,162.35 406.60,162.35\" id=\"svg_08e96ccb-fb6a-4348-ade5-b42f94a74a2f_el_199\" clip-path=\"url(#svg_08e96ccb-fb6a-4348-ade5-b42f94a74a2f_cl_3)\" fill=\"#008B8B\" fill-opacity=\"1\" stroke=\"none\" title=\"This male lives at Biscoe and was measured in 2007\"/>\n <polygon points=\"273.50,230.61 278.47,230.61 278.47,225.63 273.50,225.63\" id=\"svg_08e96ccb-fb6a-4348-ade5-b42f94a74a2f_el_200\" clip-path=\"url(#svg_08e96ccb-fb6a-4348-ade5-b42f94a74a2f_cl_3)\" fill=\"#008B8B\" fill-opacity=\"1\" stroke=\"none\" title=\"This female lives at Biscoe and was measured in 2008\"/>\n <polygon points=\"264.62,187.46 269.60,187.46 269.60,182.49 264.62,182.49\" id=\"svg_08e96ccb-fb6a-4348-ade5-b42f94a74a2f_el_201\" clip-path=\"url(#svg_08e96ccb-fb6a-4348-ade5-b42f94a74a2f_cl_3)\" fill=\"#008B8B\" fill-opacity=\"1\" stroke=\"none\" title=\"This male lives at Biscoe and was measured in 2008\"/>\n <polygon points=\"191.10,262.25 196.08,262.25 196.08,257.27 191.10,257.27\" id=\"svg_08e96ccb-fb6a-4348-ade5-b42f94a74a2f_el_202\" clip-path=\"url(#svg_08e96ccb-fb6a-4348-ade5-b42f94a74a2f_cl_3)\" fill=\"#008B8B\" fill-opacity=\"1\" stroke=\"none\" title=\"This female lives at Biscoe and was measured in 2008\"/>\n <polygon points=\"213.92,158.70 218.89,158.70 218.89,153.72 213.92,153.72\" id=\"svg_08e96ccb-fb6a-4348-ade5-b42f94a74a2f_el_203\" clip-path=\"url(#svg_08e96ccb-fb6a-4348-ade5-b42f94a74a2f_cl_3)\" fill=\"#008B8B\" fill-opacity=\"1\" stroke=\"none\" title=\"This male lives at Biscoe and was measured in 2008\"/>\n <polygon points=\"208.85,265.12 213.82,265.12 213.82,260.15 208.85,260.15\" id=\"svg_08e96ccb-fb6a-4348-ade5-b42f94a74a2f_el_204\" clip-path=\"url(#svg_08e96ccb-fb6a-4348-ade5-b42f94a74a2f_cl_3)\" fill=\"#008B8B\" fill-opacity=\"1\" stroke=\"none\" title=\"This female lives at Biscoe and was measured in 2008\"/>\n <polygon points=\"268.43,204.72 273.40,204.72 273.40,199.75 268.43,199.75\" id=\"svg_08e96ccb-fb6a-4348-ade5-b42f94a74a2f_el_205\" clip-path=\"url(#svg_08e96ccb-fb6a-4348-ade5-b42f94a74a2f_cl_3)\" fill=\"#008B8B\" fill-opacity=\"1\" stroke=\"none\" title=\"This male lives at Biscoe and was measured in 2008\"/>\n <polygon points=\"192.37,262.25 197.34,262.25 197.34,257.27 192.37,257.27\" id=\"svg_08e96ccb-fb6a-4348-ade5-b42f94a74a2f_el_206\" clip-path=\"url(#svg_08e96ccb-fb6a-4348-ade5-b42f94a74a2f_cl_3)\" fill=\"#008B8B\" fill-opacity=\"1\" stroke=\"none\" title=\"This female lives at Biscoe and was measured in 2008\"/>\n <polygon points=\"279.84,196.09 284.81,196.09 284.81,191.12 279.84,191.12\" id=\"svg_08e96ccb-fb6a-4348-ade5-b42f94a74a2f_el_207\" clip-path=\"url(#svg_08e96ccb-fb6a-4348-ade5-b42f94a74a2f_cl_3)\" fill=\"#008B8B\" fill-opacity=\"1\" stroke=\"none\" title=\"This male lives at Biscoe and was measured in 2008\"/>\n <polygon points=\"225.33,262.25 230.30,262.25 230.30,257.27 225.33,257.27\" id=\"svg_08e96ccb-fb6a-4348-ade5-b42f94a74a2f_el_208\" clip-path=\"url(#svg_08e96ccb-fb6a-4348-ade5-b42f94a74a2f_cl_3)\" fill=\"#008B8B\" fill-opacity=\"1\" stroke=\"none\" title=\"This female lives at Biscoe and was measured in 2008\"/>\n <polygon points=\"279.84,224.86 284.81,224.86 284.81,219.88 279.84,219.88\" id=\"svg_08e96ccb-fb6a-4348-ade5-b42f94a74a2f_el_209\" clip-path=\"url(#svg_08e96ccb-fb6a-4348-ade5-b42f94a74a2f_cl_3)\" fill=\"#008B8B\" fill-opacity=\"1\" stroke=\"none\" title=\"This male lives at Biscoe and was measured in 2008\"/>\n <polygon points=\"291.24,198.97 296.22,198.97 296.22,193.99 291.24,193.99\" id=\"svg_08e96ccb-fb6a-4348-ade5-b42f94a74a2f_el_210\" clip-path=\"url(#svg_08e96ccb-fb6a-4348-ade5-b42f94a74a2f_cl_3)\" fill=\"#008B8B\" fill-opacity=\"1\" stroke=\"none\" title=\"This male lives at Biscoe and was measured in 2008\"/>\n <polygon points=\"203.78,256.50 208.75,256.50 208.75,251.52 203.78,251.52\" id=\"svg_08e96ccb-fb6a-4348-ade5-b42f94a74a2f_el_211\" clip-path=\"url(#svg_08e96ccb-fb6a-4348-ade5-b42f94a74a2f_cl_3)\" fill=\"#008B8B\" fill-opacity=\"1\" stroke=\"none\" title=\"This female lives at Biscoe and was measured in 2008\"/>\n <polygon points=\"227.86,256.50 232.84,256.50 232.84,251.52 227.86,251.52\" id=\"svg_08e96ccb-fb6a-4348-ade5-b42f94a74a2f_el_212\" clip-path=\"url(#svg_08e96ccb-fb6a-4348-ade5-b42f94a74a2f_cl_3)\" fill=\"#008B8B\" fill-opacity=\"1\" stroke=\"none\" title=\"This female lives at Biscoe and was measured in 2008\"/>\n <polygon points=\"291.24,198.97 296.22,198.97 296.22,193.99 291.24,193.99\" id=\"svg_08e96ccb-fb6a-4348-ade5-b42f94a74a2f_el_213\" clip-path=\"url(#svg_08e96ccb-fb6a-4348-ade5-b42f94a74a2f_cl_3)\" fill=\"#008B8B\" fill-opacity=\"1\" stroke=\"none\" title=\"This male lives at Biscoe and was measured in 2008\"/>\n <polygon points=\"220.25,273.75 225.23,273.75 225.23,268.78 220.25,268.78\" id=\"svg_08e96ccb-fb6a-4348-ade5-b42f94a74a2f_el_214\" clip-path=\"url(#svg_08e96ccb-fb6a-4348-ade5-b42f94a74a2f_cl_3)\" fill=\"#008B8B\" fill-opacity=\"1\" stroke=\"none\" title=\"This female lives at Biscoe and was measured in 2008\"/>\n <polygon points=\"224.06,201.85 229.03,201.85 229.03,196.87 224.06,196.87\" id=\"svg_08e96ccb-fb6a-4348-ade5-b42f94a74a2f_el_215\" clip-path=\"url(#svg_08e96ccb-fb6a-4348-ade5-b42f94a74a2f_cl_3)\" fill=\"#008B8B\" fill-opacity=\"1\" stroke=\"none\" title=\"This male lives at Biscoe and was measured in 2008\"/>\n <polygon points=\"241.81,247.87 246.78,247.87 246.78,242.89 241.81,242.89\" id=\"svg_08e96ccb-fb6a-4348-ade5-b42f94a74a2f_el_216\" clip-path=\"url(#svg_08e96ccb-fb6a-4348-ade5-b42f94a74a2f_cl_3)\" fill=\"#008B8B\" fill-opacity=\"1\" stroke=\"none\" title=\"This female lives at Biscoe and was measured in 2008\"/>\n <polygon points=\"265.89,250.74 270.87,250.74 270.87,245.77 265.89,245.77\" id=\"svg_08e96ccb-fb6a-4348-ade5-b42f94a74a2f_el_217\" clip-path=\"url(#svg_08e96ccb-fb6a-4348-ade5-b42f94a74a2f_cl_3)\" fill=\"#008B8B\" fill-opacity=\"1\" stroke=\"none\" title=\"This male lives at Biscoe and was measured in 2008\"/>\n <polygon points=\"222.79,242.11 227.77,242.11 227.77,237.14 222.79,237.14\" id=\"svg_08e96ccb-fb6a-4348-ade5-b42f94a74a2f_el_218\" clip-path=\"url(#svg_08e96ccb-fb6a-4348-ade5-b42f94a74a2f_cl_3)\" fill=\"#008B8B\" fill-opacity=\"1\" stroke=\"none\" title=\"This female lives at Biscoe and was measured in 2008\"/>\n <polygon points=\"286.17,224.86 291.15,224.86 291.15,219.88 286.17,219.88\" id=\"svg_08e96ccb-fb6a-4348-ade5-b42f94a74a2f_el_219\" clip-path=\"url(#svg_08e96ccb-fb6a-4348-ade5-b42f94a74a2f_cl_3)\" fill=\"#008B8B\" fill-opacity=\"1\" stroke=\"none\" title=\"This male lives at Biscoe and was measured in 2008\"/>\n <polygon points=\"240.54,242.11 245.51,242.11 245.51,237.14 240.54,237.14\" id=\"svg_08e96ccb-fb6a-4348-ade5-b42f94a74a2f_el_220\" clip-path=\"url(#svg_08e96ccb-fb6a-4348-ade5-b42f94a74a2f_cl_3)\" fill=\"#008B8B\" fill-opacity=\"1\" stroke=\"none\" title=\"This female lives at Biscoe and was measured in 2008\"/>\n <polygon points=\"221.52,213.35 226.50,213.35 226.50,208.37 221.52,208.37\" id=\"svg_08e96ccb-fb6a-4348-ade5-b42f94a74a2f_el_221\" clip-path=\"url(#svg_08e96ccb-fb6a-4348-ade5-b42f94a74a2f_cl_3)\" fill=\"#008B8B\" fill-opacity=\"1\" stroke=\"none\" title=\"This male lives at Biscoe and was measured in 2008\"/>\n <polygon points=\"206.31,256.50 211.29,256.50 211.29,251.52 206.31,251.52\" id=\"svg_08e96ccb-fb6a-4348-ade5-b42f94a74a2f_el_222\" clip-path=\"url(#svg_08e96ccb-fb6a-4348-ade5-b42f94a74a2f_cl_3)\" fill=\"#008B8B\" fill-opacity=\"1\" stroke=\"none\" title=\"This female lives at Biscoe and was measured in 2008\"/>\n <polygon points=\"227.86,224.86 232.84,224.86 232.84,219.88 227.86,219.88\" id=\"svg_08e96ccb-fb6a-4348-ade5-b42f94a74a2f_el_223\" clip-path=\"url(#svg_08e96ccb-fb6a-4348-ade5-b42f94a74a2f_cl_3)\" fill=\"#008B8B\" fill-opacity=\"1\" stroke=\"none\" title=\"This male lives at Biscoe and was measured in 2008\"/>\n <polygon points=\"198.70,239.24 203.68,239.24 203.68,234.26 198.70,234.26\" id=\"svg_08e96ccb-fb6a-4348-ade5-b42f94a74a2f_el_224\" clip-path=\"url(#svg_08e96ccb-fb6a-4348-ade5-b42f94a74a2f_cl_3)\" fill=\"#008B8B\" fill-opacity=\"1\" stroke=\"none\" title=\"This female lives at Biscoe and was measured in 2008\"/>\n <polygon points=\"289.98,216.23 294.95,216.23 294.95,211.25 289.98,211.25\" id=\"svg_08e96ccb-fb6a-4348-ade5-b42f94a74a2f_el_225\" clip-path=\"url(#svg_08e96ccb-fb6a-4348-ade5-b42f94a74a2f_cl_3)\" fill=\"#008B8B\" fill-opacity=\"1\" stroke=\"none\" title=\"This male lives at Biscoe and was measured in 2008\"/>\n <polygon points=\"225.33,259.37 230.30,259.37 230.30,254.40 225.33,254.40\" id=\"svg_08e96ccb-fb6a-4348-ade5-b42f94a74a2f_el_226\" clip-path=\"url(#svg_08e96ccb-fb6a-4348-ade5-b42f94a74a2f_cl_3)\" fill=\"#008B8B\" fill-opacity=\"1\" stroke=\"none\" title=\"This female lives at Biscoe and was measured in 2008\"/>\n <polygon points=\"236.73,227.73 241.71,227.73 241.71,222.76 236.73,222.76\" id=\"svg_08e96ccb-fb6a-4348-ade5-b42f94a74a2f_el_227\" clip-path=\"url(#svg_08e96ccb-fb6a-4348-ade5-b42f94a74a2f_cl_3)\" fill=\"#008B8B\" fill-opacity=\"1\" stroke=\"none\" title=\"This male lives at Biscoe and was measured in 2008\"/>\n <polygon points=\"230.40,256.50 235.37,256.50 235.37,251.52 230.40,251.52\" id=\"svg_08e96ccb-fb6a-4348-ade5-b42f94a74a2f_el_228\" clip-path=\"url(#svg_08e96ccb-fb6a-4348-ade5-b42f94a74a2f_cl_3)\" fill=\"#008B8B\" fill-opacity=\"1\" stroke=\"none\" title=\"This female lives at Biscoe and was measured in 2008\"/>\n <polygon points=\"339.42,204.72 344.39,204.72 344.39,199.75 339.42,199.75\" id=\"svg_08e96ccb-fb6a-4348-ade5-b42f94a74a2f_el_229\" clip-path=\"url(#svg_08e96ccb-fb6a-4348-ade5-b42f94a74a2f_cl_3)\" fill=\"#008B8B\" fill-opacity=\"1\" stroke=\"none\" title=\"This male lives at Biscoe and was measured in 2008\"/>\n <polygon points=\"231.66,247.87 236.64,247.87 236.64,242.89 231.66,242.89\" id=\"svg_08e96ccb-fb6a-4348-ade5-b42f94a74a2f_el_230\" clip-path=\"url(#svg_08e96ccb-fb6a-4348-ade5-b42f94a74a2f_cl_3)\" fill=\"#008B8B\" fill-opacity=\"1\" stroke=\"none\" title=\"This female lives at Biscoe and was measured in 2008\"/>\n <polygon points=\"282.37,173.08 287.35,173.08 287.35,168.11 282.37,168.11\" id=\"svg_08e96ccb-fb6a-4348-ade5-b42f94a74a2f_el_231\" clip-path=\"url(#svg_08e96ccb-fb6a-4348-ade5-b42f94a74a2f_cl_3)\" fill=\"#008B8B\" fill-opacity=\"1\" stroke=\"none\" title=\"This male lives at Biscoe and was measured in 2008\"/>\n <polygon points=\"236.73,242.11 241.71,242.11 241.71,237.14 236.73,237.14\" id=\"svg_08e96ccb-fb6a-4348-ade5-b42f94a74a2f_el_232\" clip-path=\"url(#svg_08e96ccb-fb6a-4348-ade5-b42f94a74a2f_cl_3)\" fill=\"#008B8B\" fill-opacity=\"1\" stroke=\"none\" title=\"This NA lives at Biscoe and was measured in 2008\"/>\n <polygon points=\"278.57,190.34 283.54,190.34 283.54,185.36 278.57,185.36\" id=\"svg_08e96ccb-fb6a-4348-ade5-b42f94a74a2f_el_233\" clip-path=\"url(#svg_08e96ccb-fb6a-4348-ade5-b42f94a74a2f_cl_3)\" fill=\"#008B8B\" fill-opacity=\"1\" stroke=\"none\" title=\"This male lives at Biscoe and was measured in 2008\"/>\n <polygon points=\"202.51,247.87 207.48,247.87 207.48,242.89 202.51,242.89\" id=\"svg_08e96ccb-fb6a-4348-ade5-b42f94a74a2f_el_234\" clip-path=\"url(#svg_08e96ccb-fb6a-4348-ade5-b42f94a74a2f_cl_3)\" fill=\"#008B8B\" fill-opacity=\"1\" stroke=\"none\" title=\"This female lives at Biscoe and was measured in 2008\"/>\n <polygon points=\"293.78,224.86 298.76,224.86 298.76,219.88 293.78,219.88\" id=\"svg_08e96ccb-fb6a-4348-ade5-b42f94a74a2f_el_235\" clip-path=\"url(#svg_08e96ccb-fb6a-4348-ade5-b42f94a74a2f_cl_3)\" fill=\"#008B8B\" fill-opacity=\"1\" stroke=\"none\" title=\"This male lives at Biscoe and was measured in 2008\"/>\n <polygon points=\"255.75,224.86 260.73,224.86 260.73,219.88 255.75,219.88\" id=\"svg_08e96ccb-fb6a-4348-ade5-b42f94a74a2f_el_236\" clip-path=\"url(#svg_08e96ccb-fb6a-4348-ade5-b42f94a74a2f_cl_3)\" fill=\"#008B8B\" fill-opacity=\"1\" stroke=\"none\" title=\"This female lives at Biscoe and was measured in 2008\"/>\n <polygon points=\"239.27,207.60 244.25,207.60 244.25,202.62 239.27,202.62\" id=\"svg_08e96ccb-fb6a-4348-ade5-b42f94a74a2f_el_237\" clip-path=\"url(#svg_08e96ccb-fb6a-4348-ade5-b42f94a74a2f_cl_3)\" fill=\"#008B8B\" fill-opacity=\"1\" stroke=\"none\" title=\"This male lives at Biscoe and was measured in 2008\"/>\n <polygon points=\"262.09,207.60 267.06,207.60 267.06,202.62 262.09,202.62\" id=\"svg_08e96ccb-fb6a-4348-ade5-b42f94a74a2f_el_238\" clip-path=\"url(#svg_08e96ccb-fb6a-4348-ade5-b42f94a74a2f_cl_3)\" fill=\"#008B8B\" fill-opacity=\"1\" stroke=\"none\" title=\"This male lives at Biscoe and was measured in 2008\"/>\n <polygon points=\"240.54,230.61 245.51,230.61 245.51,225.63 240.54,225.63\" id=\"svg_08e96ccb-fb6a-4348-ade5-b42f94a74a2f_el_239\" clip-path=\"url(#svg_08e96ccb-fb6a-4348-ade5-b42f94a74a2f_cl_3)\" fill=\"#008B8B\" fill-opacity=\"1\" stroke=\"none\" title=\"This female lives at Biscoe and was measured in 2008\"/>\n <polygon points=\"239.27,224.86 244.25,224.86 244.25,219.88 239.27,219.88\" id=\"svg_08e96ccb-fb6a-4348-ade5-b42f94a74a2f_el_240\" clip-path=\"url(#svg_08e96ccb-fb6a-4348-ade5-b42f94a74a2f_cl_3)\" fill=\"#008B8B\" fill-opacity=\"1\" stroke=\"none\" title=\"This female lives at Biscoe and was measured in 2008\"/>\n <polygon points=\"267.16,196.09 272.14,196.09 272.14,191.12 267.16,191.12\" id=\"svg_08e96ccb-fb6a-4348-ade5-b42f94a74a2f_el_241\" clip-path=\"url(#svg_08e96ccb-fb6a-4348-ade5-b42f94a74a2f_cl_3)\" fill=\"#008B8B\" fill-opacity=\"1\" stroke=\"none\" title=\"This male lives at Biscoe and was measured in 2008\"/>\n <polygon points=\"253.21,247.87 258.19,247.87 258.19,242.89 253.21,242.89\" id=\"svg_08e96ccb-fb6a-4348-ade5-b42f94a74a2f_el_242\" clip-path=\"url(#svg_08e96ccb-fb6a-4348-ade5-b42f94a74a2f_cl_3)\" fill=\"#008B8B\" fill-opacity=\"1\" stroke=\"none\" title=\"This female lives at Biscoe and was measured in 2008\"/>\n <polygon points=\"298.85,187.46 303.83,187.46 303.83,182.49 298.85,182.49\" id=\"svg_08e96ccb-fb6a-4348-ade5-b42f94a74a2f_el_243\" clip-path=\"url(#svg_08e96ccb-fb6a-4348-ade5-b42f94a74a2f_cl_3)\" fill=\"#008B8B\" fill-opacity=\"1\" stroke=\"none\" title=\"This male lives at Biscoe and was measured in 2008\"/>\n <polygon points=\"224.06,259.37 229.03,259.37 229.03,254.40 224.06,254.40\" id=\"svg_08e96ccb-fb6a-4348-ade5-b42f94a74a2f_el_244\" clip-path=\"url(#svg_08e96ccb-fb6a-4348-ade5-b42f94a74a2f_cl_3)\" fill=\"#008B8B\" fill-opacity=\"1\" stroke=\"none\" title=\"This female lives at Biscoe and was measured in 2008\"/>\n <polygon points=\"224.06,184.59 229.03,184.59 229.03,179.61 224.06,179.61\" id=\"svg_08e96ccb-fb6a-4348-ade5-b42f94a74a2f_el_245\" clip-path=\"url(#svg_08e96ccb-fb6a-4348-ade5-b42f94a74a2f_cl_3)\" fill=\"#008B8B\" fill-opacity=\"1\" stroke=\"none\" title=\"This male lives at Biscoe and was measured in 2008\"/>\n <polygon points=\"273.50,239.24 278.47,239.24 278.47,234.26 273.50,234.26\" id=\"svg_08e96ccb-fb6a-4348-ade5-b42f94a74a2f_el_246\" clip-path=\"url(#svg_08e96ccb-fb6a-4348-ade5-b42f94a74a2f_cl_3)\" fill=\"#008B8B\" fill-opacity=\"1\" stroke=\"none\" title=\"This female lives at Biscoe and was measured in 2009\"/>\n <polygon points=\"316.60,207.60 321.57,207.60 321.57,202.62 316.60,202.62\" id=\"svg_08e96ccb-fb6a-4348-ade5-b42f94a74a2f_el_247\" clip-path=\"url(#svg_08e96ccb-fb6a-4348-ade5-b42f94a74a2f_cl_3)\" fill=\"#008B8B\" fill-opacity=\"1\" stroke=\"none\" title=\"This male lives at Biscoe and was measured in 2009\"/>\n <polygon points=\"251.95,236.36 256.92,236.36 256.92,231.39 251.95,231.39\" id=\"svg_08e96ccb-fb6a-4348-ade5-b42f94a74a2f_el_248\" clip-path=\"url(#svg_08e96ccb-fb6a-4348-ade5-b42f94a74a2f_cl_3)\" fill=\"#008B8B\" fill-opacity=\"1\" stroke=\"none\" title=\"This female lives at Biscoe and was measured in 2009\"/>\n <polygon points=\"284.91,198.97 289.88,198.97 289.88,193.99 284.91,193.99\" id=\"svg_08e96ccb-fb6a-4348-ade5-b42f94a74a2f_el_249\" clip-path=\"url(#svg_08e96ccb-fb6a-4348-ade5-b42f94a74a2f_cl_3)\" fill=\"#008B8B\" fill-opacity=\"1\" stroke=\"none\" title=\"This male lives at Biscoe and was measured in 2009\"/>\n <polygon points=\"220.25,259.37 225.23,259.37 225.23,254.40 220.25,254.40\" id=\"svg_08e96ccb-fb6a-4348-ade5-b42f94a74a2f_el_250\" clip-path=\"url(#svg_08e96ccb-fb6a-4348-ade5-b42f94a74a2f_cl_3)\" fill=\"#008B8B\" fill-opacity=\"1\" stroke=\"none\" title=\"This female lives at Biscoe and was measured in 2009\"/>\n <polygon points=\"295.05,158.70 300.02,158.70 300.02,153.72 295.05,153.72\" id=\"svg_08e96ccb-fb6a-4348-ade5-b42f94a74a2f_el_251\" clip-path=\"url(#svg_08e96ccb-fb6a-4348-ade5-b42f94a74a2f_cl_3)\" fill=\"#008B8B\" fill-opacity=\"1\" stroke=\"none\" title=\"This male lives at Biscoe and was measured in 2009\"/>\n <polygon points=\"201.24,242.11 206.22,242.11 206.22,237.14 201.24,237.14\" id=\"svg_08e96ccb-fb6a-4348-ade5-b42f94a74a2f_el_252\" clip-path=\"url(#svg_08e96ccb-fb6a-4348-ade5-b42f94a74a2f_cl_3)\" fill=\"#008B8B\" fill-opacity=\"1\" stroke=\"none\" title=\"This female lives at Biscoe and was measured in 2009\"/>\n <polygon points=\"301.39,247.87 306.36,247.87 306.36,242.89 301.39,242.89\" id=\"svg_08e96ccb-fb6a-4348-ade5-b42f94a74a2f_el_253\" clip-path=\"url(#svg_08e96ccb-fb6a-4348-ade5-b42f94a74a2f_cl_3)\" fill=\"#008B8B\" fill-opacity=\"1\" stroke=\"none\" title=\"This male lives at Biscoe and was measured in 2009\"/>\n <polygon points=\"253.21,253.62 258.19,253.62 258.19,248.64 253.21,248.64\" id=\"svg_08e96ccb-fb6a-4348-ade5-b42f94a74a2f_el_254\" clip-path=\"url(#svg_08e96ccb-fb6a-4348-ade5-b42f94a74a2f_cl_3)\" fill=\"#008B8B\" fill-opacity=\"1\" stroke=\"none\" title=\"This female lives at Biscoe and was measured in 2009\"/>\n <polygon points=\"311.53,167.33 316.50,167.33 316.50,162.35 311.53,162.35\" id=\"svg_08e96ccb-fb6a-4348-ade5-b42f94a74a2f_el_255\" clip-path=\"url(#svg_08e96ccb-fb6a-4348-ade5-b42f94a74a2f_cl_3)\" fill=\"#008B8B\" fill-opacity=\"1\" stroke=\"none\" title=\"This male lives at Biscoe and was measured in 2009\"/>\n <polygon points=\"253.21,224.86 258.19,224.86 258.19,219.88 253.21,219.88\" id=\"svg_08e96ccb-fb6a-4348-ade5-b42f94a74a2f_el_256\" clip-path=\"url(#svg_08e96ccb-fb6a-4348-ade5-b42f94a74a2f_cl_3)\" fill=\"#008B8B\" fill-opacity=\"1\" stroke=\"none\" title=\"This female lives at Biscoe and was measured in 2009\"/>\n <polygon points=\"312.79,164.45 317.77,164.45 317.77,159.48 312.79,159.48\" id=\"svg_08e96ccb-fb6a-4348-ade5-b42f94a74a2f_el_257\" clip-path=\"url(#svg_08e96ccb-fb6a-4348-ade5-b42f94a74a2f_cl_3)\" fill=\"#008B8B\" fill-opacity=\"1\" stroke=\"none\" title=\"This male lives at Biscoe and was measured in 2009\"/>\n <polygon points=\"227.86,239.24 232.84,239.24 232.84,234.26 227.86,234.26\" id=\"svg_08e96ccb-fb6a-4348-ade5-b42f94a74a2f_el_258\" clip-path=\"url(#svg_08e96ccb-fb6a-4348-ade5-b42f94a74a2f_cl_3)\" fill=\"#008B8B\" fill-opacity=\"1\" stroke=\"none\" title=\"This female lives at Biscoe and was measured in 2009\"/>\n <polygon points=\"278.57,193.22 283.54,193.22 283.54,188.24 278.57,188.24\" id=\"svg_08e96ccb-fb6a-4348-ade5-b42f94a74a2f_el_259\" clip-path=\"url(#svg_08e96ccb-fb6a-4348-ade5-b42f94a74a2f_cl_3)\" fill=\"#008B8B\" fill-opacity=\"1\" stroke=\"none\" title=\"This male lives at Biscoe and was measured in 2009\"/>\n <polygon points=\"215.18,233.49 220.16,233.49 220.16,228.51 215.18,228.51\" id=\"svg_08e96ccb-fb6a-4348-ade5-b42f94a74a2f_el_260\" clip-path=\"url(#svg_08e96ccb-fb6a-4348-ade5-b42f94a74a2f_cl_3)\" fill=\"#008B8B\" fill-opacity=\"1\" stroke=\"none\" title=\"This female lives at Biscoe and was measured in 2009\"/>\n <polygon points=\"295.05,204.72 300.02,204.72 300.02,199.75 295.05,199.75\" id=\"svg_08e96ccb-fb6a-4348-ade5-b42f94a74a2f_el_261\" clip-path=\"url(#svg_08e96ccb-fb6a-4348-ade5-b42f94a74a2f_cl_3)\" fill=\"#008B8B\" fill-opacity=\"1\" stroke=\"none\" title=\"This male lives at Biscoe and was measured in 2009\"/>\n <polygon points=\"277.30,201.85 282.28,201.85 282.28,196.87 277.30,196.87\" id=\"svg_08e96ccb-fb6a-4348-ade5-b42f94a74a2f_el_262\" clip-path=\"url(#svg_08e96ccb-fb6a-4348-ade5-b42f94a74a2f_cl_3)\" fill=\"#008B8B\" fill-opacity=\"1\" stroke=\"none\" title=\"This male lives at Biscoe and was measured in 2009\"/>\n <polygon points=\"245.61,236.36 250.58,236.36 250.58,231.39 245.61,231.39\" id=\"svg_08e96ccb-fb6a-4348-ade5-b42f94a74a2f_el_263\" clip-path=\"url(#svg_08e96ccb-fb6a-4348-ade5-b42f94a74a2f_cl_3)\" fill=\"#008B8B\" fill-opacity=\"1\" stroke=\"none\" title=\"This female lives at Biscoe and was measured in 2009\"/>\n <polygon points=\"264.62,242.11 269.60,242.11 269.60,237.14 264.62,237.14\" id=\"svg_08e96ccb-fb6a-4348-ade5-b42f94a74a2f_el_264\" clip-path=\"url(#svg_08e96ccb-fb6a-4348-ade5-b42f94a74a2f_cl_3)\" fill=\"#008B8B\" fill-opacity=\"1\" stroke=\"none\" title=\"This female lives at Biscoe and was measured in 2009\"/>\n <polygon points=\"298.85,181.71 303.83,181.71 303.83,176.74 298.85,176.74\" id=\"svg_08e96ccb-fb6a-4348-ade5-b42f94a74a2f_el_265\" clip-path=\"url(#svg_08e96ccb-fb6a-4348-ade5-b42f94a74a2f_cl_3)\" fill=\"#008B8B\" fill-opacity=\"1\" stroke=\"none\" title=\"This male lives at Biscoe and was measured in 2009\"/>\n <polygon points=\"265.89,224.86 270.87,224.86 270.87,219.88 265.89,219.88\" id=\"svg_08e96ccb-fb6a-4348-ade5-b42f94a74a2f_el_266\" clip-path=\"url(#svg_08e96ccb-fb6a-4348-ade5-b42f94a74a2f_cl_3)\" fill=\"#008B8B\" fill-opacity=\"1\" stroke=\"none\" title=\"This female lives at Biscoe and was measured in 2009\"/>\n <polygon points=\"359.70,167.33 364.67,167.33 364.67,162.35 359.70,162.35\" id=\"svg_08e96ccb-fb6a-4348-ade5-b42f94a74a2f_el_267\" clip-path=\"url(#svg_08e96ccb-fb6a-4348-ade5-b42f94a74a2f_cl_3)\" fill=\"#008B8B\" fill-opacity=\"1\" stroke=\"none\" title=\"This male lives at Biscoe and was measured in 2009\"/>\n <polygon points=\"249.41,210.47 254.39,210.47 254.39,205.50 249.41,205.50\" id=\"svg_08e96ccb-fb6a-4348-ade5-b42f94a74a2f_el_268\" clip-path=\"url(#svg_08e96ccb-fb6a-4348-ade5-b42f94a74a2f_cl_3)\" fill=\"#008B8B\" fill-opacity=\"1\" stroke=\"none\" title=\"This female lives at Biscoe and was measured in 2009\"/>\n <polygon points=\"273.50,224.86 278.47,224.86 278.47,219.88 273.50,219.88\" id=\"svg_08e96ccb-fb6a-4348-ade5-b42f94a74a2f_el_269\" clip-path=\"url(#svg_08e96ccb-fb6a-4348-ade5-b42f94a74a2f_cl_3)\" fill=\"#008B8B\" fill-opacity=\"1\" stroke=\"none\" title=\"This male lives at Biscoe and was measured in 2009\"/>\n <polygon points=\"250.68,259.37 255.66,259.37 255.66,254.40 250.68,254.40\" id=\"svg_08e96ccb-fb6a-4348-ade5-b42f94a74a2f_el_270\" clip-path=\"url(#svg_08e96ccb-fb6a-4348-ade5-b42f94a74a2f_cl_3)\" fill=\"#008B8B\" fill-opacity=\"1\" stroke=\"none\" title=\"This NA lives at Biscoe and was measured in 2009\"/>\n <polygon points=\"244.34,193.22 249.32,193.22 249.32,188.24 244.34,188.24\" id=\"svg_08e96ccb-fb6a-4348-ade5-b42f94a74a2f_el_271\" clip-path=\"url(#svg_08e96ccb-fb6a-4348-ade5-b42f94a74a2f_cl_3)\" fill=\"#008B8B\" fill-opacity=\"1\" stroke=\"none\" title=\"This male lives at Biscoe and was measured in 2009\"/>\n <polygon points=\"179.69,233.49 184.67,233.49 184.67,228.51 179.69,228.51\" id=\"svg_08e96ccb-fb6a-4348-ade5-b42f94a74a2f_el_272\" clip-path=\"url(#svg_08e96ccb-fb6a-4348-ade5-b42f94a74a2f_cl_3)\" fill=\"#008B8B\" fill-opacity=\"1\" stroke=\"none\" title=\"This female lives at Biscoe and was measured in 2009\"/>\n <polygon points=\"328.01,201.85 332.98,201.85 332.98,196.87 328.01,196.87\" id=\"svg_08e96ccb-fb6a-4348-ade5-b42f94a74a2f_el_273\" clip-path=\"url(#svg_08e96ccb-fb6a-4348-ade5-b42f94a74a2f_cl_3)\" fill=\"#008B8B\" fill-opacity=\"1\" stroke=\"none\" title=\"This male lives at Biscoe and was measured in 2009\"/>\n <polygon points=\"199.97,253.62 204.95,253.62 204.95,248.64 199.97,248.64\" id=\"svg_08e96ccb-fb6a-4348-ade5-b42f94a74a2f_el_274\" clip-path=\"url(#svg_08e96ccb-fb6a-4348-ade5-b42f94a74a2f_cl_3)\" fill=\"#008B8B\" fill-opacity=\"1\" stroke=\"none\" title=\"This female lives at Biscoe and was measured in 2009\"/>\n <polygon points=\"260.82,221.98 265.80,221.98 265.80,217.00 260.82,217.00\" id=\"svg_08e96ccb-fb6a-4348-ade5-b42f94a74a2f_el_275\" clip-path=\"url(#svg_08e96ccb-fb6a-4348-ade5-b42f94a74a2f_cl_3)\" fill=\"#008B8B\" fill-opacity=\"1\" stroke=\"none\" title=\"This male lives at Biscoe and was measured in 2009\"/>\n <polygon points=\"291.24,219.10 296.22,219.10 296.22,214.13 291.24,214.13\" id=\"svg_08e96ccb-fb6a-4348-ade5-b42f94a74a2f_el_276\" clip-path=\"url(#svg_08e96ccb-fb6a-4348-ade5-b42f94a74a2f_cl_3)\" fill=\"#008B8B\" fill-opacity=\"1\" stroke=\"none\" title=\"This female lives at Biscoe and was measured in 2009\"/>\n <polygon points=\"282.37,198.97 287.35,198.97 287.35,193.99 282.37,193.99\" id=\"svg_08e96ccb-fb6a-4348-ade5-b42f94a74a2f_el_277\" clip-path=\"url(#svg_08e96ccb-fb6a-4348-ade5-b42f94a74a2f_cl_3)\" fill=\"#008B8B\" fill-opacity=\"1\" stroke=\"none\" title=\"This male lives at Biscoe and was measured in 2009\"/>\n <polygon points=\"202.51,219.10 207.48,219.10 207.48,214.13 202.51,214.13\" id=\"svg_08e96ccb-fb6a-4348-ade5-b42f94a74a2f_el_278\" clip-path=\"url(#svg_08e96ccb-fb6a-4348-ade5-b42f94a74a2f_cl_3)\" fill=\"#008B8B\" fill-opacity=\"1\" stroke=\"none\" title=\"This female lives at Biscoe and was measured in 2009\"/>\n <polygon points=\"303.92,187.46 308.90,187.46 308.90,182.49 303.92,182.49\" id=\"svg_08e96ccb-fb6a-4348-ade5-b42f94a74a2f_el_279\" clip-path=\"url(#svg_08e96ccb-fb6a-4348-ade5-b42f94a74a2f_cl_3)\" fill=\"#008B8B\" fill-opacity=\"1\" stroke=\"none\" title=\"This male lives at Biscoe and was measured in 2009\"/>\n <polygon points=\"236.73,250.74 241.71,250.74 241.71,245.77 236.73,245.77\" id=\"svg_08e96ccb-fb6a-4348-ade5-b42f94a74a2f_el_280\" clip-path=\"url(#svg_08e96ccb-fb6a-4348-ade5-b42f94a74a2f_cl_3)\" fill=\"#008B8B\" fill-opacity=\"1\" stroke=\"none\" title=\"This female lives at Biscoe and was measured in 2009\"/>\n <polygon points=\"349.56,196.09 354.53,196.09 354.53,191.12 349.56,191.12\" id=\"svg_08e96ccb-fb6a-4348-ade5-b42f94a74a2f_el_281\" clip-path=\"url(#svg_08e96ccb-fb6a-4348-ade5-b42f94a74a2f_cl_3)\" fill=\"#008B8B\" fill-opacity=\"1\" stroke=\"none\" title=\"This male lives at Biscoe and was measured in 2009\"/>\n <polygon points=\"215.18,204.72 220.16,204.72 220.16,199.75 215.18,199.75\" id=\"svg_08e96ccb-fb6a-4348-ade5-b42f94a74a2f_el_282\" clip-path=\"url(#svg_08e96ccb-fb6a-4348-ade5-b42f94a74a2f_cl_3)\" fill=\"#008B8B\" fill-opacity=\"1\" stroke=\"none\" title=\"This NA lives at Biscoe and was measured in 2009\"/>\n <polygon points=\"269.69,190.34 274.67,190.34 274.67,185.36 269.69,185.36\" id=\"svg_08e96ccb-fb6a-4348-ade5-b42f94a74a2f_el_283\" clip-path=\"url(#svg_08e96ccb-fb6a-4348-ade5-b42f94a74a2f_cl_3)\" fill=\"#008B8B\" fill-opacity=\"1\" stroke=\"none\" title=\"This male lives at Biscoe and was measured in 2009\"/>\n <polygon points=\"249.41,262.25 254.39,262.25 254.39,257.27 249.41,257.27\" id=\"svg_08e96ccb-fb6a-4348-ade5-b42f94a74a2f_el_284\" clip-path=\"url(#svg_08e96ccb-fb6a-4348-ade5-b42f94a74a2f_cl_3)\" fill=\"#008B8B\" fill-opacity=\"1\" stroke=\"none\" title=\"This female lives at Biscoe and was measured in 2009\"/>\n <polygon points=\"244.34,244.99 249.32,244.99 249.32,240.01 244.34,240.01\" id=\"svg_08e96ccb-fb6a-4348-ade5-b42f94a74a2f_el_285\" clip-path=\"url(#svg_08e96ccb-fb6a-4348-ade5-b42f94a74a2f_cl_3)\" fill=\"#008B8B\" fill-opacity=\"1\" stroke=\"none\" title=\"This female lives at Biscoe and was measured in 2009\"/>\n <polygon points=\"289.98,204.72 294.95,204.72 294.95,199.75 289.98,199.75\" id=\"svg_08e96ccb-fb6a-4348-ade5-b42f94a74a2f_el_286\" clip-path=\"url(#svg_08e96ccb-fb6a-4348-ade5-b42f94a74a2f_cl_3)\" fill=\"#008B8B\" fill-opacity=\"1\" stroke=\"none\" title=\"This male lives at Biscoe and was measured in 2009\"/>\n <polygon points=\"224.06,230.61 229.03,230.61 229.03,225.63 224.06,225.63\" id=\"svg_08e96ccb-fb6a-4348-ade5-b42f94a74a2f_el_287\" clip-path=\"url(#svg_08e96ccb-fb6a-4348-ade5-b42f94a74a2f_cl_3)\" fill=\"#008B8B\" fill-opacity=\"1\" stroke=\"none\" title=\"This female lives at Biscoe and was measured in 2009\"/>\n <polygon points=\"283.64,193.22 288.61,193.22 288.61,188.24 283.64,188.24\" id=\"svg_08e96ccb-fb6a-4348-ade5-b42f94a74a2f_el_288\" clip-path=\"url(#svg_08e96ccb-fb6a-4348-ade5-b42f94a74a2f_cl_3)\" fill=\"#008B8B\" fill-opacity=\"1\" stroke=\"none\" title=\"This male lives at Biscoe and was measured in 2009\"/>\n <polygon points=\"243.03,135.09 246.38,140.89 239.67,140.89\" id=\"svg_08e96ccb-fb6a-4348-ade5-b42f94a74a2f_el_289\" clip-path=\"url(#svg_08e96ccb-fb6a-4348-ade5-b42f94a74a2f_cl_3)\" fill=\"#9932CC\" fill-opacity=\"1\" stroke=\"none\" title=\"This female lives at Dream and was measured in 2007\"/>\n <polygon points=\"287.39,89.06 290.75,94.87 284.04,94.87\" id=\"svg_08e96ccb-fb6a-4348-ade5-b42f94a74a2f_el_290\" clip-path=\"url(#svg_08e96ccb-fb6a-4348-ade5-b42f94a74a2f_cl_3)\" fill=\"#9932CC\" fill-opacity=\"1\" stroke=\"none\" title=\"This male lives at Dream and was measured in 2007\"/>\n <polygon points=\"303.87,97.69 307.23,103.50 300.52,103.50\" id=\"svg_08e96ccb-fb6a-4348-ade5-b42f94a74a2f_el_291\" clip-path=\"url(#svg_08e96ccb-fb6a-4348-ade5-b42f94a74a2f_cl_3)\" fill=\"#9932CC\" fill-opacity=\"1\" stroke=\"none\" title=\"This male lives at Dream and was measured in 2007\"/>\n <polygon points=\"229.08,112.08 232.43,117.88 225.73,117.88\" id=\"svg_08e96ccb-fb6a-4348-ade5-b42f94a74a2f_el_292\" clip-path=\"url(#svg_08e96ccb-fb6a-4348-ade5-b42f94a74a2f_cl_3)\" fill=\"#9932CC\" fill-opacity=\"1\" stroke=\"none\" title=\"This female lives at Dream and was measured in 2007\"/>\n <polygon points=\"321.62,80.44 324.97,86.24 318.27,86.24\" id=\"svg_08e96ccb-fb6a-4348-ade5-b42f94a74a2f_el_293\" clip-path=\"url(#svg_08e96ccb-fb6a-4348-ade5-b42f94a74a2f_cl_3)\" fill=\"#9932CC\" fill-opacity=\"1\" stroke=\"none\" title=\"This male lives at Dream and was measured in 2007\"/>\n <polygon points=\"226.55,137.96 229.90,143.77 223.20,143.77\" id=\"svg_08e96ccb-fb6a-4348-ade5-b42f94a74a2f_el_294\" clip-path=\"url(#svg_08e96ccb-fb6a-4348-ade5-b42f94a74a2f_cl_3)\" fill=\"#9932CC\" fill-opacity=\"1\" stroke=\"none\" title=\"This female lives at Dream and was measured in 2007\"/>\n <polygon points=\"237.96,126.46 241.31,132.26 234.60,132.26\" id=\"svg_08e96ccb-fb6a-4348-ade5-b42f94a74a2f_el_295\" clip-path=\"url(#svg_08e96ccb-fb6a-4348-ade5-b42f94a74a2f_cl_3)\" fill=\"#9932CC\" fill-opacity=\"1\" stroke=\"none\" title=\"This female lives at Dream and was measured in 2007\"/>\n <polygon points=\"303.87,126.46 307.23,132.26 300.52,132.26\" id=\"svg_08e96ccb-fb6a-4348-ade5-b42f94a74a2f_el_296\" clip-path=\"url(#svg_08e96ccb-fb6a-4348-ade5-b42f94a74a2f_cl_3)\" fill=\"#9932CC\" fill-opacity=\"1\" stroke=\"none\" title=\"This male lives at Dream and was measured in 2007\"/>\n <polygon points=\"236.69,106.32 240.04,112.13 233.34,112.13\" id=\"svg_08e96ccb-fb6a-4348-ade5-b42f94a74a2f_el_297\" clip-path=\"url(#svg_08e96ccb-fb6a-4348-ade5-b42f94a74a2f_cl_3)\" fill=\"#9932CC\" fill-opacity=\"1\" stroke=\"none\" title=\"This female lives at Dream and was measured in 2007\"/>\n <polygon points=\"303.87,77.56 307.23,83.36 300.52,83.36\" id=\"svg_08e96ccb-fb6a-4348-ade5-b42f94a74a2f_el_298\" clip-path=\"url(#svg_08e96ccb-fb6a-4348-ade5-b42f94a74a2f_cl_3)\" fill=\"#9932CC\" fill-opacity=\"1\" stroke=\"none\" title=\"This male lives at Dream and was measured in 2007\"/>\n <polygon points=\"244.29,137.96 247.64,143.77 240.94,143.77\" id=\"svg_08e96ccb-fb6a-4348-ade5-b42f94a74a2f_el_299\" clip-path=\"url(#svg_08e96ccb-fb6a-4348-ade5-b42f94a74a2f_cl_3)\" fill=\"#9932CC\" fill-opacity=\"1\" stroke=\"none\" title=\"This female lives at Dream and was measured in 2007\"/>\n <polygon points=\"308.94,66.05 312.30,71.86 305.59,71.86\" id=\"svg_08e96ccb-fb6a-4348-ade5-b42f94a74a2f_el_300\" clip-path=\"url(#svg_08e96ccb-fb6a-4348-ade5-b42f94a74a2f_cl_3)\" fill=\"#9932CC\" fill-opacity=\"1\" stroke=\"none\" title=\"This male lives at Dream and was measured in 2007\"/>\n <polygon points=\"249.36,152.34 252.72,158.15 246.01,158.15\" id=\"svg_08e96ccb-fb6a-4348-ade5-b42f94a74a2f_el_301\" clip-path=\"url(#svg_08e96ccb-fb6a-4348-ade5-b42f94a74a2f_cl_3)\" fill=\"#9932CC\" fill-opacity=\"1\" stroke=\"none\" title=\"This female lives at Dream and was measured in 2007\"/>\n <polygon points=\"312.75,129.33 316.10,135.14 309.40,135.14\" id=\"svg_08e96ccb-fb6a-4348-ade5-b42f94a74a2f_el_302\" clip-path=\"url(#svg_08e96ccb-fb6a-4348-ade5-b42f94a74a2f_cl_3)\" fill=\"#9932CC\" fill-opacity=\"1\" stroke=\"none\" title=\"This male lives at Dream and was measured in 2007\"/>\n <polygon points=\"235.42,158.10 238.77,163.90 232.07,163.90\" id=\"svg_08e96ccb-fb6a-4348-ade5-b42f94a74a2f_el_303\" clip-path=\"url(#svg_08e96ccb-fb6a-4348-ade5-b42f94a74a2f_cl_3)\" fill=\"#9932CC\" fill-opacity=\"1\" stroke=\"none\" title=\"This female lives at Dream and was measured in 2007\"/>\n <polygon points=\"293.73,86.19 297.08,91.99 290.38,91.99\" id=\"svg_08e96ccb-fb6a-4348-ade5-b42f94a74a2f_el_304\" clip-path=\"url(#svg_08e96ccb-fb6a-4348-ade5-b42f94a74a2f_cl_3)\" fill=\"#9932CC\" fill-opacity=\"1\" stroke=\"none\" title=\"This male lives at Dream and was measured in 2007\"/>\n <polygon points=\"291.20,74.68 294.55,80.49 287.85,80.49\" id=\"svg_08e96ccb-fb6a-4348-ade5-b42f94a74a2f_el_305\" clip-path=\"url(#svg_08e96ccb-fb6a-4348-ade5-b42f94a74a2f_cl_3)\" fill=\"#9932CC\" fill-opacity=\"1\" stroke=\"none\" title=\"This male lives at Dream and was measured in 2007\"/>\n <polygon points=\"388.81,137.96 392.16,143.77 385.46,143.77\" id=\"svg_08e96ccb-fb6a-4348-ade5-b42f94a74a2f_el_306\" clip-path=\"url(#svg_08e96ccb-fb6a-4348-ade5-b42f94a74a2f_cl_3)\" fill=\"#9932CC\" fill-opacity=\"1\" stroke=\"none\" title=\"This female lives at Dream and was measured in 2007\"/>\n <polygon points=\"241.76,114.95 245.11,120.76 238.41,120.76\" id=\"svg_08e96ccb-fb6a-4348-ade5-b42f94a74a2f_el_307\" clip-path=\"url(#svg_08e96ccb-fb6a-4348-ade5-b42f94a74a2f_cl_3)\" fill=\"#9932CC\" fill-opacity=\"1\" stroke=\"none\" title=\"This female lives at Dream and was measured in 2007\"/>\n <polygon points=\"277.25,126.46 280.60,132.26 273.90,132.26\" id=\"svg_08e96ccb-fb6a-4348-ade5-b42f94a74a2f_el_308\" clip-path=\"url(#svg_08e96ccb-fb6a-4348-ade5-b42f94a74a2f_cl_3)\" fill=\"#9932CC\" fill-opacity=\"1\" stroke=\"none\" title=\"This male lives at Dream and was measured in 2007\"/>\n <polygon points=\"191.05,152.34 194.40,158.15 187.70,158.15\" id=\"svg_08e96ccb-fb6a-4348-ade5-b42f94a74a2f_el_309\" clip-path=\"url(#svg_08e96ccb-fb6a-4348-ade5-b42f94a74a2f_cl_3)\" fill=\"#9932CC\" fill-opacity=\"1\" stroke=\"none\" title=\"This female lives at Dream and was measured in 2007\"/>\n <polygon points=\"268.38,146.59 271.73,152.40 265.03,152.40\" id=\"svg_08e96ccb-fb6a-4348-ade5-b42f94a74a2f_el_310\" clip-path=\"url(#svg_08e96ccb-fb6a-4348-ade5-b42f94a74a2f_cl_3)\" fill=\"#9932CC\" fill-opacity=\"1\" stroke=\"none\" title=\"This male lives at Dream and was measured in 2007\"/>\n <polygon points=\"201.19,172.48 204.54,178.28 197.84,178.28\" id=\"svg_08e96ccb-fb6a-4348-ade5-b42f94a74a2f_el_311\" clip-path=\"url(#svg_08e96ccb-fb6a-4348-ade5-b42f94a74a2f_cl_3)\" fill=\"#9932CC\" fill-opacity=\"1\" stroke=\"none\" title=\"This female lives at Dream and was measured in 2007\"/>\n <polygon points=\"295.00,91.94 298.35,97.75 291.65,97.75\" id=\"svg_08e96ccb-fb6a-4348-ade5-b42f94a74a2f_el_312\" clip-path=\"url(#svg_08e96ccb-fb6a-4348-ade5-b42f94a74a2f_cl_3)\" fill=\"#9932CC\" fill-opacity=\"1\" stroke=\"none\" title=\"This male lives at Dream and was measured in 2007\"/>\n <polygon points=\"245.56,135.09 248.91,140.89 242.21,140.89\" id=\"svg_08e96ccb-fb6a-4348-ade5-b42f94a74a2f_el_313\" clip-path=\"url(#svg_08e96ccb-fb6a-4348-ade5-b42f94a74a2f_cl_3)\" fill=\"#9932CC\" fill-opacity=\"1\" stroke=\"none\" title=\"This female lives at Dream and was measured in 2007\"/>\n <polygon points=\"312.75,103.45 316.10,109.25 309.40,109.25\" id=\"svg_08e96ccb-fb6a-4348-ade5-b42f94a74a2f_el_314\" clip-path=\"url(#svg_08e96ccb-fb6a-4348-ade5-b42f94a74a2f_cl_3)\" fill=\"#9932CC\" fill-opacity=\"1\" stroke=\"none\" title=\"This male lives at Dream and was measured in 2007\"/>\n <polygon points=\"293.73,120.70 297.08,126.51 290.38,126.51\" id=\"svg_08e96ccb-fb6a-4348-ade5-b42f94a74a2f_el_315\" clip-path=\"url(#svg_08e96ccb-fb6a-4348-ade5-b42f94a74a2f_cl_3)\" fill=\"#9932CC\" fill-opacity=\"1\" stroke=\"none\" title=\"This female lives at Dream and was measured in 2008\"/>\n <polygon points=\"281.06,103.45 284.41,109.25 277.70,109.25\" id=\"svg_08e96ccb-fb6a-4348-ade5-b42f94a74a2f_el_316\" clip-path=\"url(#svg_08e96ccb-fb6a-4348-ade5-b42f94a74a2f_cl_3)\" fill=\"#9932CC\" fill-opacity=\"1\" stroke=\"none\" title=\"This male lives at Dream and was measured in 2008\"/>\n <polygon points=\"241.76,137.96 245.11,143.77 238.41,143.77\" id=\"svg_08e96ccb-fb6a-4348-ade5-b42f94a74a2f_el_317\" clip-path=\"url(#svg_08e96ccb-fb6a-4348-ade5-b42f94a74a2f_cl_3)\" fill=\"#9932CC\" fill-opacity=\"1\" stroke=\"none\" title=\"This female lives at Dream and was measured in 2008\"/>\n <polygon points=\"322.89,74.68 326.24,80.49 319.54,80.49\" id=\"svg_08e96ccb-fb6a-4348-ade5-b42f94a74a2f_el_318\" clip-path=\"url(#svg_08e96ccb-fb6a-4348-ade5-b42f94a74a2f_cl_3)\" fill=\"#9932CC\" fill-opacity=\"1\" stroke=\"none\" title=\"This male lives at Dream and was measured in 2008\"/>\n <polygon points=\"172.04,172.48 175.39,178.28 168.69,178.28\" id=\"svg_08e96ccb-fb6a-4348-ade5-b42f94a74a2f_el_319\" clip-path=\"url(#svg_08e96ccb-fb6a-4348-ade5-b42f94a74a2f_cl_3)\" fill=\"#9932CC\" fill-opacity=\"1\" stroke=\"none\" title=\"This female lives at Dream and was measured in 2008\"/>\n <polygon points=\"340.64,51.67 343.99,57.48 337.29,57.48\" id=\"svg_08e96ccb-fb6a-4348-ade5-b42f94a74a2f_el_320\" clip-path=\"url(#svg_08e96ccb-fb6a-4348-ade5-b42f94a74a2f_cl_3)\" fill=\"#9932CC\" fill-opacity=\"1\" stroke=\"none\" title=\"This male lives at Dream and was measured in 2008\"/>\n <polygon points=\"192.32,169.60 195.67,175.41 188.97,175.41\" id=\"svg_08e96ccb-fb6a-4348-ade5-b42f94a74a2f_el_321\" clip-path=\"url(#svg_08e96ccb-fb6a-4348-ade5-b42f94a74a2f_cl_3)\" fill=\"#9932CC\" fill-opacity=\"1\" stroke=\"none\" title=\"This female lives at Dream and was measured in 2008\"/>\n <polygon points=\"300.07,109.20 303.42,115.00 296.72,115.00\" id=\"svg_08e96ccb-fb6a-4348-ade5-b42f94a74a2f_el_322\" clip-path=\"url(#svg_08e96ccb-fb6a-4348-ade5-b42f94a74a2f_cl_3)\" fill=\"#9932CC\" fill-opacity=\"1\" stroke=\"none\" title=\"This male lives at Dream and was measured in 2008\"/>\n <polygon points=\"283.59,114.95 286.94,120.76 280.24,120.76\" id=\"svg_08e96ccb-fb6a-4348-ade5-b42f94a74a2f_el_323\" clip-path=\"url(#svg_08e96ccb-fb6a-4348-ade5-b42f94a74a2f_cl_3)\" fill=\"#9932CC\" fill-opacity=\"1\" stroke=\"none\" title=\"This male lives at Dream and was measured in 2008\"/>\n <polygon points=\"255.70,166.73 259.05,172.53 252.35,172.53\" id=\"svg_08e96ccb-fb6a-4348-ade5-b42f94a74a2f_el_324\" clip-path=\"url(#svg_08e96ccb-fb6a-4348-ade5-b42f94a74a2f_cl_3)\" fill=\"#9932CC\" fill-opacity=\"1\" stroke=\"none\" title=\"This female lives at Dream and was measured in 2008\"/>\n <polygon points=\"256.97,123.58 260.32,129.38 253.62,129.38\" id=\"svg_08e96ccb-fb6a-4348-ade5-b42f94a74a2f_el_325\" clip-path=\"url(#svg_08e96ccb-fb6a-4348-ade5-b42f94a74a2f_cl_3)\" fill=\"#9932CC\" fill-opacity=\"1\" stroke=\"none\" title=\"This female lives at Dream and was measured in 2008\"/>\n <polygon points=\"312.75,54.55 316.10,60.35 309.40,60.35\" id=\"svg_08e96ccb-fb6a-4348-ade5-b42f94a74a2f_el_326\" clip-path=\"url(#svg_08e96ccb-fb6a-4348-ade5-b42f94a74a2f_cl_3)\" fill=\"#9932CC\" fill-opacity=\"1\" stroke=\"none\" title=\"This male lives at Dream and was measured in 2008\"/>\n <polygon points=\"248.10,172.48 251.45,178.28 244.75,178.28\" id=\"svg_08e96ccb-fb6a-4348-ade5-b42f94a74a2f_el_327\" clip-path=\"url(#svg_08e96ccb-fb6a-4348-ade5-b42f94a74a2f_cl_3)\" fill=\"#9932CC\" fill-opacity=\"1\" stroke=\"none\" title=\"This female lives at Dream and was measured in 2008\"/>\n <polygon points=\"331.76,77.56 335.11,83.36 328.41,83.36\" id=\"svg_08e96ccb-fb6a-4348-ade5-b42f94a74a2f_el_328\" clip-path=\"url(#svg_08e96ccb-fb6a-4348-ade5-b42f94a74a2f_cl_3)\" fill=\"#9932CC\" fill-opacity=\"1\" stroke=\"none\" title=\"This male lives at Dream and was measured in 2008\"/>\n <polygon points=\"274.72,89.06 278.07,94.87 271.37,94.87\" id=\"svg_08e96ccb-fb6a-4348-ade5-b42f94a74a2f_el_329\" clip-path=\"url(#svg_08e96ccb-fb6a-4348-ade5-b42f94a74a2f_cl_3)\" fill=\"#9932CC\" fill-opacity=\"1\" stroke=\"none\" title=\"This male lives at Dream and was measured in 2008\"/>\n <polygon points=\"239.22,146.59 242.57,152.40 235.87,152.40\" id=\"svg_08e96ccb-fb6a-4348-ade5-b42f94a74a2f_el_330\" clip-path=\"url(#svg_08e96ccb-fb6a-4348-ade5-b42f94a74a2f_cl_3)\" fill=\"#9932CC\" fill-opacity=\"1\" stroke=\"none\" title=\"This female lives at Dream and was measured in 2008\"/>\n <polygon points=\"298.80,100.57 302.15,106.37 295.45,106.37\" id=\"svg_08e96ccb-fb6a-4348-ade5-b42f94a74a2f_el_331\" clip-path=\"url(#svg_08e96ccb-fb6a-4348-ade5-b42f94a74a2f_cl_3)\" fill=\"#9932CC\" fill-opacity=\"1\" stroke=\"none\" title=\"This male lives at Dream and was measured in 2008\"/>\n <polygon points=\"230.35,160.97 233.70,166.78 227.00,166.78\" id=\"svg_08e96ccb-fb6a-4348-ade5-b42f94a74a2f_el_332\" clip-path=\"url(#svg_08e96ccb-fb6a-4348-ade5-b42f94a74a2f_cl_3)\" fill=\"#9932CC\" fill-opacity=\"1\" stroke=\"none\" title=\"This female lives at Dream and was measured in 2008\"/>\n <polygon points=\"298.80,135.09 302.15,140.89 295.45,140.89\" id=\"svg_08e96ccb-fb6a-4348-ade5-b42f94a74a2f_el_333\" clip-path=\"url(#svg_08e96ccb-fb6a-4348-ade5-b42f94a74a2f_cl_3)\" fill=\"#9932CC\" fill-opacity=\"1\" stroke=\"none\" title=\"This female lives at Dream and was measured in 2009\"/>\n <polygon points=\"297.54,117.83 300.89,123.63 294.18,123.63\" id=\"svg_08e96ccb-fb6a-4348-ade5-b42f94a74a2f_el_334\" clip-path=\"url(#svg_08e96ccb-fb6a-4348-ade5-b42f94a74a2f_cl_3)\" fill=\"#9932CC\" fill-opacity=\"1\" stroke=\"none\" title=\"This male lives at Dream and was measured in 2009\"/>\n <polygon points=\"288.66,135.09 292.01,140.89 285.31,140.89\" id=\"svg_08e96ccb-fb6a-4348-ade5-b42f94a74a2f_el_335\" clip-path=\"url(#svg_08e96ccb-fb6a-4348-ade5-b42f94a74a2f_cl_3)\" fill=\"#9932CC\" fill-opacity=\"1\" stroke=\"none\" title=\"This female lives at Dream and was measured in 2009\"/>\n <polygon points=\"274.72,86.19 278.07,91.99 271.37,91.99\" id=\"svg_08e96ccb-fb6a-4348-ade5-b42f94a74a2f_el_336\" clip-path=\"url(#svg_08e96ccb-fb6a-4348-ade5-b42f94a74a2f_cl_3)\" fill=\"#9932CC\" fill-opacity=\"1\" stroke=\"none\" title=\"This male lives at Dream and was measured in 2009\"/>\n <polygon points=\"306.41,112.08 309.76,117.88 303.06,117.88\" id=\"svg_08e96ccb-fb6a-4348-ade5-b42f94a74a2f_el_337\" clip-path=\"url(#svg_08e96ccb-fb6a-4348-ade5-b42f94a74a2f_cl_3)\" fill=\"#9932CC\" fill-opacity=\"1\" stroke=\"none\" title=\"This male lives at Dream and was measured in 2009\"/>\n <polygon points=\"284.86,152.34 288.21,158.15 281.51,158.15\" id=\"svg_08e96ccb-fb6a-4348-ade5-b42f94a74a2f_el_338\" clip-path=\"url(#svg_08e96ccb-fb6a-4348-ade5-b42f94a74a2f_cl_3)\" fill=\"#9932CC\" fill-opacity=\"1\" stroke=\"none\" title=\"This female lives at Dream and was measured in 2009\"/>\n <polygon points=\"263.31,178.23 266.66,184.03 259.96,184.03\" id=\"svg_08e96ccb-fb6a-4348-ade5-b42f94a74a2f_el_339\" clip-path=\"url(#svg_08e96ccb-fb6a-4348-ade5-b42f94a74a2f_cl_3)\" fill=\"#9932CC\" fill-opacity=\"1\" stroke=\"none\" title=\"This female lives at Dream and was measured in 2009\"/>\n <polygon points=\"305.14,103.45 308.49,109.25 301.79,109.25\" id=\"svg_08e96ccb-fb6a-4348-ade5-b42f94a74a2f_el_340\" clip-path=\"url(#svg_08e96ccb-fb6a-4348-ade5-b42f94a74a2f_cl_3)\" fill=\"#9932CC\" fill-opacity=\"1\" stroke=\"none\" title=\"This male lives at Dream and was measured in 2009\"/>\n <polygon points=\"232.88,152.34 236.24,158.15 229.53,158.15\" id=\"svg_08e96ccb-fb6a-4348-ade5-b42f94a74a2f_el_341\" clip-path=\"url(#svg_08e96ccb-fb6a-4348-ade5-b42f94a74a2f_cl_3)\" fill=\"#9932CC\" fill-opacity=\"1\" stroke=\"none\" title=\"This female lives at Dream and was measured in 2009\"/>\n <polygon points=\"296.27,83.31 299.62,89.12 292.92,89.12\" id=\"svg_08e96ccb-fb6a-4348-ade5-b42f94a74a2f_el_342\" clip-path=\"url(#svg_08e96ccb-fb6a-4348-ade5-b42f94a74a2f_cl_3)\" fill=\"#9932CC\" fill-opacity=\"1\" stroke=\"none\" title=\"This male lives at Dream and was measured in 2009\"/>\n <polygon points=\"192.32,152.34 195.67,158.15 188.97,158.15\" id=\"svg_08e96ccb-fb6a-4348-ade5-b42f94a74a2f_el_343\" clip-path=\"url(#svg_08e96ccb-fb6a-4348-ade5-b42f94a74a2f_cl_3)\" fill=\"#9932CC\" fill-opacity=\"1\" stroke=\"none\" title=\"This female lives at Dream and was measured in 2009\"/>\n <polygon points=\"315.28,109.20 318.63,115.00 311.93,115.00\" id=\"svg_08e96ccb-fb6a-4348-ade5-b42f94a74a2f_el_344\" clip-path=\"url(#svg_08e96ccb-fb6a-4348-ade5-b42f94a74a2f_cl_3)\" fill=\"#9932CC\" fill-opacity=\"1\" stroke=\"none\" title=\"This male lives at Dream and was measured in 2009\"/>\n <polygon points=\"226.55,172.48 229.90,178.28 223.20,178.28\" id=\"svg_08e96ccb-fb6a-4348-ade5-b42f94a74a2f_el_345\" clip-path=\"url(#svg_08e96ccb-fb6a-4348-ade5-b42f94a74a2f_cl_3)\" fill=\"#9932CC\" fill-opacity=\"1\" stroke=\"none\" title=\"This female lives at Dream and was measured in 2009\"/>\n <polygon points=\"278.52,77.56 281.87,83.36 275.17,83.36\" id=\"svg_08e96ccb-fb6a-4348-ade5-b42f94a74a2f_el_346\" clip-path=\"url(#svg_08e96ccb-fb6a-4348-ade5-b42f94a74a2f_cl_3)\" fill=\"#9932CC\" fill-opacity=\"1\" stroke=\"none\" title=\"This male lives at Dream and was measured in 2009\"/>\n <polygon points=\"289.93,109.20 293.28,115.00 286.58,115.00\" id=\"svg_08e96ccb-fb6a-4348-ade5-b42f94a74a2f_el_347\" clip-path=\"url(#svg_08e96ccb-fb6a-4348-ade5-b42f94a74a2f_cl_3)\" fill=\"#9932CC\" fill-opacity=\"1\" stroke=\"none\" title=\"This male lives at Dream and was measured in 2009\"/>\n <polygon points=\"231.62,91.94 234.97,97.75 228.27,97.75\" id=\"svg_08e96ccb-fb6a-4348-ade5-b42f94a74a2f_el_348\" clip-path=\"url(#svg_08e96ccb-fb6a-4348-ade5-b42f94a74a2f_cl_3)\" fill=\"#9932CC\" fill-opacity=\"1\" stroke=\"none\" title=\"This female lives at Dream and was measured in 2009\"/>\n <polygon points=\"311.48,89.06 314.83,94.87 308.13,94.87\" id=\"svg_08e96ccb-fb6a-4348-ade5-b42f94a74a2f_el_349\" clip-path=\"url(#svg_08e96ccb-fb6a-4348-ade5-b42f94a74a2f_cl_3)\" fill=\"#9932CC\" fill-opacity=\"1\" stroke=\"none\" title=\"This male lives at Dream and was measured in 2009\"/>\n <polygon points=\"246.83,175.35 250.18,181.16 243.48,181.16\" id=\"svg_08e96ccb-fb6a-4348-ade5-b42f94a74a2f_el_350\" clip-path=\"url(#svg_08e96ccb-fb6a-4348-ade5-b42f94a74a2f_cl_3)\" fill=\"#9932CC\" fill-opacity=\"1\" stroke=\"none\" title=\"This female lives at Dream and was measured in 2009\"/>\n <polygon points=\"232.88,160.97 236.24,166.78 229.53,166.78\" id=\"svg_08e96ccb-fb6a-4348-ade5-b42f94a74a2f_el_351\" clip-path=\"url(#svg_08e96ccb-fb6a-4348-ade5-b42f94a74a2f_cl_3)\" fill=\"#9932CC\" fill-opacity=\"1\" stroke=\"none\" title=\"This female lives at Dream and was measured in 2009\"/>\n <polygon points=\"360.92,80.44 364.27,86.24 357.57,86.24\" id=\"svg_08e96ccb-fb6a-4348-ade5-b42f94a74a2f_el_352\" clip-path=\"url(#svg_08e96ccb-fb6a-4348-ade5-b42f94a74a2f_cl_3)\" fill=\"#9932CC\" fill-opacity=\"1\" stroke=\"none\" title=\"This male lives at Dream and was measured in 2009\"/>\n <polygon points=\"205.00,129.33 208.35,135.14 201.64,135.14\" id=\"svg_08e96ccb-fb6a-4348-ade5-b42f94a74a2f_el_353\" clip-path=\"url(#svg_08e96ccb-fb6a-4348-ade5-b42f94a74a2f_cl_3)\" fill=\"#9932CC\" fill-opacity=\"1\" stroke=\"none\" title=\"This female lives at Dream and was measured in 2009\"/>\n <polygon points=\"282.32,126.46 285.67,132.26 278.97,132.26\" id=\"svg_08e96ccb-fb6a-4348-ade5-b42f94a74a2f_el_354\" clip-path=\"url(#svg_08e96ccb-fb6a-4348-ade5-b42f94a74a2f_cl_3)\" fill=\"#9932CC\" fill-opacity=\"1\" stroke=\"none\" title=\"This male lives at Dream and was measured in 2009\"/>\n <polygon points=\"297.54,103.45 300.89,109.25 294.18,109.25\" id=\"svg_08e96ccb-fb6a-4348-ade5-b42f94a74a2f_el_355\" clip-path=\"url(#svg_08e96ccb-fb6a-4348-ade5-b42f94a74a2f_cl_3)\" fill=\"#9932CC\" fill-opacity=\"1\" stroke=\"none\" title=\"This male lives at Dream and was measured in 2009\"/>\n <polygon points=\"289.93,112.08 293.28,117.88 286.58,117.88\" id=\"svg_08e96ccb-fb6a-4348-ade5-b42f94a74a2f_el_356\" clip-path=\"url(#svg_08e96ccb-fb6a-4348-ade5-b42f94a74a2f_cl_3)\" fill=\"#9932CC\" fill-opacity=\"1\" stroke=\"none\" title=\"This female lives at Dream and was measured in 2009\"/>\n <polyline points=\"60.48,160.54 62.71,159.63 64.94,158.73 67.17,157.82 69.40,156.92 71.63,156.01 73.86,155.11 76.10,154.20 78.33,153.30 80.56,152.39 82.79,151.49 85.02,150.58 87.25,149.68 89.48,148.77 91.71,147.87 93.94,146.96 96.17,146.06 98.40,145.15 100.63,144.24 102.86,143.34 105.09,142.43 107.32,141.53 109.55,140.62 111.78,139.72 114.01,138.81 116.24,137.91 118.47,137.00 120.70,136.10 122.93,135.19 125.17,134.29 127.40,133.38 129.63,132.48 131.86,131.57 134.09,130.67 136.32,129.76 138.55,128.86 140.78,127.95 143.01,127.05 145.24,126.14 147.47,125.24 149.70,124.33 151.93,123.43 154.16,122.52 156.39,121.62 158.62,120.71 160.85,119.81 163.08,118.90 165.31,118.00 167.54,117.09 169.77,116.19 172.00,115.28 174.23,114.38 176.47,113.47 178.70,112.57 180.93,111.66 183.16,110.76 185.39,109.85 187.62,108.95 189.85,108.04 192.08,107.14 194.31,106.23 196.54,105.33 198.77,104.42 201.00,103.52 203.23,102.61 205.46,101.71 207.69,100.80 209.92,99.90 212.15,98.99 214.38,98.09 216.61,97.18 218.84,96.28 221.07,95.37 223.30,94.47 225.54,93.56 227.77,92.66 230.00,91.75 232.23,90.85 234.46,89.94 236.69,89.04\" id=\"svg_08e96ccb-fb6a-4348-ade5-b42f94a74a2f_el_357\" clip-path=\"url(#svg_08e96ccb-fb6a-4348-ade5-b42f94a74a2f_cl_3)\" fill=\"none\" stroke-width=\"2.13396\" stroke=\"#FF8C00\" stroke-opacity=\"1\" stroke-linejoin=\"round\" stroke-linecap=\"butt\"/>\n <polyline points=\"172.04,174.69 174.78,173.31 177.52,171.92 180.27,170.54 183.01,169.16 185.76,167.77 188.50,166.39 191.24,165.01 193.99,163.62 196.73,162.24 199.48,160.86 202.22,159.47 204.96,158.09 207.71,156.71 210.45,155.32 213.20,153.94 215.94,152.55 218.68,151.17 221.43,149.79 224.17,148.40 226.92,147.02 229.66,145.64 232.40,144.25 235.15,142.87 237.89,141.49 240.63,140.10 243.38,138.72 246.12,137.34 248.87,135.95 251.61,134.57 254.35,133.19 257.10,131.80 259.84,130.42 262.59,129.04 265.33,127.65 268.07,126.27 270.82,124.89 273.56,123.50 276.31,122.12 279.05,120.73 281.79,119.35 284.54,117.97 287.28,116.58 290.03,115.20 292.77,113.82 295.51,112.43 298.26,111.05 301.00,109.67 303.75,108.28 306.49,106.90 309.23,105.52 311.98,104.13 314.72,102.75 317.47,101.37 320.21,99.98 322.95,98.60 325.70,97.22 328.44,95.83 331.18,94.45 333.93,93.07 336.67,91.68 339.42,90.30 342.16,88.91 344.90,87.53 347.65,86.15 350.39,84.76 353.14,83.38 355.88,82.00 358.62,80.61 361.37,79.23 364.11,77.85 366.86,76.46 369.60,75.08 372.34,73.70 375.09,72.31 377.83,70.93 380.58,69.55 383.32,68.16 386.06,66.78 388.81,65.40\" id=\"svg_08e96ccb-fb6a-4348-ade5-b42f94a74a2f_el_358\" clip-path=\"url(#svg_08e96ccb-fb6a-4348-ade5-b42f94a74a2f_cl_3)\" fill=\"none\" stroke-width=\"2.13396\" stroke=\"#9932CC\" stroke-opacity=\"1\" stroke-linejoin=\"round\" stroke-linecap=\"butt\"/>\n <polyline points=\"172.04,261.80 175.04,260.40 178.04,259.01 181.04,257.61 184.04,256.22 187.04,254.82 190.04,253.43 193.04,252.04 196.04,250.64 199.04,249.25 202.04,247.85 205.04,246.46 208.04,245.06 211.05,243.67 214.05,242.27 217.05,240.88 220.05,239.48 223.05,238.09 226.05,236.69 229.05,235.30 232.05,233.90 235.05,232.51 238.05,231.12 241.05,229.72 244.05,228.33 247.05,226.93 250.05,225.54 253.05,224.14 256.06,222.75 259.06,221.35 262.06,219.96 265.06,218.56 268.06,217.17 271.06,215.77 274.06,214.38 277.06,212.98 280.06,211.59 283.06,210.20 286.06,208.80 289.06,207.41 292.06,206.01 295.06,204.62 298.07,203.22 301.07,201.83 304.07,200.43 307.07,199.04 310.07,197.64 313.07,196.25 316.07,194.85 319.07,193.46 322.07,192.06 325.07,190.67 328.07,189.28 331.07,187.88 334.07,186.49 337.07,185.09 340.07,183.70 343.08,182.30 346.08,180.91 349.08,179.51 352.08,178.12 355.08,176.72 358.08,175.33 361.08,173.93 364.08,172.54 367.08,171.14 370.08,169.75 373.08,168.35 376.08,166.96 379.08,165.57 382.08,164.17 385.08,162.78 388.09,161.38 391.09,159.99 394.09,158.59 397.09,157.20 400.09,155.80 403.09,154.41 406.09,153.01 409.09,151.62\" id=\"svg_08e96ccb-fb6a-4348-ade5-b42f94a74a2f_el_359\" clip-path=\"url(#svg_08e96ccb-fb6a-4348-ade5-b42f94a74a2f_cl_3)\" fill=\"none\" stroke-width=\"2.13396\" stroke=\"#008B8B\" stroke-opacity=\"1\" stroke-linejoin=\"round\" stroke-linecap=\"butt\"/>\n <defs>\n <clipPath id=\"svg_08e96ccb-fb6a-4348-ade5-b42f94a74a2f_cl_4\">\n <rect x=\"0.00\" y=\"0.00\" width=\"432.00\" height=\"360.00\"/>\n <\/clipPath>\n <\/defs>\n <g clip-path=\"url(#svg_08e96ccb-fb6a-4348-ade5-b42f94a74a2f_cl_4)\">\n <text x=\"18.53\" y=\"225.58\" id=\"svg_08e96ccb-fb6a-4348-ade5-b42f94a74a2f_el_360\" font-size=\"6.60pt\" fill=\"#4D4D4D\" fill-opacity=\"1\" font-family=\"DejaVu Sans\">15.0<\/text>\n <\/g>\n <g clip-path=\"url(#svg_08e96ccb-fb6a-4348-ade5-b42f94a74a2f_cl_4)\">\n <text x=\"18.53\" y=\"153.67\" id=\"svg_08e96ccb-fb6a-4348-ade5-b42f94a74a2f_el_361\" font-size=\"6.60pt\" fill=\"#4D4D4D\" fill-opacity=\"1\" font-family=\"DejaVu Sans\">17.5<\/text>\n <\/g>\n <g clip-path=\"url(#svg_08e96ccb-fb6a-4348-ade5-b42f94a74a2f_cl_4)\">\n <text x=\"18.53\" y=\"81.76\" id=\"svg_08e96ccb-fb6a-4348-ade5-b42f94a74a2f_el_362\" font-size=\"6.60pt\" fill=\"#4D4D4D\" fill-opacity=\"1\" font-family=\"DejaVu Sans\">20.0<\/text>\n <\/g>\n <g clip-path=\"url(#svg_08e96ccb-fb6a-4348-ade5-b42f94a74a2f_cl_4)\">\n <text x=\"155.03\" y=\"300.45\" id=\"svg_08e96ccb-fb6a-4348-ade5-b42f94a74a2f_el_363\" font-size=\"6.60pt\" fill=\"#4D4D4D\" fill-opacity=\"1\" font-family=\"DejaVu Sans\">40<\/text>\n <\/g>\n <g clip-path=\"url(#svg_08e96ccb-fb6a-4348-ade5-b42f94a74a2f_cl_4)\">\n <text x=\"281.80\" y=\"300.45\" id=\"svg_08e96ccb-fb6a-4348-ade5-b42f94a74a2f_el_364\" font-size=\"6.60pt\" fill=\"#4D4D4D\" fill-opacity=\"1\" font-family=\"DejaVu Sans\">50<\/text>\n <\/g>\n <g clip-path=\"url(#svg_08e96ccb-fb6a-4348-ade5-b42f94a74a2f_cl_4)\">\n <text x=\"408.56\" y=\"300.45\" id=\"svg_08e96ccb-fb6a-4348-ade5-b42f94a74a2f_el_365\" font-size=\"6.60pt\" fill=\"#4D4D4D\" fill-opacity=\"1\" font-family=\"DejaVu Sans\">60<\/text>\n <\/g>\n <g clip-path=\"url(#svg_08e96ccb-fb6a-4348-ade5-b42f94a74a2f_cl_4)\">\n <text x=\"190.68\" y=\"313.03\" id=\"svg_08e96ccb-fb6a-4348-ade5-b42f94a74a2f_el_366\" font-size=\"8.25pt\" font-family=\"DejaVu Sans\">bill length (mm)<\/text>\n <\/g>\n <g clip-path=\"url(#svg_08e96ccb-fb6a-4348-ade5-b42f94a74a2f_cl_4)\">\n <text transform=\"translate(13.50,198.80) rotate(-90)\" id=\"svg_08e96ccb-fb6a-4348-ade5-b42f94a74a2f_el_367\" font-size=\"8.25pt\" font-family=\"DejaVu Sans\">bill depth (mm)<\/text>\n <\/g>\n <g clip-path=\"url(#svg_08e96ccb-fb6a-4348-ade5-b42f94a74a2f_cl_4)\">\n <text x=\"121.02\" y=\"344.41\" id=\"svg_08e96ccb-fb6a-4348-ade5-b42f94a74a2f_el_368\" font-size=\"8.25pt\" font-family=\"DejaVu Sans\">species<\/text>\n <\/g>\n <circle cx=\"176.22\" cy=\"340.40\" r=\"1.87pt\" id=\"svg_08e96ccb-fb6a-4348-ade5-b42f94a74a2f_el_369\" clip-path=\"url(#svg_08e96ccb-fb6a-4348-ade5-b42f94a74a2f_cl_4)\" fill=\"#FF8C00\" fill-opacity=\"1\" stroke=\"none\"/>\n <line x1=\"169.31\" y1=\"340.40\" x2=\"183.14\" y2=\"340.40\" id=\"svg_08e96ccb-fb6a-4348-ade5-b42f94a74a2f_el_370\" clip-path=\"url(#svg_08e96ccb-fb6a-4348-ade5-b42f94a74a2f_cl_4)\" stroke-width=\"2.13396\" stroke=\"#FF8C00\" stroke-opacity=\"1\" stroke-linejoin=\"round\" stroke-linecap=\"butt\" fill=\"#FF8C00\" fill-opacity=\"1\"/>\n <polygon points=\"231.79,336.53 235.14,342.34 228.44,342.34\" id=\"svg_08e96ccb-fb6a-4348-ade5-b42f94a74a2f_el_371\" clip-path=\"url(#svg_08e96ccb-fb6a-4348-ade5-b42f94a74a2f_cl_4)\" fill=\"#9932CC\" fill-opacity=\"1\" stroke=\"none\"/>\n <line x1=\"224.88\" y1=\"340.40\" x2=\"238.70\" y2=\"340.40\" id=\"svg_08e96ccb-fb6a-4348-ade5-b42f94a74a2f_el_372\" clip-path=\"url(#svg_08e96ccb-fb6a-4348-ade5-b42f94a74a2f_cl_4)\" stroke-width=\"2.13396\" stroke=\"#9932CC\" stroke-opacity=\"1\" stroke-linejoin=\"round\" stroke-linecap=\"butt\" fill=\"#9932CC\" fill-opacity=\"1\"/>\n <polygon points=\"299.91,342.89 304.89,342.89 304.89,337.91 299.91,337.91\" id=\"svg_08e96ccb-fb6a-4348-ade5-b42f94a74a2f_el_373\" clip-path=\"url(#svg_08e96ccb-fb6a-4348-ade5-b42f94a74a2f_cl_4)\" fill=\"#008B8B\" fill-opacity=\"1\" stroke=\"none\"/>\n <line x1=\"295.49\" y1=\"340.40\" x2=\"309.31\" y2=\"340.40\" id=\"svg_08e96ccb-fb6a-4348-ade5-b42f94a74a2f_el_374\" clip-path=\"url(#svg_08e96ccb-fb6a-4348-ade5-b42f94a74a2f_cl_4)\" stroke-width=\"2.13396\" stroke=\"#008B8B\" stroke-opacity=\"1\" stroke-linejoin=\"round\" stroke-linecap=\"butt\" fill=\"#008B8B\" fill-opacity=\"1\"/>\n <g clip-path=\"url(#svg_08e96ccb-fb6a-4348-ade5-b42f94a74a2f_cl_4)\">\n <text x=\"190.34\" y=\"343.61\" id=\"svg_08e96ccb-fb6a-4348-ade5-b42f94a74a2f_el_375\" font-size=\"6.60pt\" font-family=\"DejaVu Sans\">Adelie<\/text>\n <\/g>\n <g clip-path=\"url(#svg_08e96ccb-fb6a-4348-ade5-b42f94a74a2f_cl_4)\">\n <text x=\"245.91\" y=\"343.61\" id=\"svg_08e96ccb-fb6a-4348-ade5-b42f94a74a2f_el_376\" font-size=\"6.60pt\" font-family=\"DejaVu Sans\">Chinstrap<\/text>\n <\/g>\n <g clip-path=\"url(#svg_08e96ccb-fb6a-4348-ade5-b42f94a74a2f_cl_4)\">\n <text x=\"316.52\" y=\"343.61\" id=\"svg_08e96ccb-fb6a-4348-ade5-b42f94a74a2f_el_377\" font-size=\"6.60pt\" font-family=\"DejaVu Sans\">Gentoo<\/text>\n <\/g>\n <g clip-path=\"url(#svg_08e96ccb-fb6a-4348-ade5-b42f94a74a2f_cl_4)\">\n <text x=\"43.05\" y=\"15.10\" id=\"svg_08e96ccb-fb6a-4348-ade5-b42f94a74a2f_el_378\" font-size=\"9.90pt\" font-weight=\"bold\" font-family=\"DejaVu Sans\">Penguin species differentation<\/text>\n <\/g>\n <\/g>\n<\/svg>\n","js":null,"uid":"svg_08e96ccb-fb6a-4348-ade5-b42f94a74a2f","ratio":1.2,"settings":{"tooltip":{"css":" .tooltip_SVGID_ { padding:5px;background:black;color:white;border-radius:2px 2px 2px 2px ; position:absolute;pointer-events:none;z-index:999;}\n","offx":10,"offy":0,"use_cursor_pos":true,"opacity":0.9,"usefill":false,"usestroke":false,"delay":{"over":200,"out":500}},"hover":{"css":" .hover_SVGID_ { fill:orange;stroke:gray; }\n"},"hoverkey":{"css":" .hover_key_SVGID_ { stroke:red; }\n"},"hovertheme":{"css":" .hover_theme_SVGID_ { fill:green; }\n"},"zoom":{"min":1,"max":1},"capture":{"css":" .selected_SVGID_ { fill:red;stroke:gray; }\n","type":"multiple","only_shiny":true,"selected":[]},"capturekey":{"css":" .selected_key_SVGID_ { stroke:gray; }\n","type":"single","only_shiny":true,"selected":[]},"capturetheme":{"css":" .selected_theme_SVGID_ { stroke:gray; }\n","type":"single","only_shiny":true,"selected":[]},"toolbar":{"position":"topright","saveaspng":true},"sizing":{"rescale":true,"width":1}}},"evals":[],"jsHooks":[]}</script> ] <style> .panel1-ggiraph_test-user { color: black; width: 38.6060606060606%; hight: 32%; float: left; padding-left: 1%; font-size: 50% } .panel2-ggiraph_test-user { color: black; width: 59.3939393939394%; hight: 32%; float: left; padding-left: 1%; font-size: 50% } .panel3-ggiraph_test-user { color: black; width: NA%; hight: 33%; float: left; padding-left: 1%; font-size: 50% } </style> --- <div style="float: right; position: fixed; right: 10px; top: 10px;"> <img style="float: right; position: relative;" src="plotly.png" alt="plotly"/><br> </div> ## ggplotly - [Plotly + ggplot2](https://plotly.com/ggplot2/) --- count: false .panel1-ggplotly_test-user[ ```r *penguins_int_plot <- ggplot( * data = penguins_int #<< * ) + * aes(x = bill_length_mm, * y = bill_depth_mm, * text = hover_text) + #<< * geom_point( * aes(color = species, * shape = species), * size = 2) + * scale_color_manual( * values = c( * "darkorange", * "darkorchid", * "cyan4")) + * labs(title = * "Penguin species differentation") + * xlab("bill length (mm)") + * ylab("bill depth (mm)") + * theme_minimal() + * theme(plot.title = * element_text(face = "bold")) ``` ] .panel2-ggplotly_test-user[ ] --- count: false .panel1-ggplotly_test-user[ ```r penguins_int_plot <- ggplot( * data = penguins_int ) + aes(x = bill_length_mm, y = bill_depth_mm, * text = hover_text) + geom_point( aes(color = species, shape = species), size = 2) + scale_color_manual( values = c( "darkorange", "darkorchid", "cyan4")) + labs(title = "Penguin species differentation") + xlab("bill length (mm)") + ylab("bill depth (mm)") + theme_minimal() + theme(plot.title = element_text(face = "bold")) *plotly::ggplotly( #<< * penguins_int_plot, #<< * tooltip = "text") ``` ] .panel2-ggplotly_test-user[ <div id="htmlwidget-2cda5c68e213695e4eea" style="width:504px;height:504px;" class="plotly html-widget"></div> <script type="application/json" data-for="htmlwidget-2cda5c68e213695e4eea">{"x":{"data":[{"x":[39.1,39.5,40.3,null,36.7,39.3,38.9,39.2,34.1,42,37.8,37.8,41.1,38.6,34.6,36.6,38.7,42.5,34.4,46,37.8,37.7,35.9,38.2,38.8,35.3,40.6,40.5,37.9,40.5,39.5,37.2,39.5,40.9,36.4,39.2,38.8,42.2,37.6,39.8,36.5,40.8,36,44.1,37,39.6,41.1,37.5,36,42.3,39.6,40.1,35,42,34.5,41.4,39,40.6,36.5,37.6,35.7,41.3,37.6,41.1,36.4,41.6,35.5,41.1,35.9,41.8,33.5,39.7,39.6,45.8,35.5,42.8,40.9,37.2,36.2,42.1,34.6,42.9,36.7,35.1,37.3,41.3,36.3,36.9,38.3,38.9,35.7,41.1,34,39.6,36.2,40.8,38.1,40.3,33.1,43.2,35,41,37.7,37.8,37.9,39.7,38.6,38.2,38.1,43.2,38.1,45.6,39.7,42.2,39.6,42.7,38.6,37.3,35.7,41.1,36.2,37.7,40.2,41.4,35.2,40.6,38.8,41.5,39,44.1,38.5,43.1,36.8,37.5,38.1,41.1,35.6,40.2,37,39.7,40.2,40.6,32.1,40.7,37.3,39,39.2,36.6,36,37.8,36,41.5],"y":[18.7,17.4,18,null,19.3,20.6,17.8,19.6,18.1,20.2,17.1,17.3,17.6,21.2,21.1,17.8,19,20.7,18.4,21.5,18.3,18.7,19.2,18.1,17.2,18.9,18.6,17.9,18.6,18.9,16.7,18.1,17.8,18.9,17,21.1,20,18.5,19.3,19.1,18,18.4,18.5,19.7,16.9,18.8,19,18.9,17.9,21.2,17.7,18.9,17.9,19.5,18.1,18.6,17.5,18.8,16.6,19.1,16.9,21.1,17,18.2,17.1,18,16.2,19.1,16.6,19.4,19,18.4,17.2,18.9,17.5,18.5,16.8,19.4,16.1,19.1,17.2,17.6,18.8,19.4,17.8,20.3,19.5,18.6,19.2,18.8,18,18.1,17.1,18.1,17.3,18.9,18.6,18.5,16.1,18.5,17.9,20,16,20,18.6,18.9,17.2,20,17,19,16.5,20.3,17.7,19.5,20.7,18.3,17,20.5,17,18.6,17.2,19.8,17,18.5,15.9,19,17.6,18.3,17.1,18,17.9,19.2,18.5,18.5,17.6,17.5,17.5,20.1,16.5,17.9,17.1,17.2,15.5,17,16.8,18.7,18.6,18.4,17.8,18.1,17.1,18.5],"text":["This male lives at Torgersen and was measured in 2007","This female lives at Torgersen and was measured in 2007","This female lives at Torgersen and was measured in 2007","This NA lives at Torgersen and was measured in 2007","This female lives at Torgersen and was measured in 2007","This male lives at Torgersen and was measured in 2007","This female lives at Torgersen and was measured in 2007","This male lives at Torgersen and was measured in 2007","This NA lives at Torgersen and was measured in 2007","This NA lives at Torgersen and was measured in 2007","This NA lives at Torgersen and was measured in 2007","This NA lives at Torgersen and was measured in 2007","This female lives at Torgersen and was measured in 2007","This male lives at Torgersen and was measured in 2007","This male lives at Torgersen and was measured in 2007","This female lives at Torgersen and was measured in 2007","This female lives at Torgersen and was measured in 2007","This male lives at Torgersen and was measured in 2007","This female lives at Torgersen and was measured in 2007","This male lives at Torgersen and was measured in 2007","This female lives at Biscoe and was measured in 2007","This male lives at Biscoe and was measured in 2007","This female lives at Biscoe and was measured in 2007","This male lives at Biscoe and was measured in 2007","This male lives at Biscoe and was measured in 2007","This female lives at Biscoe and was measured in 2007","This male lives at Biscoe and was measured in 2007","This female lives at Biscoe and was measured in 2007","This female lives at Biscoe and was measured in 2007","This male lives at Biscoe and was measured in 2007","This female lives at Dream and was measured in 2007","This male lives at Dream and was measured in 2007","This female lives at Dream and was measured in 2007","This male lives at Dream and was measured in 2007","This female lives at Dream and was measured in 2007","This male lives at Dream and was measured in 2007","This male lives at Dream and was measured in 2007","This female lives at Dream and was measured in 2007","This female lives at Dream and was measured in 2007","This male lives at Dream and was measured in 2007","This female lives at Dream and was measured in 2007","This male lives at Dream and was measured in 2007","This female lives at Dream and was measured in 2007","This male lives at Dream and was measured in 2007","This female lives at Dream and was measured in 2007","This male lives at Dream and was measured in 2007","This male lives at Dream and was measured in 2007","This NA lives at Dream and was measured in 2007","This female lives at Dream and was measured in 2007","This male lives at Dream and was measured in 2007","This female lives at Biscoe and was measured in 2008","This male lives at Biscoe and was measured in 2008","This female lives at Biscoe and was measured in 2008","This male lives at Biscoe and was measured in 2008","This female lives at Biscoe and was measured in 2008","This male lives at Biscoe and was measured in 2008","This female lives at Biscoe and was measured in 2008","This male lives at Biscoe and was measured in 2008","This female lives at Biscoe and was measured in 2008","This male lives at Biscoe and was measured in 2008","This female lives at Biscoe and was measured in 2008","This male lives at Biscoe and was measured in 2008","This female lives at Biscoe and was measured in 2008","This male lives at Biscoe and was measured in 2008","This female lives at Biscoe and was measured in 2008","This male lives at Biscoe and was measured in 2008","This female lives at Biscoe and was measured in 2008","This male lives at Biscoe and was measured in 2008","This female lives at Torgersen and was measured in 2008","This male lives at Torgersen and was measured in 2008","This female lives at Torgersen and was measured in 2008","This male lives at Torgersen and was measured in 2008","This female lives at Torgersen and was measured in 2008","This male lives at Torgersen and was measured in 2008","This female lives at Torgersen and was measured in 2008","This male lives at Torgersen and was measured in 2008","This female lives at Torgersen and was measured in 2008","This male lives at Torgersen and was measured in 2008","This female lives at Torgersen and was measured in 2008","This male lives at Torgersen and was measured in 2008","This female lives at Torgersen and was measured in 2008","This male lives at Torgersen and was measured in 2008","This female lives at Torgersen and was measured in 2008","This male lives at Torgersen and was measured in 2008","This female lives at Dream and was measured in 2008","This male lives at Dream and was measured in 2008","This male lives at Dream and was measured in 2008","This female lives at Dream and was measured in 2008","This male lives at Dream and was measured in 2008","This female lives at Dream and was measured in 2008","This female lives at Dream and was measured in 2008","This male lives at Dream and was measured in 2008","This female lives at Dream and was measured in 2008","This male lives at Dream and was measured in 2008","This female lives at Dream and was measured in 2008","This male lives at Dream and was measured in 2008","This female lives at Dream and was measured in 2008","This male lives at Dream and was measured in 2008","This female lives at Dream and was measured in 2008","This male lives at Dream and was measured in 2008","This female lives at Biscoe and was measured in 2009","This male lives at Biscoe and was measured in 2009","This female lives at Biscoe and was measured in 2009","This male lives at Biscoe and was measured in 2009","This female lives at Biscoe and was measured in 2009","This male lives at Biscoe and was measured in 2009","This female lives at Biscoe and was measured in 2009","This male lives at Biscoe and was measured in 2009","This female lives at Biscoe and was measured in 2009","This male lives at Biscoe and was measured in 2009","This female lives at Biscoe and was measured in 2009","This male lives at Biscoe and was measured in 2009","This female lives at Biscoe and was measured in 2009","This male lives at Biscoe and was measured in 2009","This female lives at Biscoe and was measured in 2009","This male lives at Biscoe and was measured in 2009","This female lives at Torgersen and was measured in 2009","This male lives at Torgersen and was measured in 2009","This female lives at Torgersen and was measured in 2009","This male lives at Torgersen and was measured in 2009","This female lives at Torgersen and was measured in 2009","This male lives at Torgersen and was measured in 2009","This female lives at Torgersen and was measured in 2009","This male lives at Torgersen and was measured in 2009","This female lives at Torgersen and was measured in 2009","This male lives at Torgersen and was measured in 2009","This female lives at Torgersen and was measured in 2009","This male lives at Torgersen and was measured in 2009","This female lives at Torgersen and was measured in 2009","This male lives at Torgersen and was measured in 2009","This female lives at Torgersen and was measured in 2009","This male lives at Torgersen and was measured in 2009","This female lives at Dream and was measured in 2009","This male lives at Dream and was measured in 2009","This female lives at Dream and was measured in 2009","This male lives at Dream and was measured in 2009","This female lives at Dream and was measured in 2009","This male lives at Dream and was measured in 2009","This female lives at Dream and was measured in 2009","This male lives at Dream and was measured in 2009","This female lives at Dream and was measured in 2009","This male lives at Dream and was measured in 2009","This female lives at Dream and was measured in 2009","This male lives at Dream and was measured in 2009","This female lives at Dream and was measured in 2009","This male lives at Dream and was measured in 2009","This male lives at Dream and was measured in 2009","This female lives at Dream and was measured in 2009","This female lives at Dream and was measured in 2009","This male lives at Dream and was measured in 2009","This female lives at Dream and was measured in 2009","This male lives at Dream and was measured in 2009"],"type":"scatter","mode":"markers","marker":{"autocolorscale":false,"color":"rgba(255,140,0,1)","opacity":1,"size":7.55905511811024,"symbol":"circle","line":{"width":1.88976377952756,"color":"rgba(255,140,0,1)"}},"hoveron":"points","name":"Adelie","legendgroup":"Adelie","showlegend":true,"xaxis":"x","yaxis":"y","hoverinfo":"text","frame":null},{"x":[46.5,50,51.3,45.4,52.7,45.2,46.1,51.3,46,51.3,46.6,51.7,47,52,45.9,50.5,50.3,58,46.4,49.2,42.4,48.5,43.2,50.6,46.7,52,50.5,49.5,46.4,52.8,40.9,54.2,42.5,51,49.7,47.5,47.6,52,46.9,53.5,49,46.2,50.9,45.5,50.9,50.8,50.1,49,51.5,49.8,48.1,51.4,45.7,50.7,42.5,52.2,45.2,49.3,50.2,45.6,51.9,46.8,45.7,55.8,43.5,49.6,50.8,50.2],"y":[17.9,19.5,19.2,18.7,19.8,17.8,18.2,18.2,18.9,19.9,17.8,20.3,17.3,18.1,17.1,19.6,20,17.8,18.6,18.2,17.3,17.5,16.6,19.4,17.9,19,18.4,19,17.8,20,16.6,20.8,16.7,18.8,18.6,16.8,18.3,20.7,16.6,19.9,19.5,17.5,19.1,17,17.9,18.5,17.9,19.6,18.7,17.3,16.4,19,17.3,19.7,17.3,18.8,16.6,19.9,18.8,19.4,19.5,16.5,17,19.8,18.1,18.2,19,18.7],"text":["This female lives at Dream and was measured in 2007","This male lives at Dream and was measured in 2007","This male lives at Dream and was measured in 2007","This female lives at Dream and was measured in 2007","This male lives at Dream and was measured in 2007","This female lives at Dream and was measured in 2007","This female lives at Dream and was measured in 2007","This male lives at Dream and was measured in 2007","This female lives at Dream and was measured in 2007","This male lives at Dream and was measured in 2007","This female lives at Dream and was measured in 2007","This male lives at Dream and was measured in 2007","This female lives at Dream and was measured in 2007","This male lives at Dream and was measured in 2007","This female lives at Dream and was measured in 2007","This male lives at Dream and was measured in 2007","This male lives at Dream and was measured in 2007","This female lives at Dream and was measured in 2007","This female lives at Dream and was measured in 2007","This male lives at Dream and was measured in 2007","This female lives at Dream and was measured in 2007","This male lives at Dream and was measured in 2007","This female lives at Dream and was measured in 2007","This male lives at Dream and was measured in 2007","This female lives at Dream and was measured in 2007","This male lives at Dream and was measured in 2007","This female lives at Dream and was measured in 2008","This male lives at Dream and was measured in 2008","This female lives at Dream and was measured in 2008","This male lives at Dream and was measured in 2008","This female lives at Dream and was measured in 2008","This male lives at Dream and was measured in 2008","This female lives at Dream and was measured in 2008","This male lives at Dream and was measured in 2008","This male lives at Dream and was measured in 2008","This female lives at Dream and was measured in 2008","This female lives at Dream and was measured in 2008","This male lives at Dream and was measured in 2008","This female lives at Dream and was measured in 2008","This male lives at Dream and was measured in 2008","This male lives at Dream and was measured in 2008","This female lives at Dream and was measured in 2008","This male lives at Dream and was measured in 2008","This female lives at Dream and was measured in 2008","This female lives at Dream and was measured in 2009","This male lives at Dream and was measured in 2009","This female lives at Dream and was measured in 2009","This male lives at Dream and was measured in 2009","This male lives at Dream and was measured in 2009","This female lives at Dream and was measured in 2009","This female lives at Dream and was measured in 2009","This male lives at Dream and was measured in 2009","This female lives at Dream and was measured in 2009","This male lives at Dream and was measured in 2009","This female lives at Dream and was measured in 2009","This male lives at Dream and was measured in 2009","This female lives at Dream and was measured in 2009","This male lives at Dream and was measured in 2009","This male lives at Dream and was measured in 2009","This female lives at Dream and was measured in 2009","This male lives at Dream and was measured in 2009","This female lives at Dream and was measured in 2009","This female lives at Dream and was measured in 2009","This male lives at Dream and was measured in 2009","This female lives at Dream and was measured in 2009","This male lives at Dream and was measured in 2009","This male lives at Dream and was measured in 2009","This female lives at Dream and was measured in 2009"],"type":"scatter","mode":"markers","marker":{"autocolorscale":false,"color":"rgba(153,50,204,1)","opacity":1,"size":7.55905511811024,"symbol":"triangle-up","line":{"width":1.88976377952756,"color":"rgba(153,50,204,1)"}},"hoveron":"points","name":"Chinstrap","legendgroup":"Chinstrap","showlegend":true,"xaxis":"x","yaxis":"y","hoverinfo":"text","frame":null},{"x":[46.1,50,48.7,50,47.6,46.5,45.4,46.7,43.3,46.8,40.9,49,45.5,48.4,45.8,49.3,42,49.2,46.2,48.7,50.2,45.1,46.5,46.3,42.9,46.1,44.5,47.8,48.2,50,47.3,42.8,45.1,59.6,49.1,48.4,42.6,44.4,44,48.7,42.7,49.6,45.3,49.6,50.5,43.6,45.5,50.5,44.9,45.2,46.6,48.5,45.1,50.1,46.5,45,43.8,45.5,43.2,50.4,45.3,46.2,45.7,54.3,45.8,49.8,46.2,49.5,43.5,50.7,47.7,46.4,48.2,46.5,46.4,48.6,47.5,51.1,45.2,45.2,49.1,52.5,47.4,50,44.9,50.8,43.4,51.3,47.5,52.1,47.5,52.2,45.5,49.5,44.5,50.8,49.4,46.9,48.4,51.1,48.5,55.9,47.2,49.1,47.3,46.8,41.7,53.4,43.3,48.1,50.5,49.8,43.5,51.5,46.2,55.1,44.5,48.8,47.2,null,46.8,50.4,45.2,49.9],"y":[13.2,16.3,14.1,15.2,14.5,13.5,14.6,15.3,13.4,15.4,13.7,16.1,13.7,14.6,14.6,15.7,13.5,15.2,14.5,15.1,14.3,14.5,14.5,15.8,13.1,15.1,14.3,15,14.3,15.3,15.3,14.2,14.5,17,14.8,16.3,13.7,17.3,13.6,15.7,13.7,16,13.7,15,15.9,13.9,13.9,15.9,13.3,15.8,14.2,14.1,14.4,15,14.4,15.4,13.9,15,14.5,15.3,13.8,14.9,13.9,15.7,14.2,16.8,14.4,16.2,14.2,15,15,15.6,15.6,14.8,15,16,14.2,16.3,13.8,16.4,14.5,15.6,14.6,15.9,13.8,17.3,14.4,14.2,14,17,15,17.1,14.5,16.1,14.7,15.7,15.8,14.6,14.4,16.5,15,17,15.5,15,13.8,16.1,14.7,15.8,14,15.1,15.2,15.9,15.2,16.3,14.1,16,15.7,16.2,13.7,null,14.3,15.7,14.8,16.1],"text":["This female lives at Biscoe and was measured in 2007","This male lives at Biscoe and was measured in 2007","This female lives at Biscoe and was measured in 2007","This male lives at Biscoe and was measured in 2007","This male lives at Biscoe and was measured in 2007","This female lives at Biscoe and was measured in 2007","This female lives at Biscoe and was measured in 2007","This male lives at Biscoe and was measured in 2007","This female lives at Biscoe and was measured in 2007","This male lives at Biscoe and was measured in 2007","This female lives at Biscoe and was measured in 2007","This male lives at Biscoe and was measured in 2007","This female lives at Biscoe and was measured in 2007","This male lives at Biscoe and was measured in 2007","This female lives at Biscoe and was measured in 2007","This male lives at Biscoe and was measured in 2007","This female lives at Biscoe and was measured in 2007","This male lives at Biscoe and was measured in 2007","This female lives at Biscoe and was measured in 2007","This male lives at Biscoe and was measured in 2007","This male lives at Biscoe and was measured in 2007","This female lives at Biscoe and was measured in 2007","This female lives at Biscoe and was measured in 2007","This male lives at Biscoe and was measured in 2007","This female lives at Biscoe and was measured in 2007","This male lives at Biscoe and was measured in 2007","This NA lives at Biscoe and was measured in 2007","This male lives at Biscoe and was measured in 2007","This female lives at Biscoe and was measured in 2007","This male lives at Biscoe and was measured in 2007","This male lives at Biscoe and was measured in 2007","This female lives at Biscoe and was measured in 2007","This female lives at Biscoe and was measured in 2007","This male lives at Biscoe and was measured in 2007","This female lives at Biscoe and was measured in 2008","This male lives at Biscoe and was measured in 2008","This female lives at Biscoe and was measured in 2008","This male lives at Biscoe and was measured in 2008","This female lives at Biscoe and was measured in 2008","This male lives at Biscoe and was measured in 2008","This female lives at Biscoe and was measured in 2008","This male lives at Biscoe and was measured in 2008","This female lives at Biscoe and was measured in 2008","This male lives at Biscoe and was measured in 2008","This male lives at Biscoe and was measured in 2008","This female lives at Biscoe and was measured in 2008","This female lives at Biscoe and was measured in 2008","This male lives at Biscoe and was measured in 2008","This female lives at Biscoe and was measured in 2008","This male lives at Biscoe and was measured in 2008","This female lives at Biscoe and was measured in 2008","This male lives at Biscoe and was measured in 2008","This female lives at Biscoe and was measured in 2008","This male lives at Biscoe and was measured in 2008","This female lives at Biscoe and was measured in 2008","This male lives at Biscoe and was measured in 2008","This female lives at Biscoe and was measured in 2008","This male lives at Biscoe and was measured in 2008","This female lives at Biscoe and was measured in 2008","This male lives at Biscoe and was measured in 2008","This female lives at Biscoe and was measured in 2008","This male lives at Biscoe and was measured in 2008","This female lives at Biscoe and was measured in 2008","This male lives at Biscoe and was measured in 2008","This female lives at Biscoe and was measured in 2008","This male lives at Biscoe and was measured in 2008","This NA lives at Biscoe and was measured in 2008","This male lives at Biscoe and was measured in 2008","This female lives at Biscoe and was measured in 2008","This male lives at Biscoe and was measured in 2008","This female lives at Biscoe and was measured in 2008","This male lives at Biscoe and was measured in 2008","This male lives at Biscoe and was measured in 2008","This female lives at Biscoe and was measured in 2008","This female lives at Biscoe and was measured in 2008","This male lives at Biscoe and was measured in 2008","This female lives at Biscoe and was measured in 2008","This male lives at Biscoe and was measured in 2008","This female lives at Biscoe and was measured in 2008","This male lives at Biscoe and was measured in 2008","This female lives at Biscoe and was measured in 2009","This male lives at Biscoe and was measured in 2009","This female lives at Biscoe and was measured in 2009","This male lives at Biscoe and was measured in 2009","This female lives at Biscoe and was measured in 2009","This male lives at Biscoe and was measured in 2009","This female lives at Biscoe and was measured in 2009","This male lives at Biscoe and was measured in 2009","This female lives at Biscoe and was measured in 2009","This male lives at Biscoe and was measured in 2009","This female lives at Biscoe and was measured in 2009","This male lives at Biscoe and was measured in 2009","This female lives at Biscoe and was measured in 2009","This male lives at Biscoe and was measured in 2009","This female lives at Biscoe and was measured in 2009","This male lives at Biscoe and was measured in 2009","This male lives at Biscoe and was measured in 2009","This female lives at Biscoe and was measured in 2009","This female lives at Biscoe and was measured in 2009","This male lives at Biscoe and was measured in 2009","This female lives at Biscoe and was measured in 2009","This male lives at Biscoe and was measured in 2009","This female lives at Biscoe and was measured in 2009","This male lives at Biscoe and was measured in 2009","This NA lives at Biscoe and was measured in 2009","This male lives at Biscoe and was measured in 2009","This female lives at Biscoe and was measured in 2009","This male lives at Biscoe and was measured in 2009","This female lives at Biscoe and was measured in 2009","This male lives at Biscoe and was measured in 2009","This female lives at Biscoe and was measured in 2009","This male lives at Biscoe and was measured in 2009","This female lives at Biscoe and was measured in 2009","This male lives at Biscoe and was measured in 2009","This female lives at Biscoe and was measured in 2009","This male lives at Biscoe and was measured in 2009","This NA lives at Biscoe and was measured in 2009","This male lives at Biscoe and was measured in 2009","This female lives at Biscoe and was measured in 2009","This NA lives at Biscoe and was measured in 2009","This female lives at Biscoe and was measured in 2009","This male lives at Biscoe and was measured in 2009","This female lives at Biscoe and was measured in 2009","This male lives at Biscoe and was measured in 2009"],"type":"scatter","mode":"markers","marker":{"autocolorscale":false,"color":"rgba(0,139,139,1)","opacity":1,"size":7.55905511811024,"symbol":"square","line":{"width":1.88976377952756,"color":"rgba(0,139,139,1)"}},"hoveron":"points","name":"Gentoo","legendgroup":"Gentoo","showlegend":true,"xaxis":"x","yaxis":"y","hoverinfo":"text","frame":null}],"layout":{"margin":{"t":40.8401826484018,"r":7.30593607305936,"b":37.2602739726027,"l":48.9497716894977},"font":{"color":"rgba(0,0,0,1)","family":"","size":14.6118721461187},"title":{"text":"<b> Penguin species differentation <\/b>","font":{"color":"rgba(0,0,0,1)","family":"","size":17.5342465753425},"x":0,"xref":"paper"},"xaxis":{"domain":[0,1],"automargin":true,"type":"linear","autorange":false,"range":[30.725,60.975],"tickmode":"array","ticktext":["40","50","60"],"tickvals":[40,50,60],"categoryorder":"array","categoryarray":["40","50","60"],"nticks":null,"ticks":"","tickcolor":null,"ticklen":3.65296803652968,"tickwidth":0,"showticklabels":true,"tickfont":{"color":"rgba(77,77,77,1)","family":"","size":11.689497716895},"tickangle":-0,"showline":false,"linecolor":null,"linewidth":0,"showgrid":true,"gridcolor":"rgba(235,235,235,1)","gridwidth":0.66417600664176,"zeroline":false,"anchor":"y","title":{"text":"bill length (mm)","font":{"color":"rgba(0,0,0,1)","family":"","size":14.6118721461187}},"hoverformat":".2f"},"yaxis":{"domain":[0,1],"automargin":true,"type":"linear","autorange":false,"range":[12.68,21.92],"tickmode":"array","ticktext":["15.0","17.5","20.0"],"tickvals":[15,17.5,20],"categoryorder":"array","categoryarray":["15.0","17.5","20.0"],"nticks":null,"ticks":"","tickcolor":null,"ticklen":3.65296803652968,"tickwidth":0,"showticklabels":true,"tickfont":{"color":"rgba(77,77,77,1)","family":"","size":11.689497716895},"tickangle":-0,"showline":false,"linecolor":null,"linewidth":0,"showgrid":true,"gridcolor":"rgba(235,235,235,1)","gridwidth":0.66417600664176,"zeroline":false,"anchor":"x","title":{"text":"bill depth (mm)","font":{"color":"rgba(0,0,0,1)","family":"","size":14.6118721461187}},"hoverformat":".2f"},"shapes":[{"type":"rect","fillcolor":null,"line":{"color":null,"width":0,"linetype":[]},"yref":"paper","xref":"paper","x0":0,"x1":1,"y0":0,"y1":1}],"showlegend":true,"legend":{"bgcolor":null,"bordercolor":null,"borderwidth":0,"font":{"color":"rgba(0,0,0,1)","family":"","size":11.689497716895},"y":0.938132733408324},"annotations":[{"text":"species","x":1.02,"y":1,"showarrow":false,"ax":0,"ay":0,"font":{"color":"rgba(0,0,0,1)","family":"","size":14.6118721461187},"xref":"paper","yref":"paper","textangle":-0,"xanchor":"left","yanchor":"bottom","legendTitle":true}],"hovermode":"closest","barmode":"relative"},"config":{"doubleClick":"reset","showSendToCloud":false},"source":"A","attrs":{"7d28eac091":{"colour":{},"shape":{},"x":{},"y":{},"text":{},"type":"scatter"}},"cur_data":"7d28eac091","visdat":{"7d28eac091":["function (y) ","x"]},"highlight":{"on":"plotly_click","persistent":false,"dynamic":false,"selectize":false,"opacityDim":0.2,"selected":{"opacity":1},"debounce":0},"shinyEvents":["plotly_hover","plotly_click","plotly_selected","plotly_relayout","plotly_brushed","plotly_brushing","plotly_clickannotation","plotly_doubleclick","plotly_deselect","plotly_afterplot","plotly_sunburstclick"],"base_url":"https://plot.ly"},"evals":[],"jsHooks":[]}</script> ] <style> .panel1-ggplotly_test-user { color: black; width: 38.6060606060606%; hight: 32%; float: left; padding-left: 1%; font-size: 50% } .panel2-ggplotly_test-user { color: black; width: 59.3939393939394%; hight: 32%; float: left; padding-left: 1%; font-size: 50% } .panel3-ggplotly_test-user { color: black; width: NA%; hight: 33%; float: left; padding-left: 1%; font-size: 50% } </style> --- class: inverse, left, middle # Interaktywne grafy ## zaawansowane ??? Chcecie jeszcze więcej? Proszę bardzo! --- <div style="float: right; position: fixed; right: 10px; top: 10px;"> <img style="float: right; position: relative;" src="highcharter_logo.png" alt="highcharter"/><br> </div> ## highcharter https://jkunst.com/highcharter/ - implementacja R biblioteki javascript [`highcharts`](https://www.highcharts.com/demo) - trochę jak ggplot: - dodajemy warstwy danych funkcją `hc_add_series` - dodajemy warstwy wizualne funkcją `hcaes` - szybkie rysowanie przez funkcję `hchart` - dodajemy elementy przez odpowiednie funkcje `hc_`, np. `hc_title` dodaje tytuł, `hc_colorAxis` definiuje paletę kolorów i dodaje legendę -- - mnóstwo przykładów: https://jkunst.com/highcharter/articles/showcase.html - bardziej zaawansowany przykład: https://jrom.bitbucket.io/showcase/ - kod: https://bitbucket.org/jrom/jrom.bitbucket.io/src/master/showcase/index.Rmd --- ## Interaktywny Rmarkdown - [flexdashboard](https://rmarkdown.rstudio.com/flexdashboard/index.html) - Rmarkdown z ekstra opcjami - dzięki `htmlwidgets` można łatwo umieszczać interaktywne komponenty - dzięki `crosstalk` można łączyć komponenty - [htmlwidgets](https://www.htmlwidgets.org/) - wybierz spośród gotowych funkcji R - kompilacja do JS i HTML - [crosstalk](https://rstudio.github.io/crosstalk/) - dodaj zależności pomiędzy komponentami --- ```yaml --- title: "Interactive results" output: flexdashboard::flex_dashboard: orientation: columns vertical_layout: scroll theme: paper --- Column {.tabset} ----------------------------------------------------------------------- ``{r} # twój kod z np. ggplotly `` ``` [Kliknij tu, żeby zobaczyć przykład](flexdashboard_penguins.html)